This is an inside review of the popular Russian stereo microscope MBS-10 or МБС-10 respectively. The affordable and rugged CMO-type design was derived from the Carl-Zeiss-Jena stereo microscopes during the GDR/USSR technology transfer of the 1960s (e.g. it is similar to the "CZJ Technival 2"). One important info right at the beginning: This microscope is a product by the "Lytkarino Optical Glass Plant" also known as "LZOS" - it is not a product by LOMO!
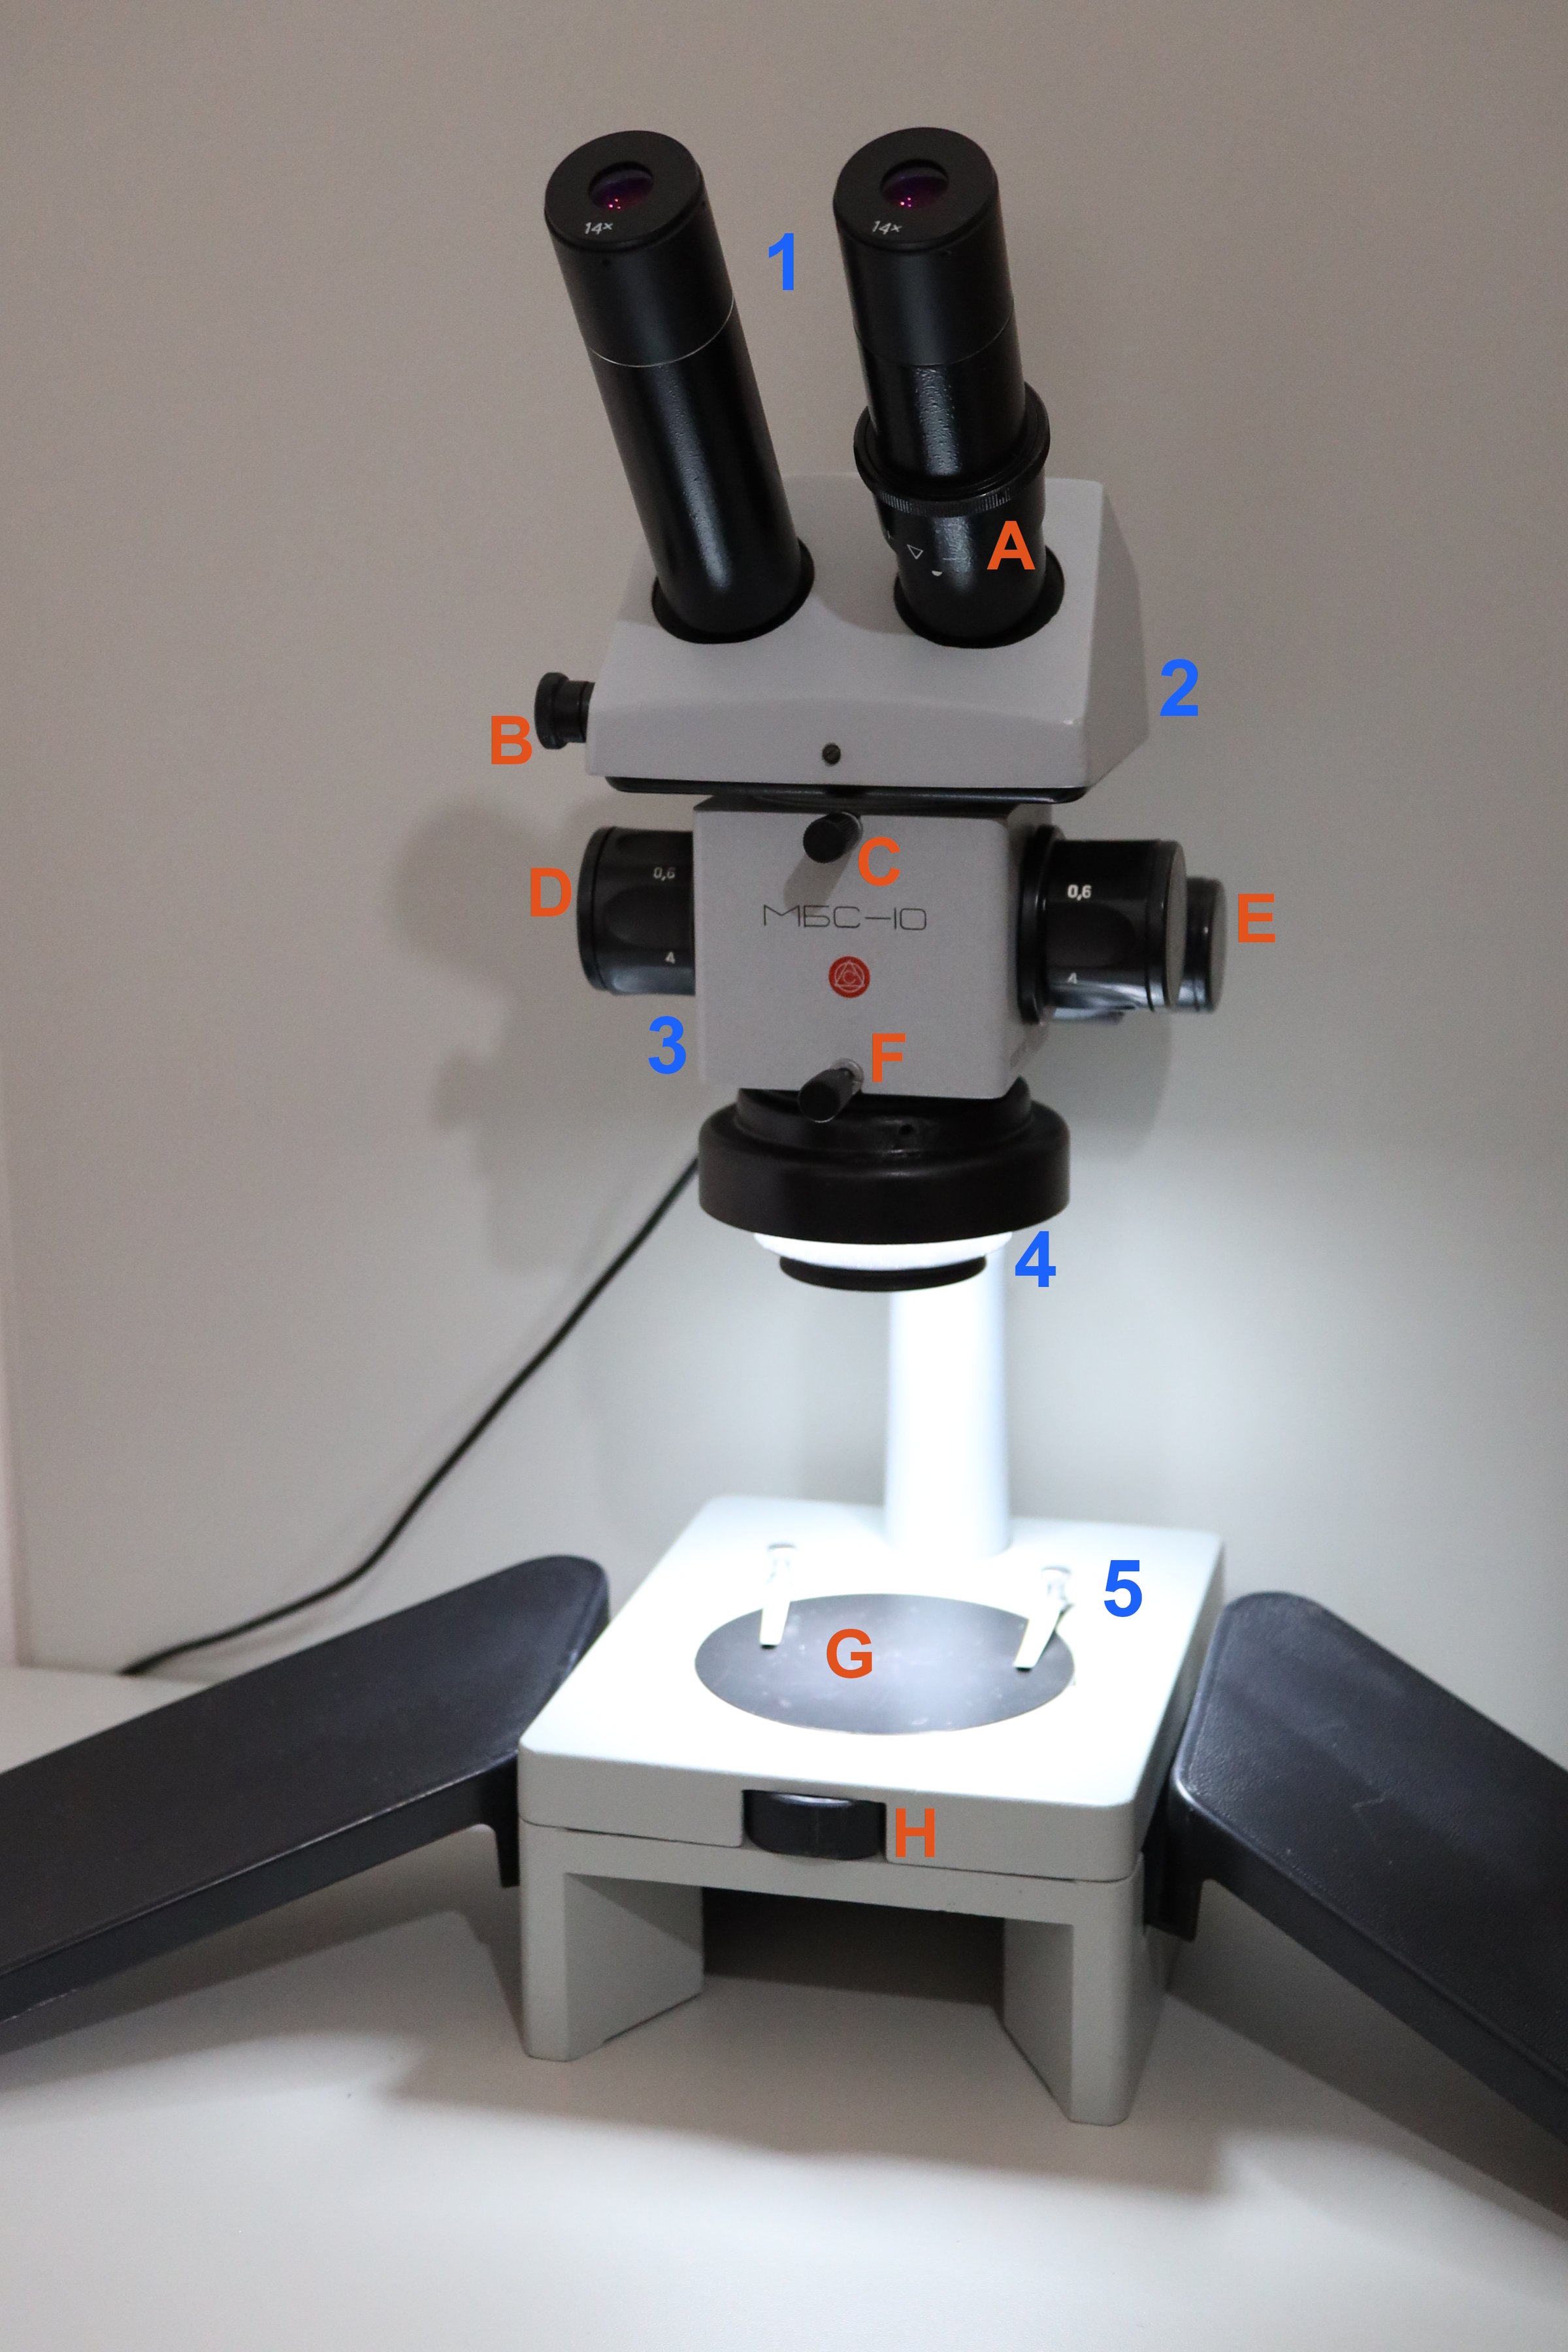
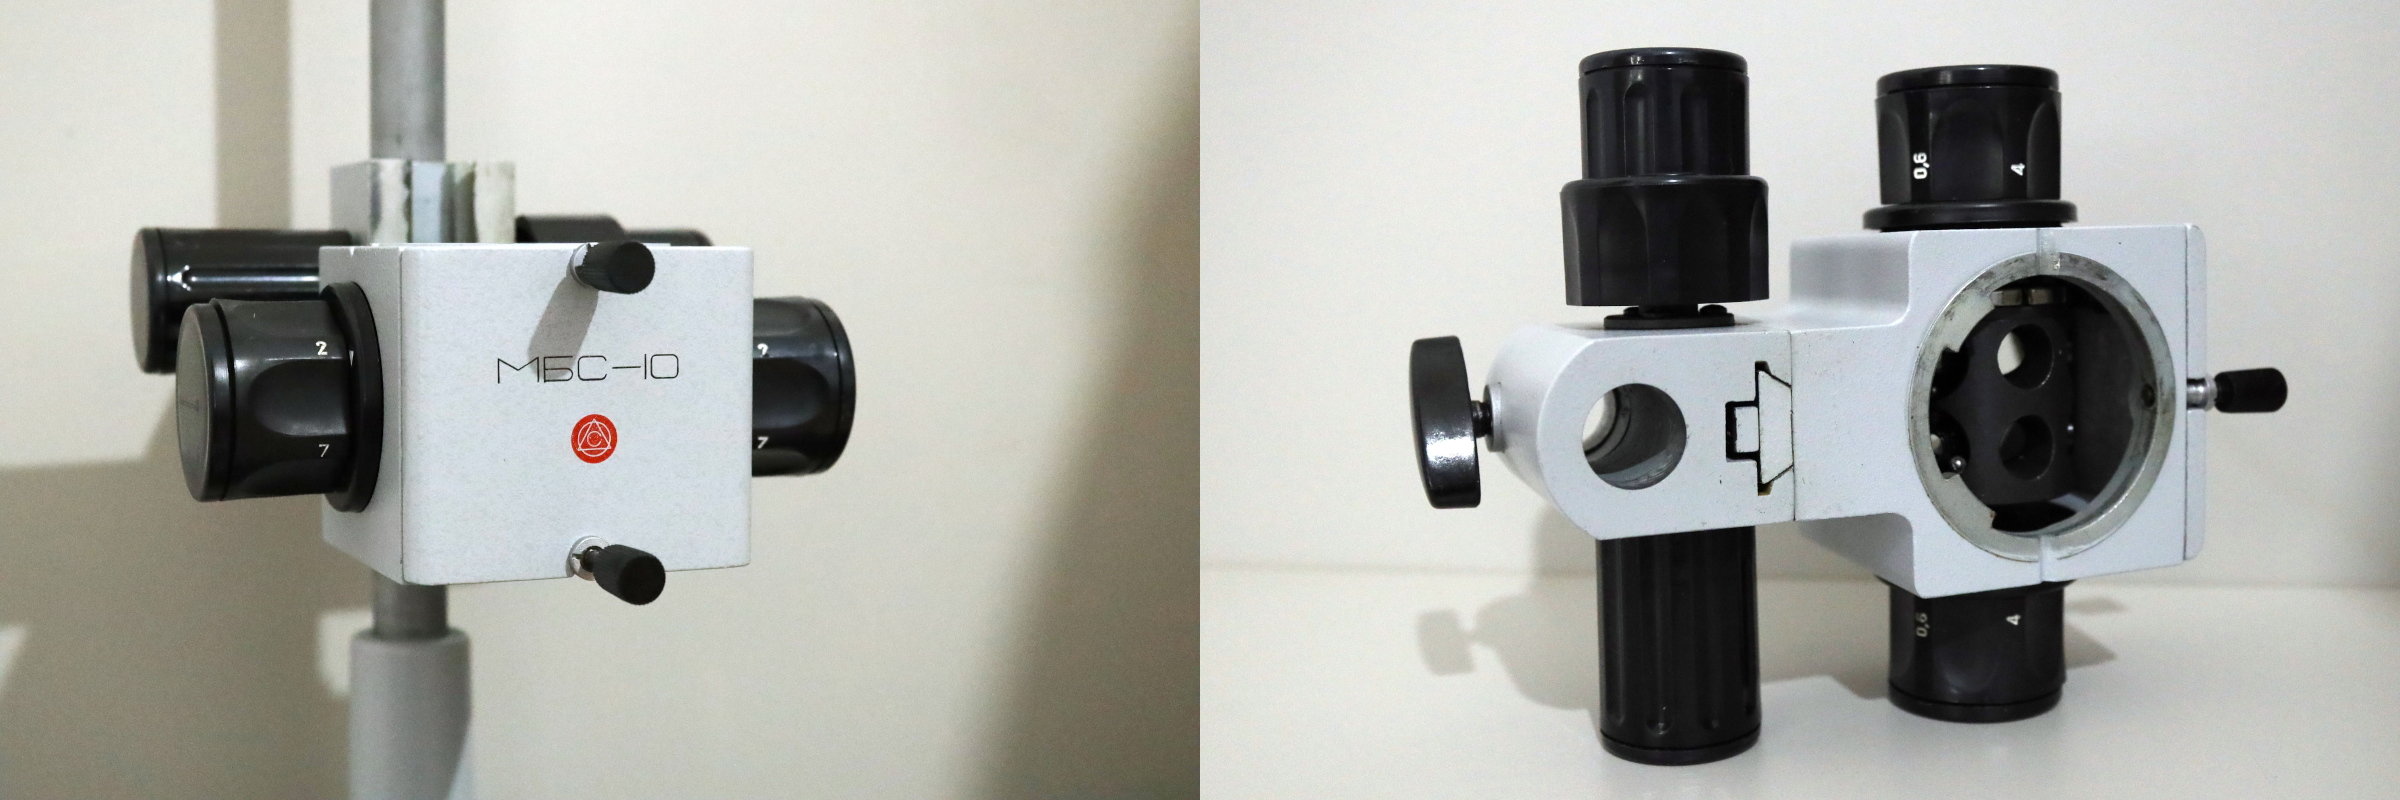
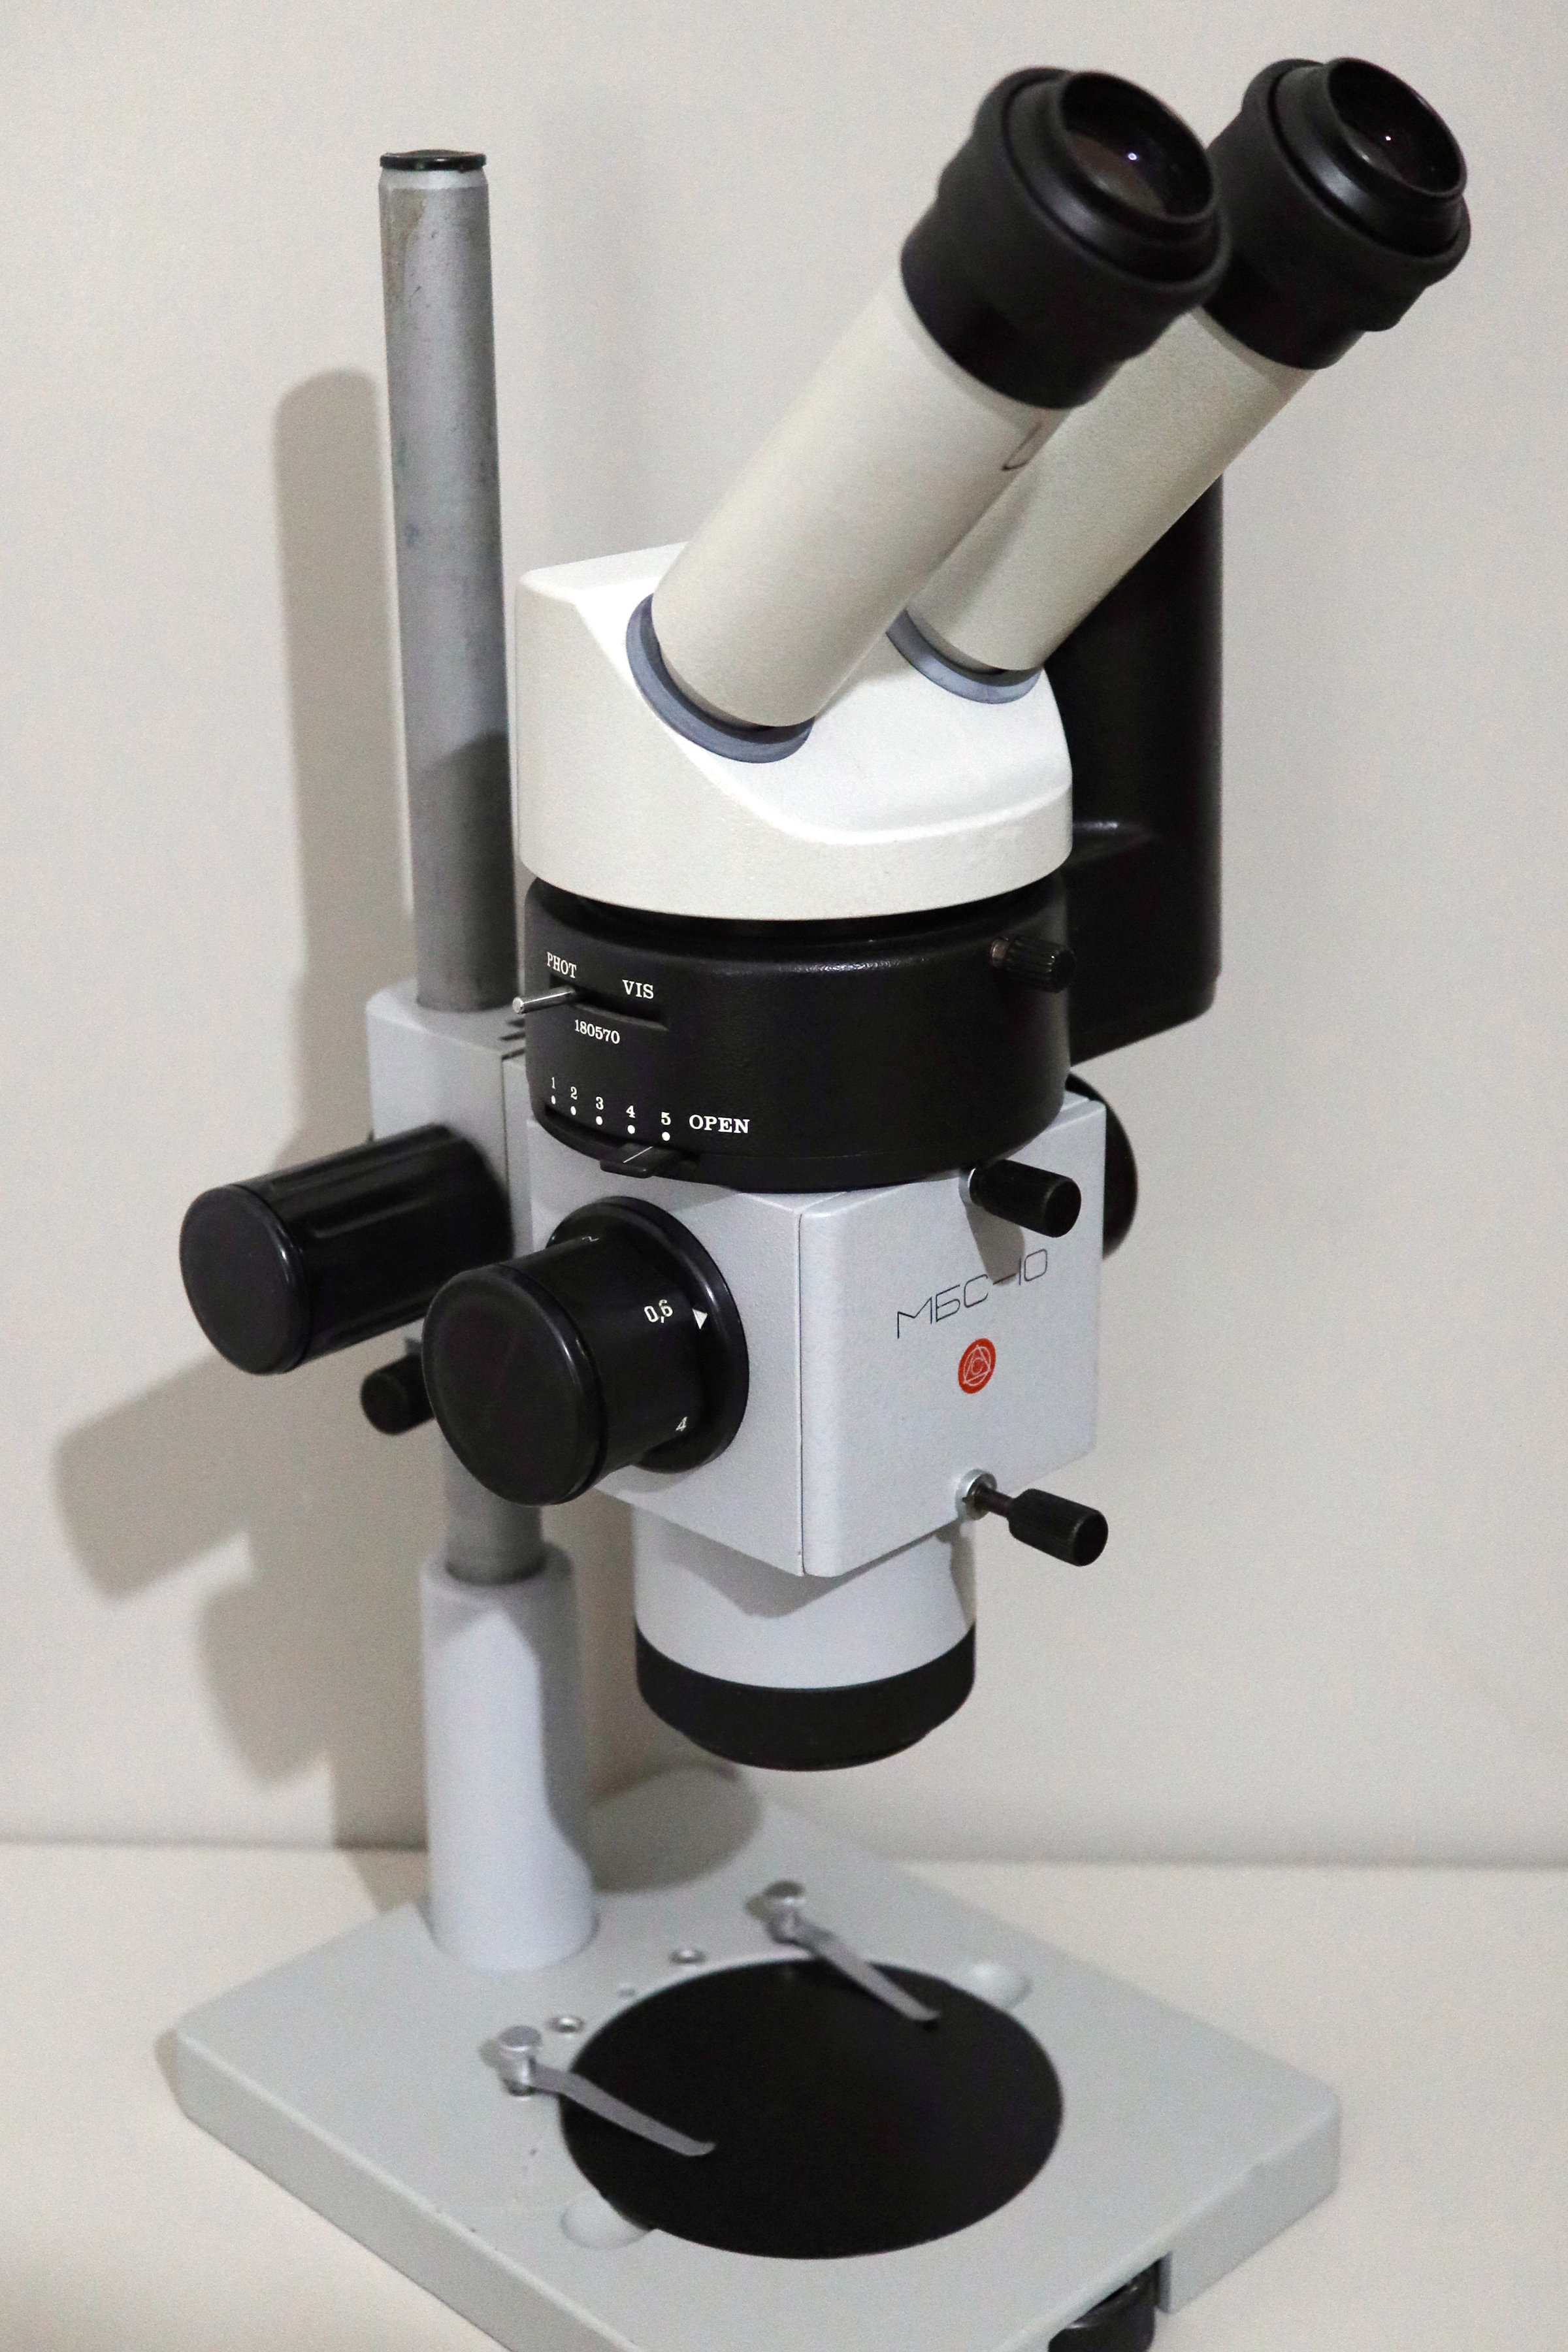
The microscope consists of the binocular head module (2, removable by locking screw "C") with long protruding eyepiece tubes (1), the body (3) with the magnification switcher (knob "D", current magnification is facing towards the operator, here 0.6x * 14x eyepiece mag. = 8.4x in total) and focus drive (knob "E", including a tension adjustment option), the objective (4) with the incident light illuminator (released by locking screw "F", hold objective lens to prevent falling damages!) and the microscope stand with a 20mm diameter column and a base, which features an integrated mirror device for transmitted illumination and the armrests (5).
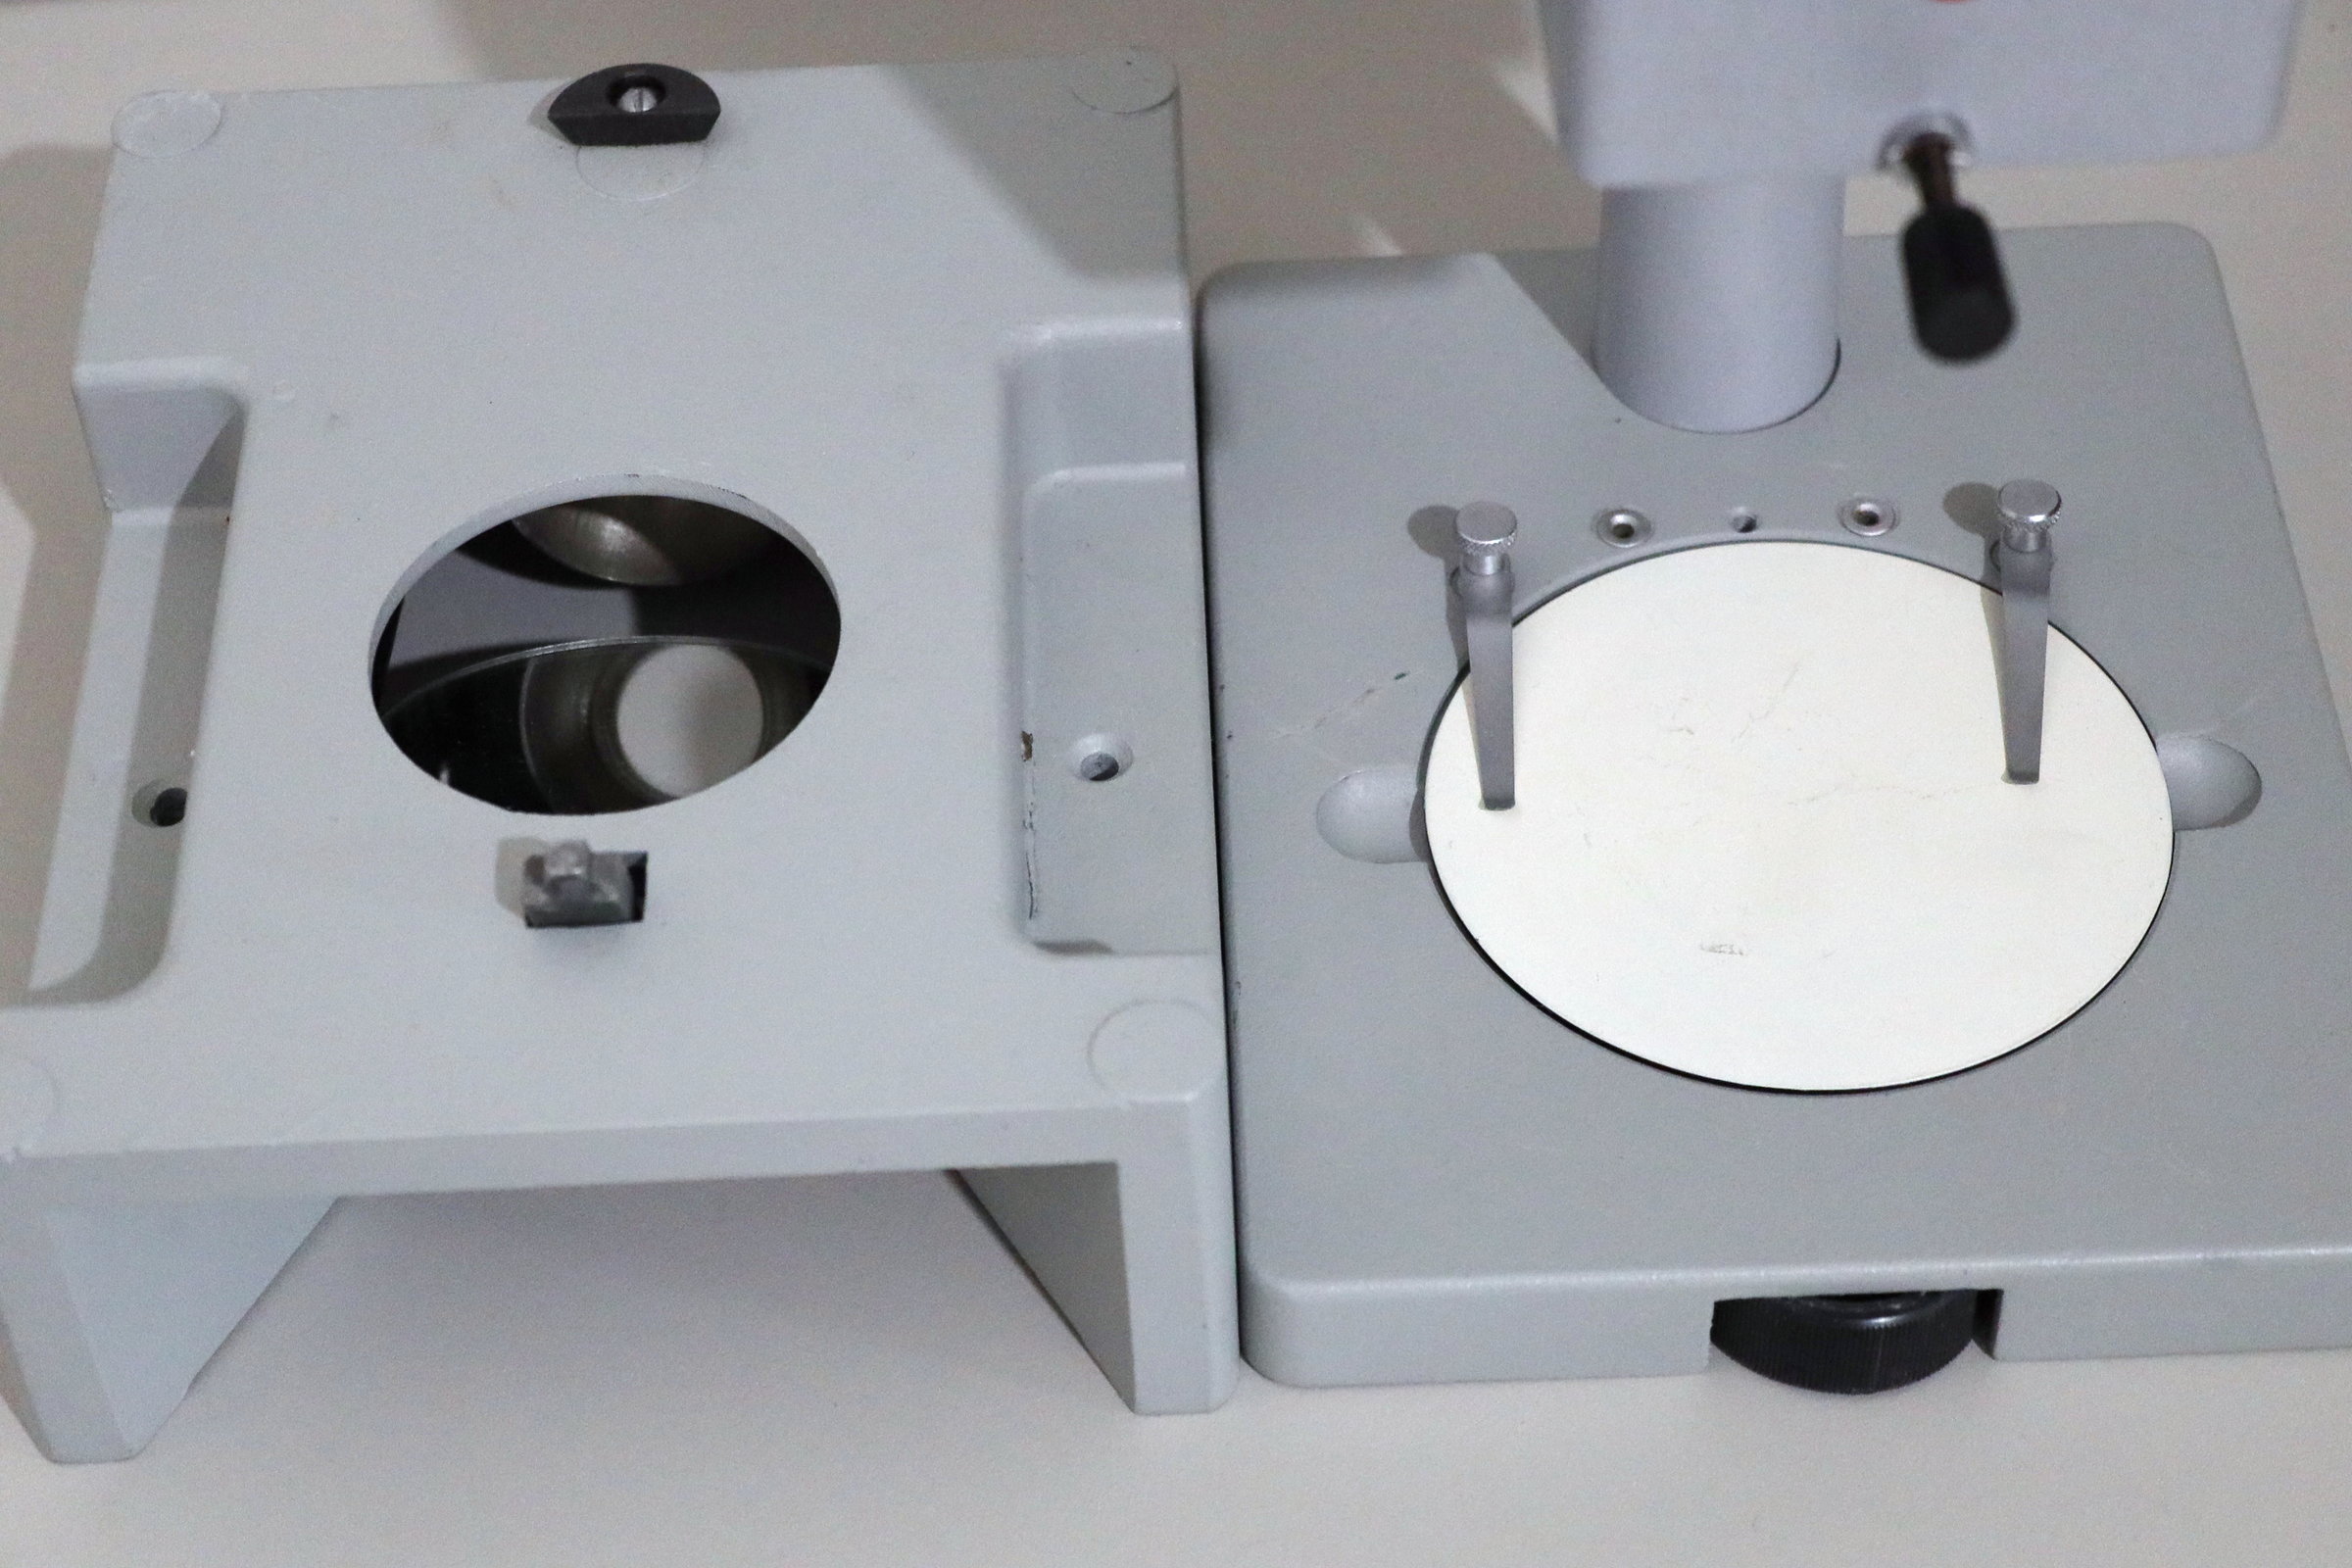
The right eyepiece tube offers diopter adjustment at "A". The pupillary distance is adjustable with a knob "B". The 100mm-diameter base plate at "G" can be rotated between black and white or swapped with a translucent glass plate. The lower part of the base including the (removable) armrests can be decoupled by a knob "H" which saves about 60mm of the roughly 0.5m overall height (picture here). Nearly all the metal parts are made of aluminium.
Binocular head
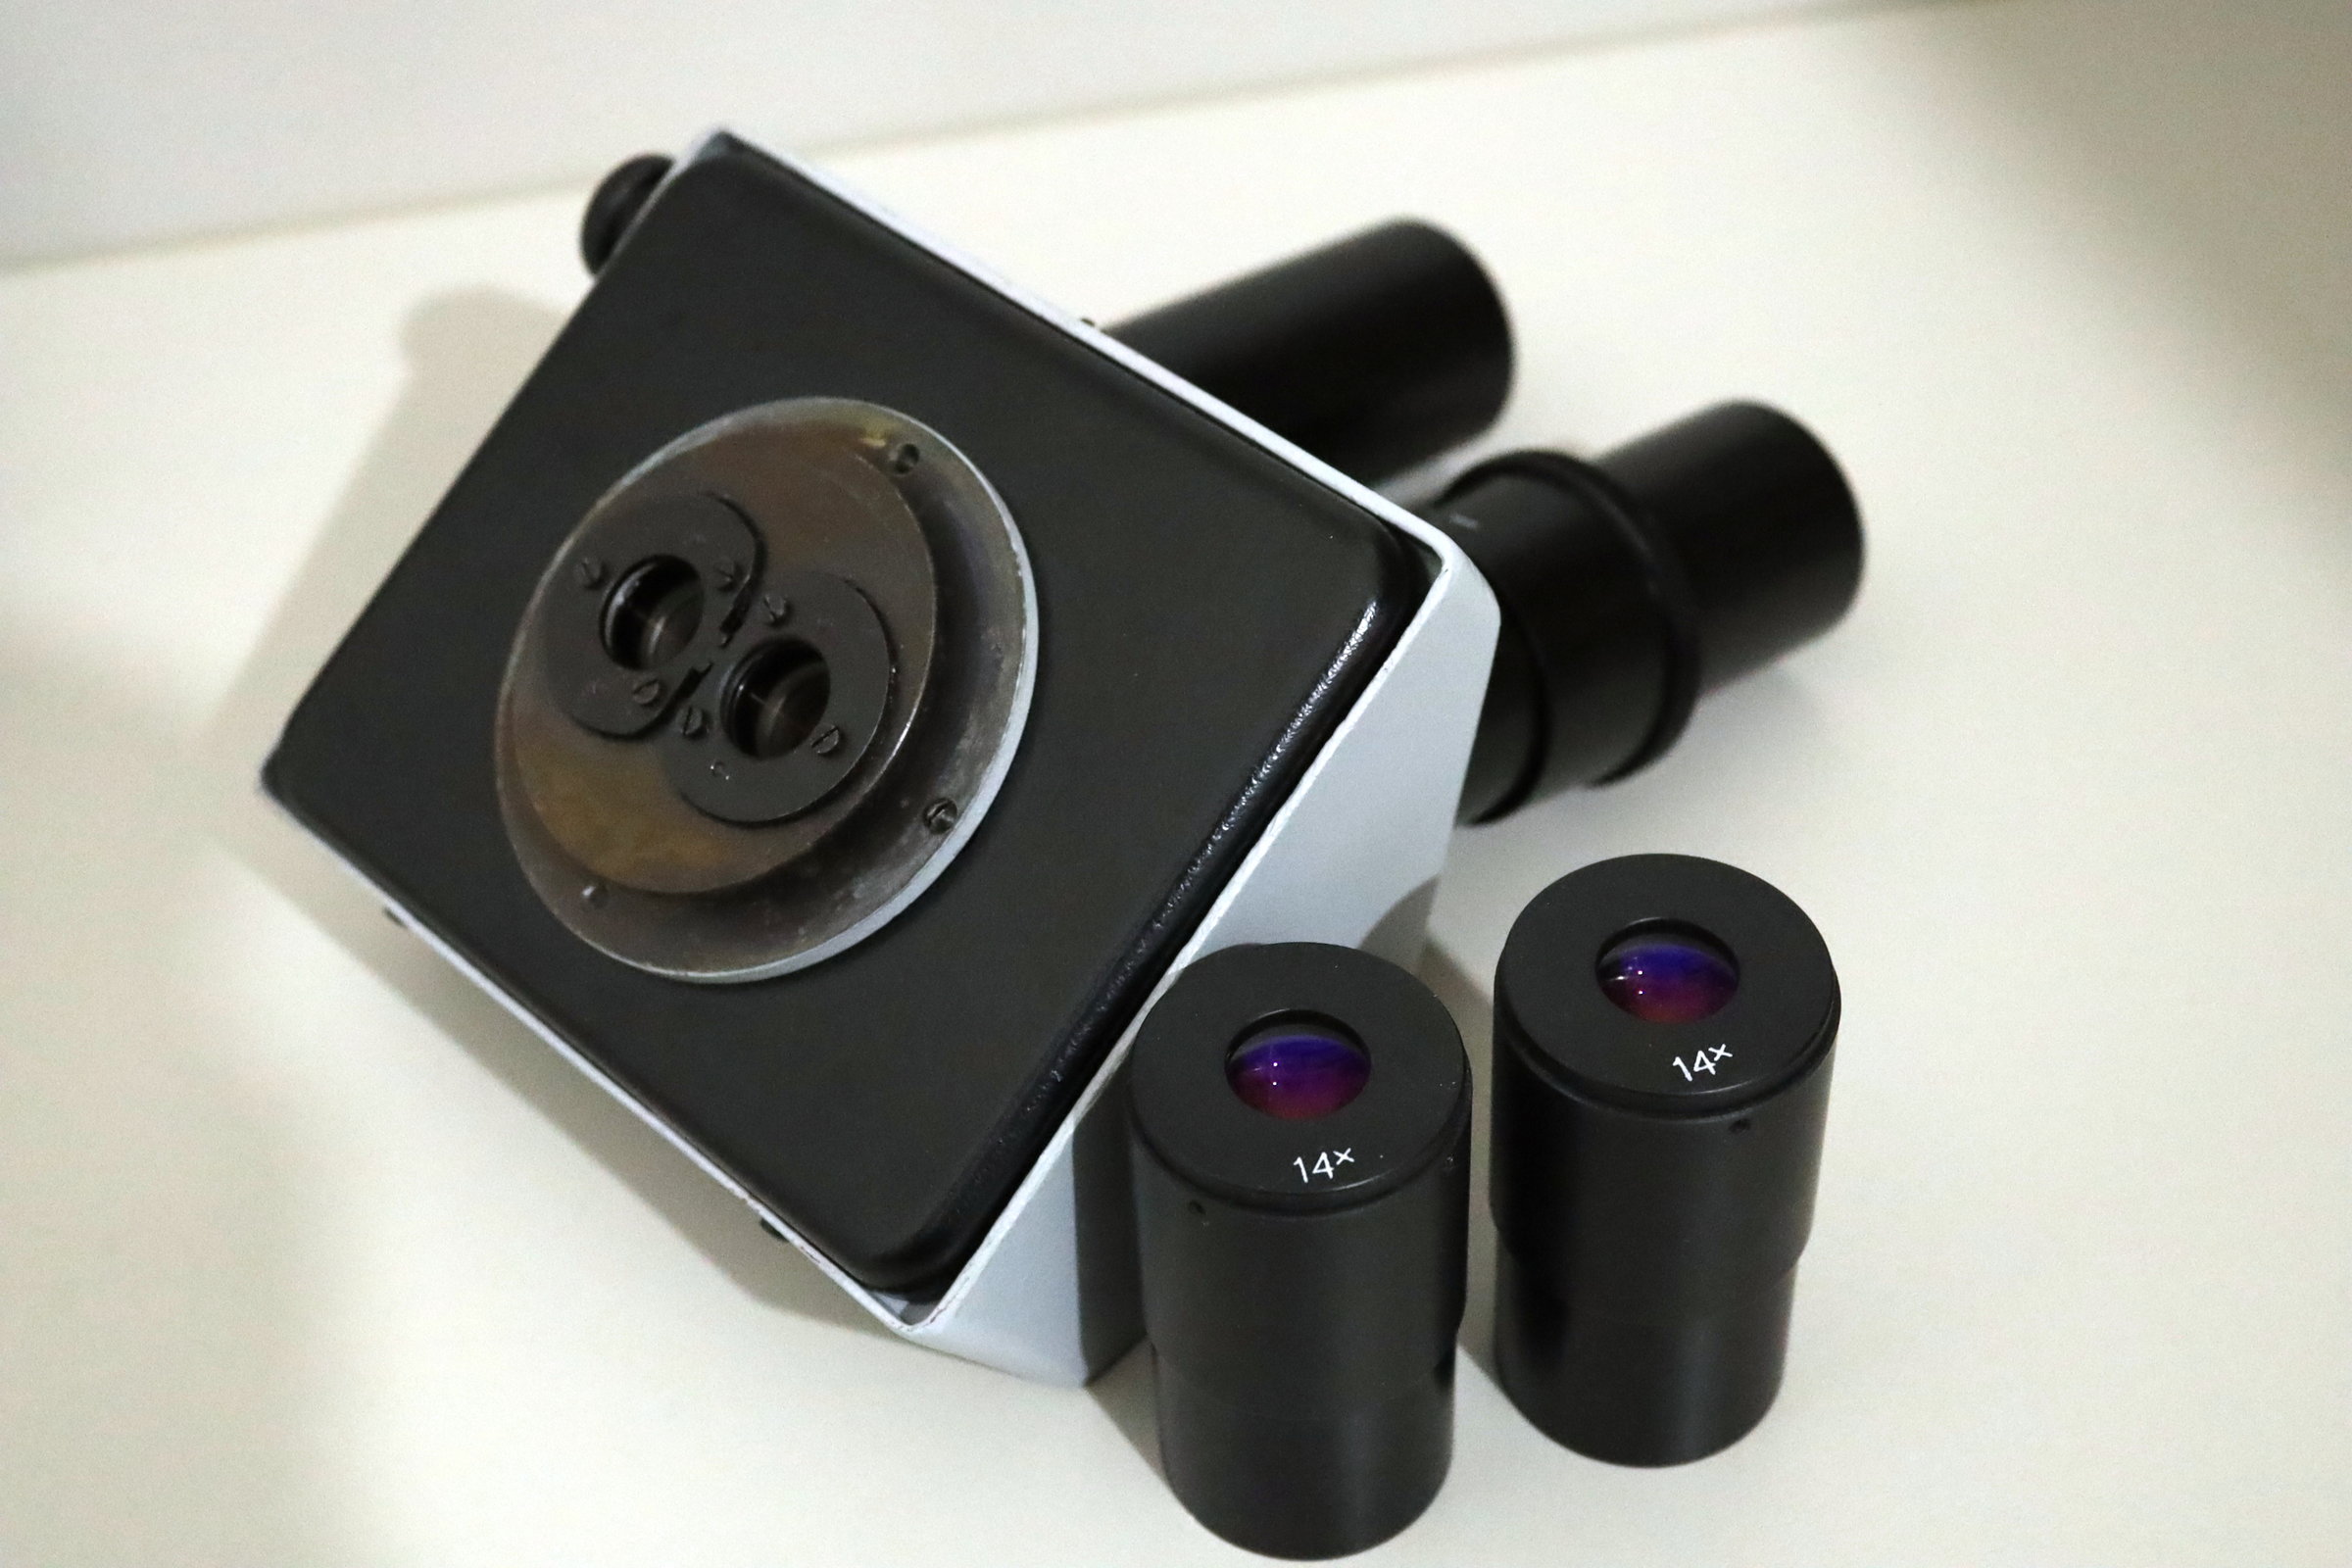
Above, the removed eyepieces with the separated binocular tube. It features a +/- ergonomic 45° inclination angle and 180mm focal length.
Attention: The lower eyepiece diameter is 32mm instead of the usual 30mm of Zeiss, Nikon and most other manufacturers!

"Under the hood" (held in place by three screws and the eyepiece tubes) we find two rubber sealings (bad quality, often with plasticizer issues) and the usual prism construction. The small bone-like part on the front right side is the coupler for the eye-distance adjustment.
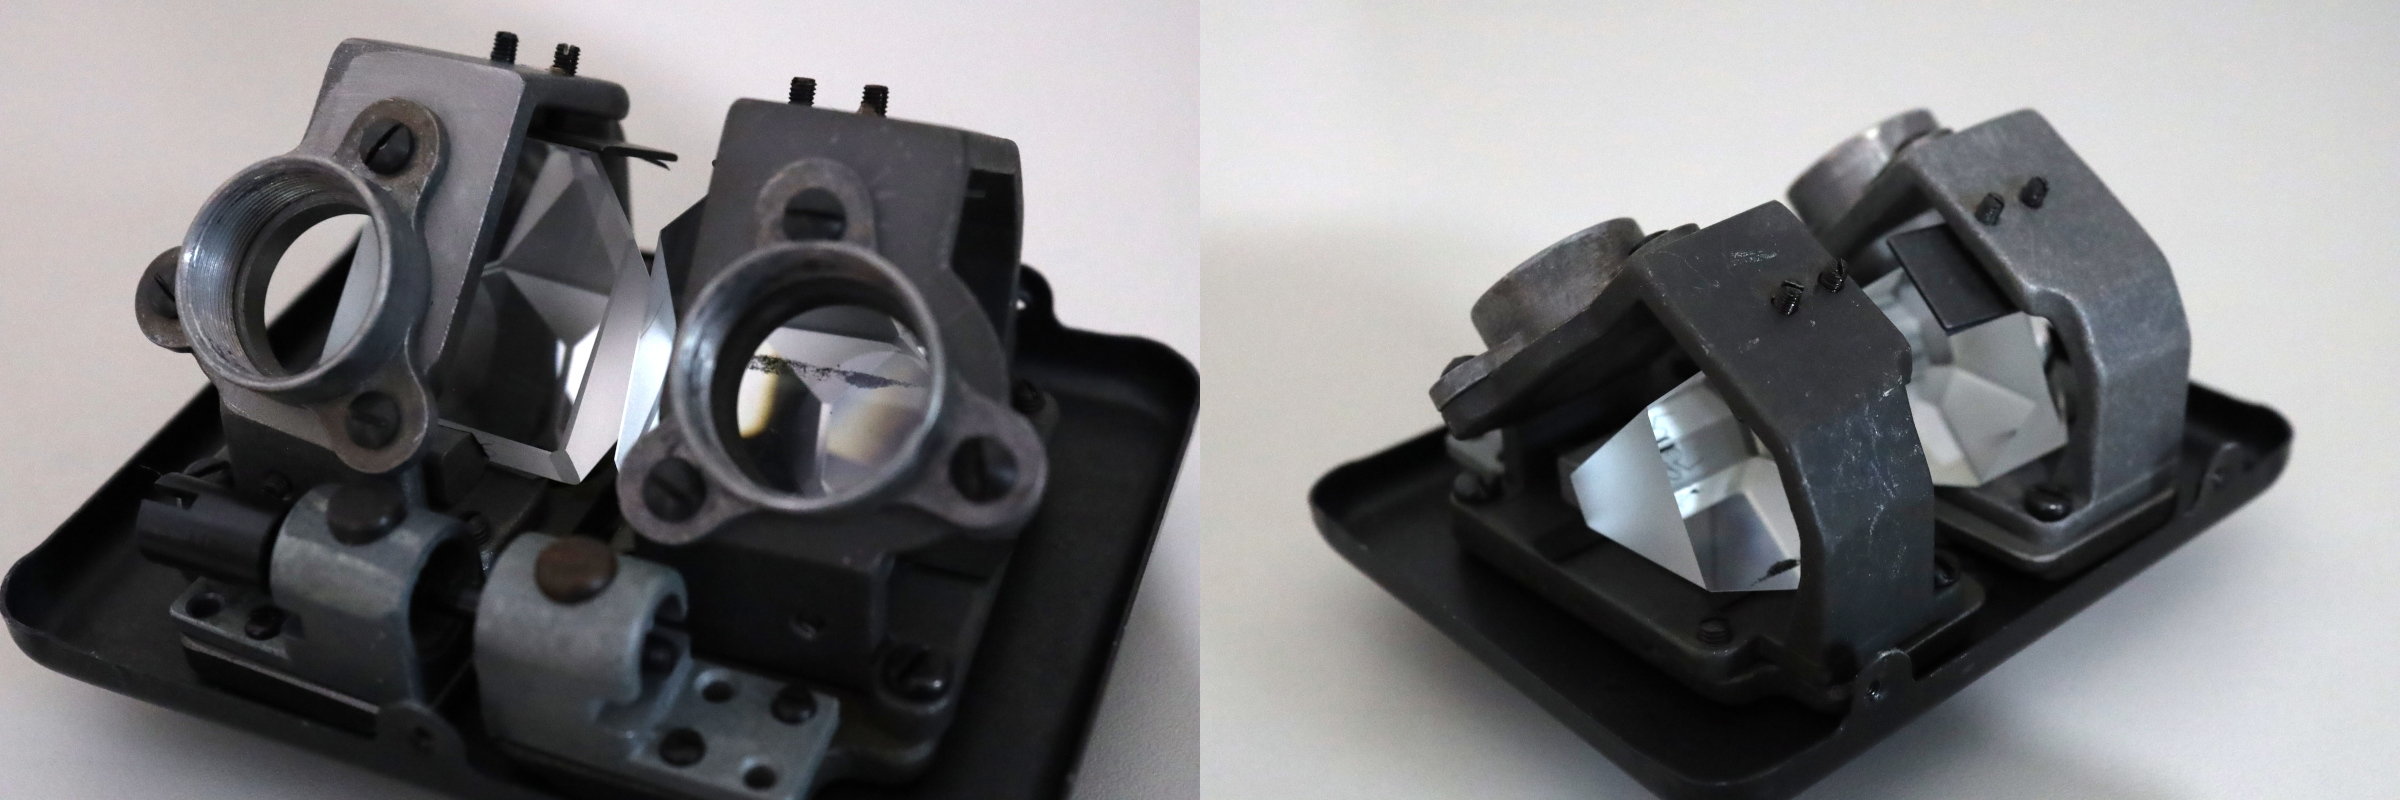
Over the years, I have tested probably a handful of MBS-10 microscopes and basically all of them suffered from +/- misaligned prisms in the binotubes. This can be seen as double vision in a worst-case-scenario or it can cause eyestrain, headaches and dizziness over time (as your brain and eyes try to compensate for the shifted optics). The only way to cope with this, is to loosen the prisms with the screw pairs on their holders and shift the prisms until the image "feels" right for you. The repair process has been described nicely by Martin Mach (in my opinion, the procedure to get the orientation and 3d-effect right, is easier with two measurement eyepieces and some dense grid pattern or scaled paper under the objective - but it will be a pita nevertheless...and totally worth it, too).
Microscope body
The magnification switcher (with a red LZOS brand logo...) is basically a cube with 70mm edge length fused to a focus drive. It uses an ingenious rotatable drum design with three optical axes shifted by 60° angles. One of the three allows the light to pass trough directly, the other two axes feature each a lens pair that form simple Galilean systems (i.e. they shrink or enlarge, depending on the direction you look through them). This way we get five different magnifications: Two powers per lens pair, depending upon their orientation in the beam path between the binotube and objective, plus the "2x"-labelled but visually identical magnification positions (those with the free beam path and no intermediate lenses, why it is 2x mag. here, will become clearer in the next section...). Might be hard to imagine, so an animation might serve for better illustration:
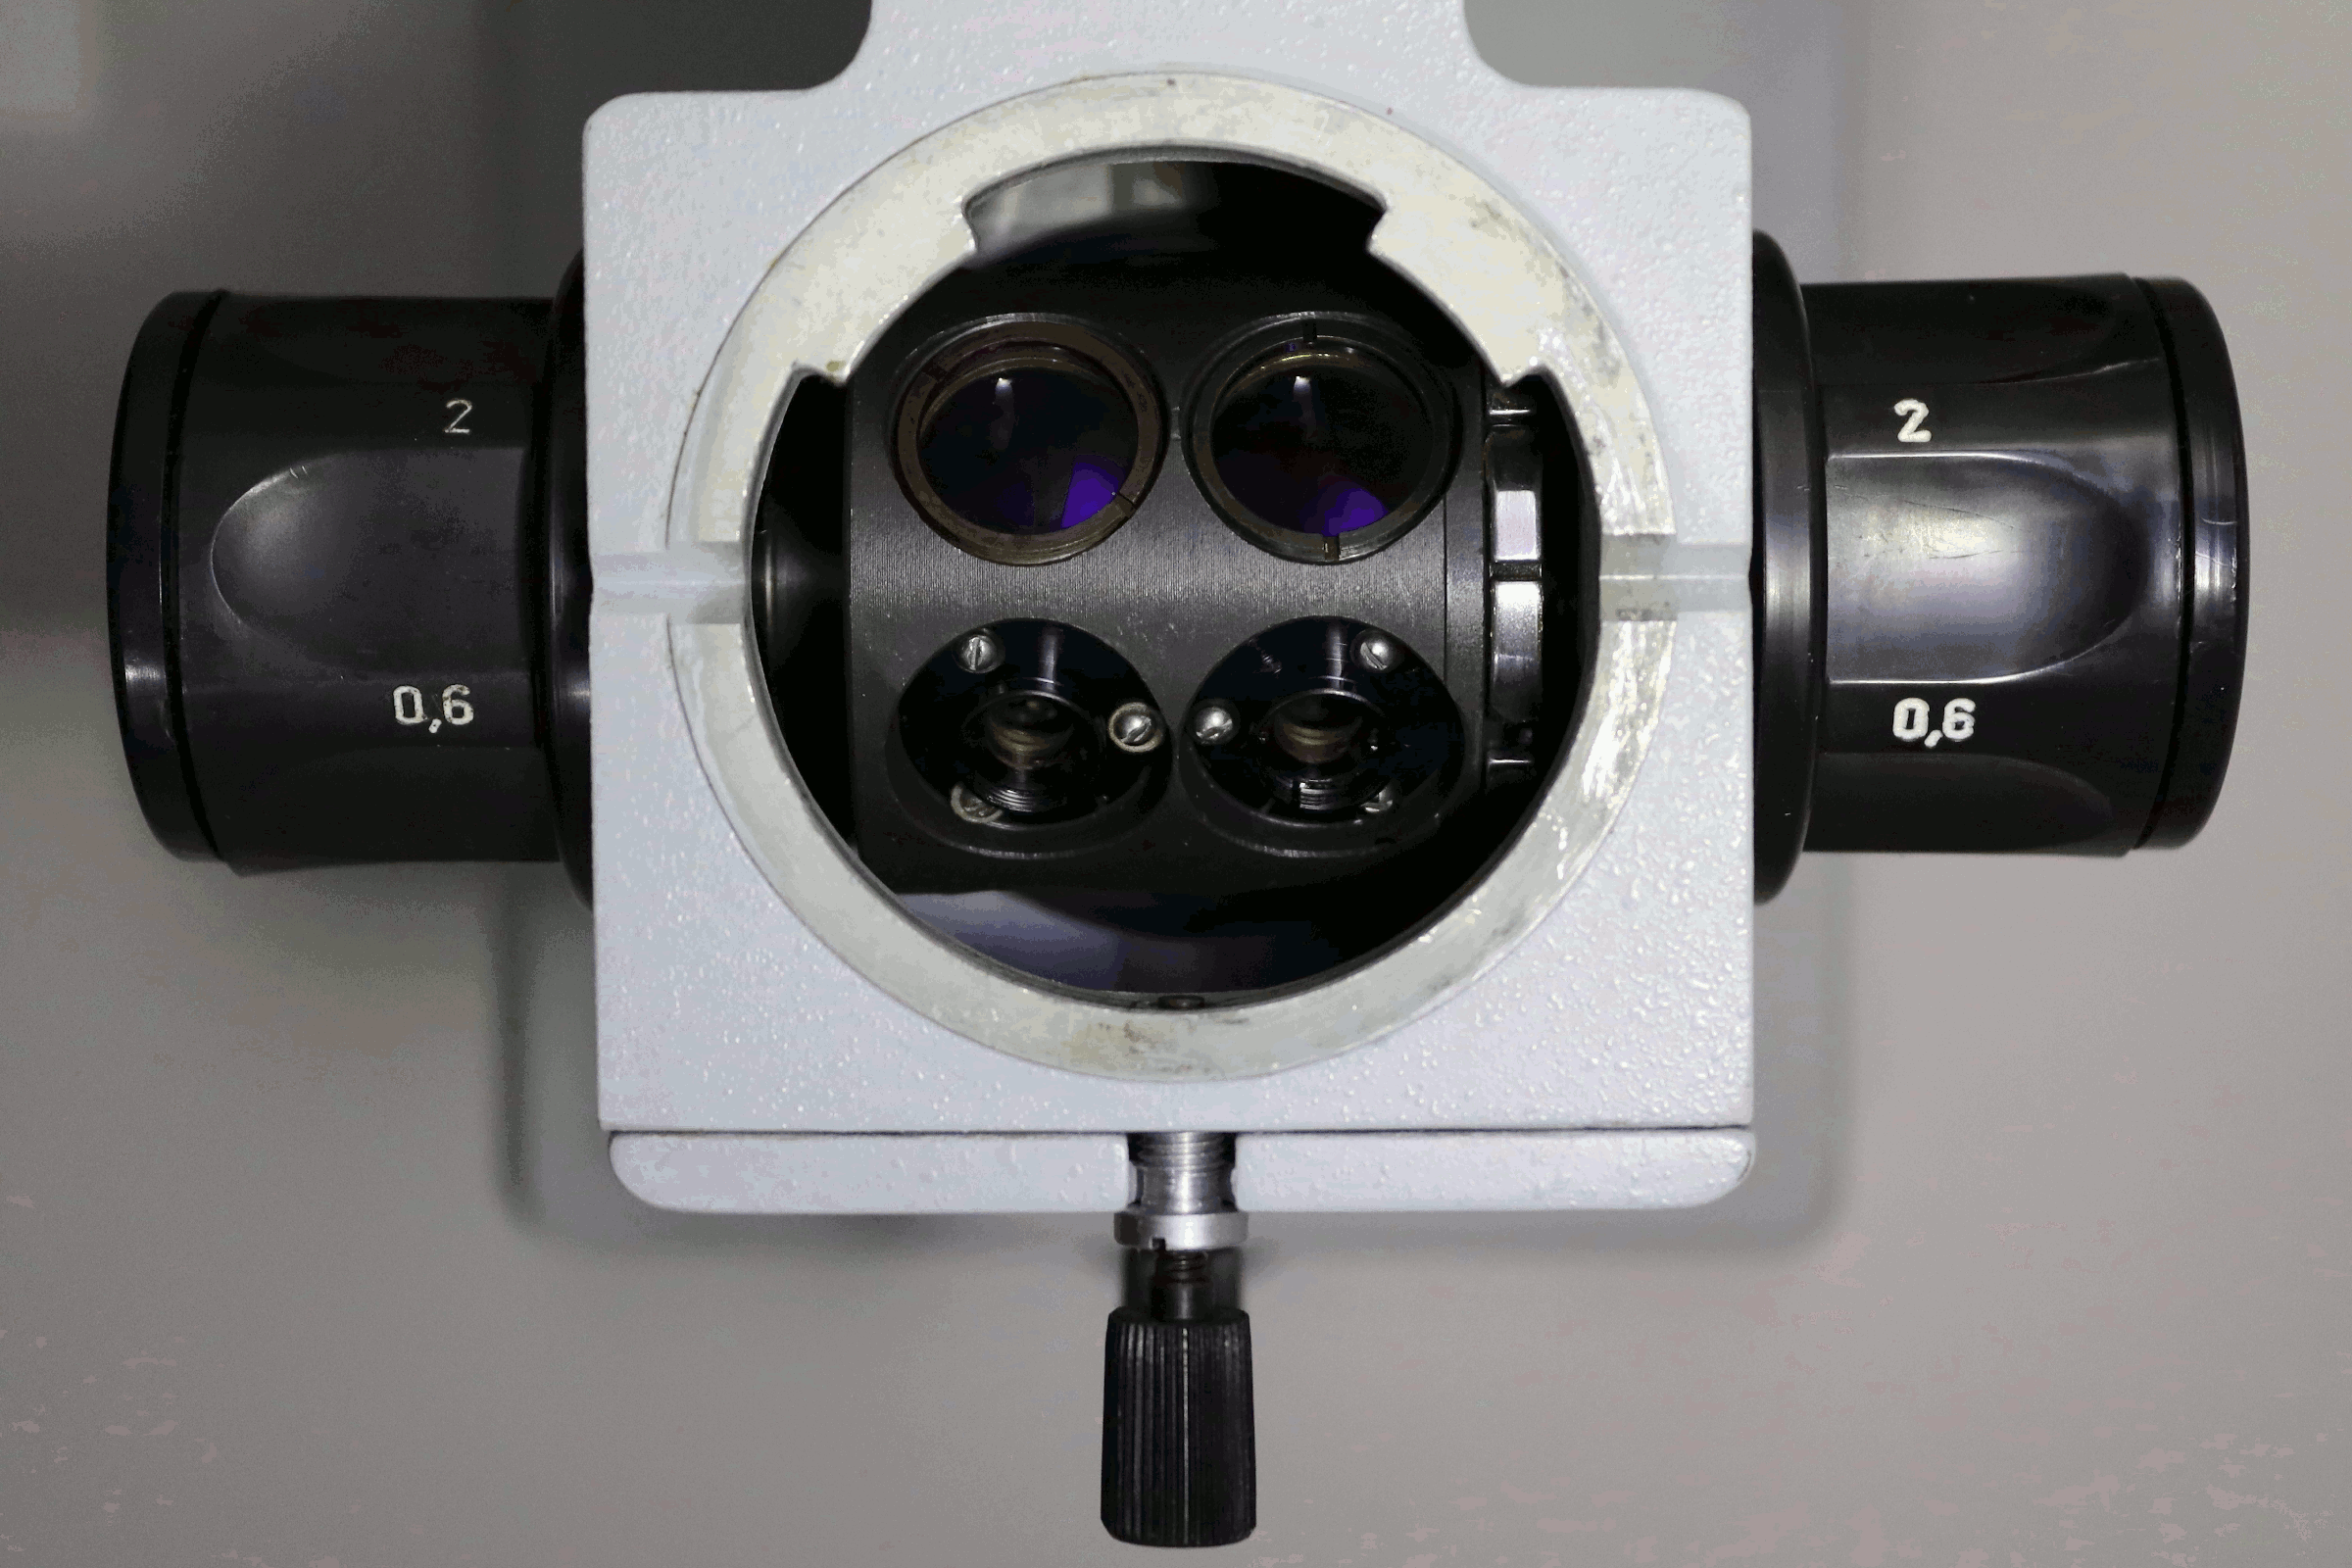
With an excess of patience, all of the lenses in the Galilean systems, could actually be realigned for better focus, parfocality (z-axis) and centering (x/y axes of the small screw-secured lenses visible in the 4x and 7x positions).
MBS-10 objective

Next part is the 1x achromatic objective formed by four lens elements and with 90mm focal (or working) distance. Combined with the 180mm focal distance of the binotube results an additional so called tube factor of...yes correct, of the 2x mentioned above (180mm/90mm). Furthermore, the objective has a movable tube around it with a connector for the default microscope lamp, which is presented in the next section.
The objective does not have a thread but is only held in place by a locking screw. Release it - and off it comes...and it can hit the ground in case you do not know and expect this (possibly resulting in dents / scratches on the lens or its coating or worse). This is also why you have to pay attention to possible objective damages if you want to buy a used MBS-10.
If intact, the objective is quite decent with a sufficiently wide and flat field of view (more on optics below...). Really noteworthy, is that the significant 90mm working distance makes the MBS-10 an affordable allrounder stereo microscope for various disciplines, where it comes as a great advantage, to have enough space under the lens to move and manipulate freely (e.g. for preparation in zoology / botany, soldering, gemology, jewelry, watchmaking and many more).
There are also 0.5x and 2x addon lenses that can be attached to the front of the 1x objective for halving or doubling the possible range of magnifications. I have not tried these, but in general single lens elements have a tendency to induce additional spheric and chromatic aberrations to otherwise good optics and I assume this wouldn´t be any different here (especially considering that a 2x addon lens would generate a 196x total magnification, which would go far beyond the optical capabilities of the rest of the setup).
Lighting solutions and microscope stand
A real flaw of the MBS-10 is its default incident light source - it is incredibly bad by today´s standards.
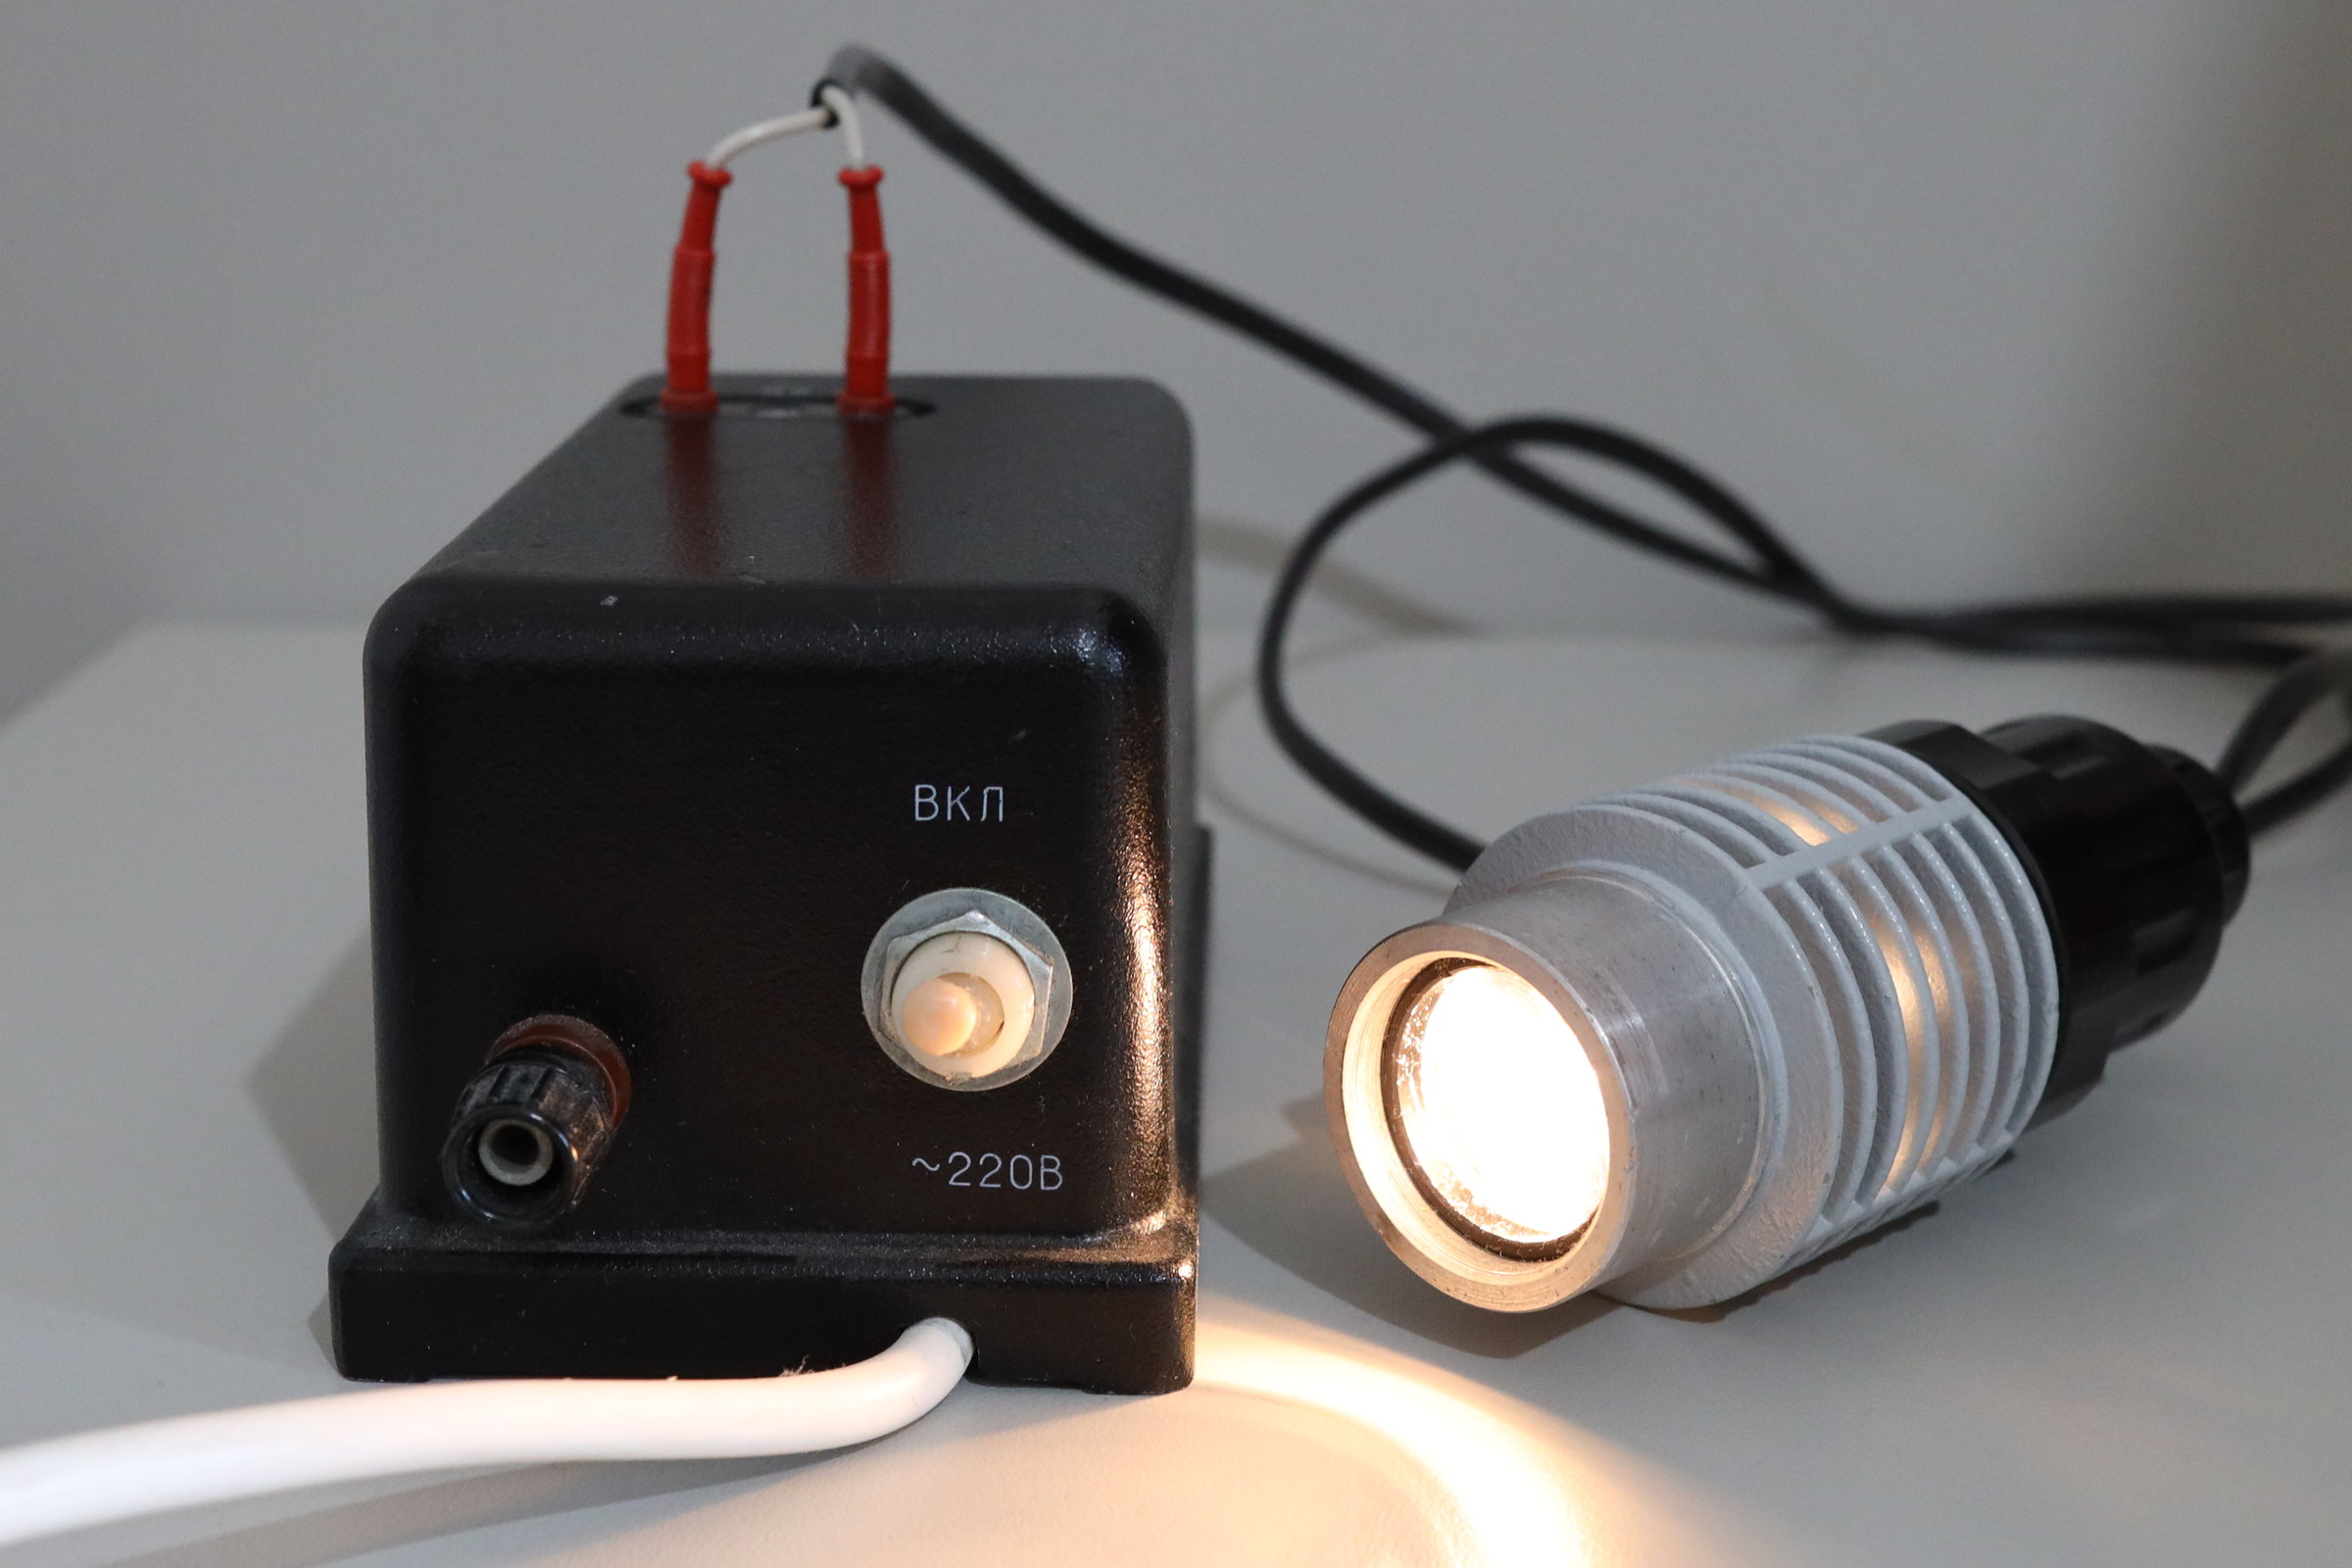
Technically, it is based on a Russian РН-8-20 incandescent light bulb (8V, 20W) which can be hooked to the objective body with a clamp construction. Halogen-based solutions exist (e.g. right in the middle of the above animation), but are not really significantly better. Some pictures of the original setup in action can be seen on the Internet´s #1 tardigrade-appreciation site baertierchen.de (most recommendable, online since around the year 2000).
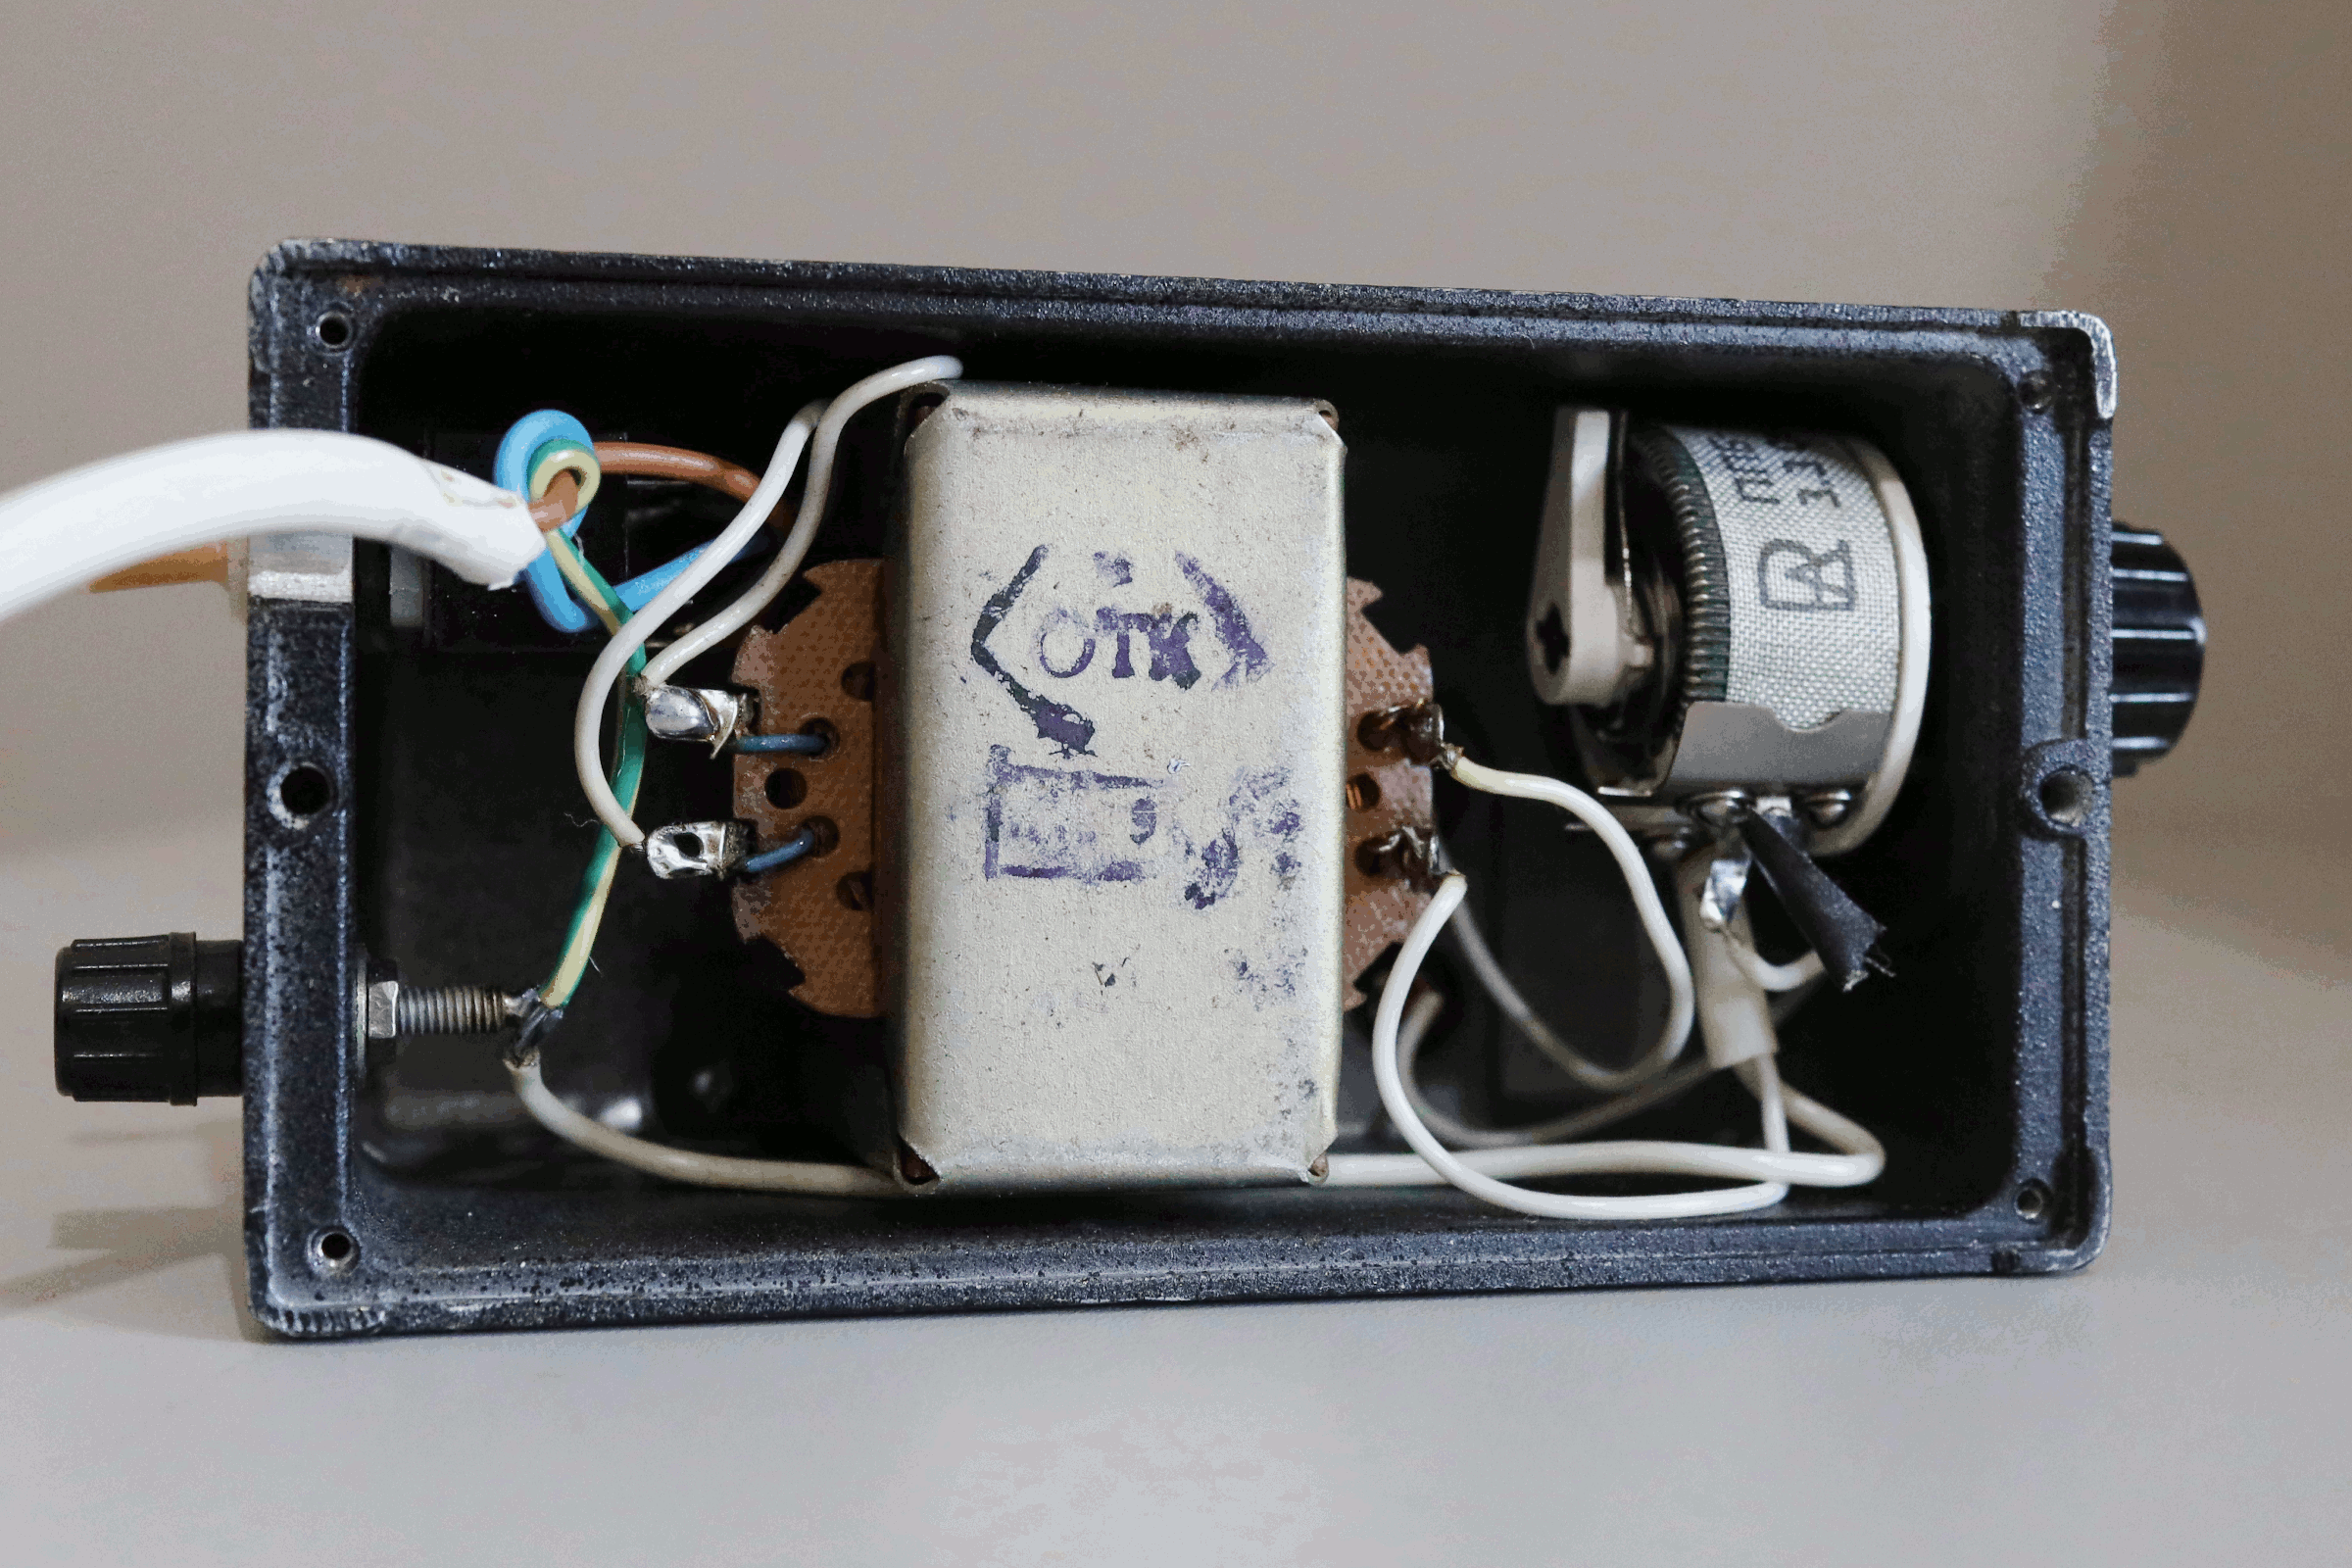
The power supply is oldschool-to-the-max - the pictured one is quite okay (no strain relief but at least a protective ground wire...), but there are severe quality and safety issues with older versions of it (again: baertierchen.de and this thread on the German mikroskopie-forum.de).
If you hear people complain about the image quality of the MBS-10 it will likely originate from the use of this abomination of a lamp.
Why this lighting solution sucks:
-
It is huge and bulky
-
It gets really hot (you actually have to take care to not burn your fingers while working under it)
-
Compared with high-power LEDs, the light is quite dim (even at its brightest setting)
-
The light temperature and color rendition is nowhere near current high-CRI 4000-6000K daylight LED solutions
-
It is unidirectional (you vs. the shadows...) and requires constant manipulation (if you want to examine something from different angles / sides)
-
Digital photographic documentation with this lamp (if you happen to have a phototube) will deliver very low, grainy image quality
-
The power supply may seem very "rugged" (which it is...plus "heavy" and "huge"), but some of these come with a 8V-socket that resembles a Euro plug (which also means the 8V lamp can proverbially find its end in a European 250V power outlet = life-endangering) and the use of a ground wire was not always the standard
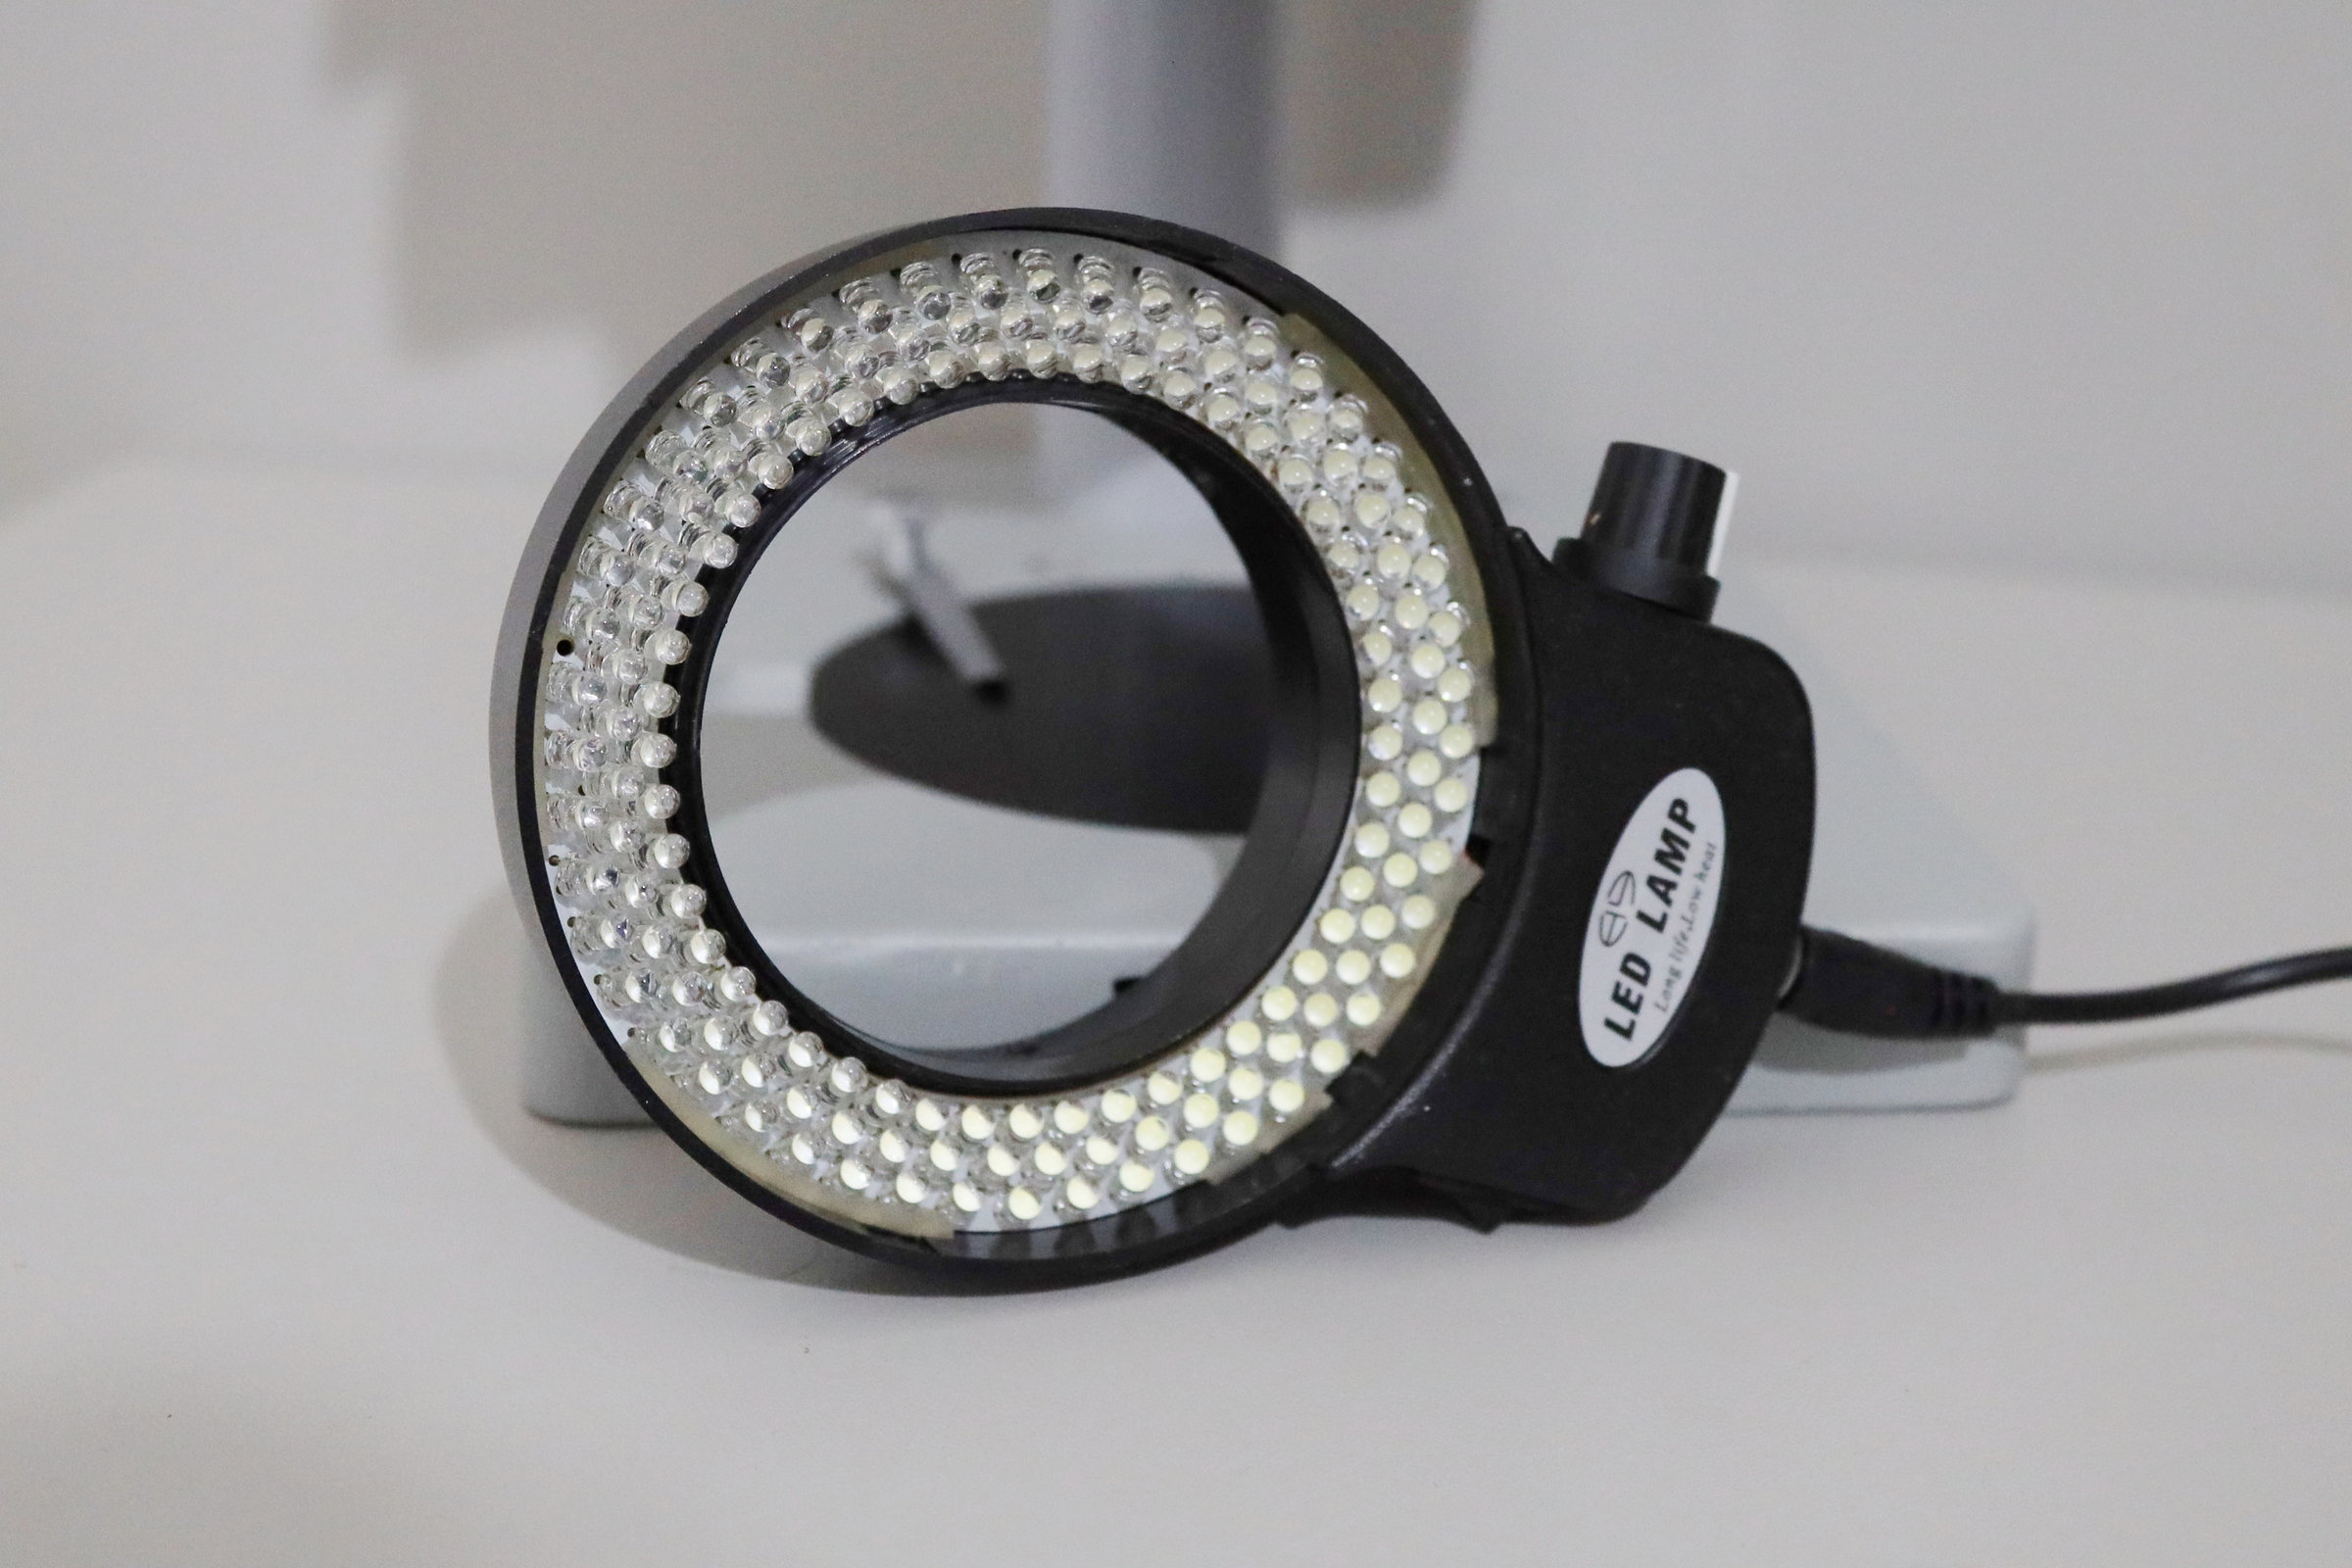
As you may have seen on this article´s first picture, I have modified my MBS-10 with an inexpensive 144-LED ring light from a China-based online store. The model is called MIC-209 and after the three holding screws are out, its inner diameter fits the objective perfectly.
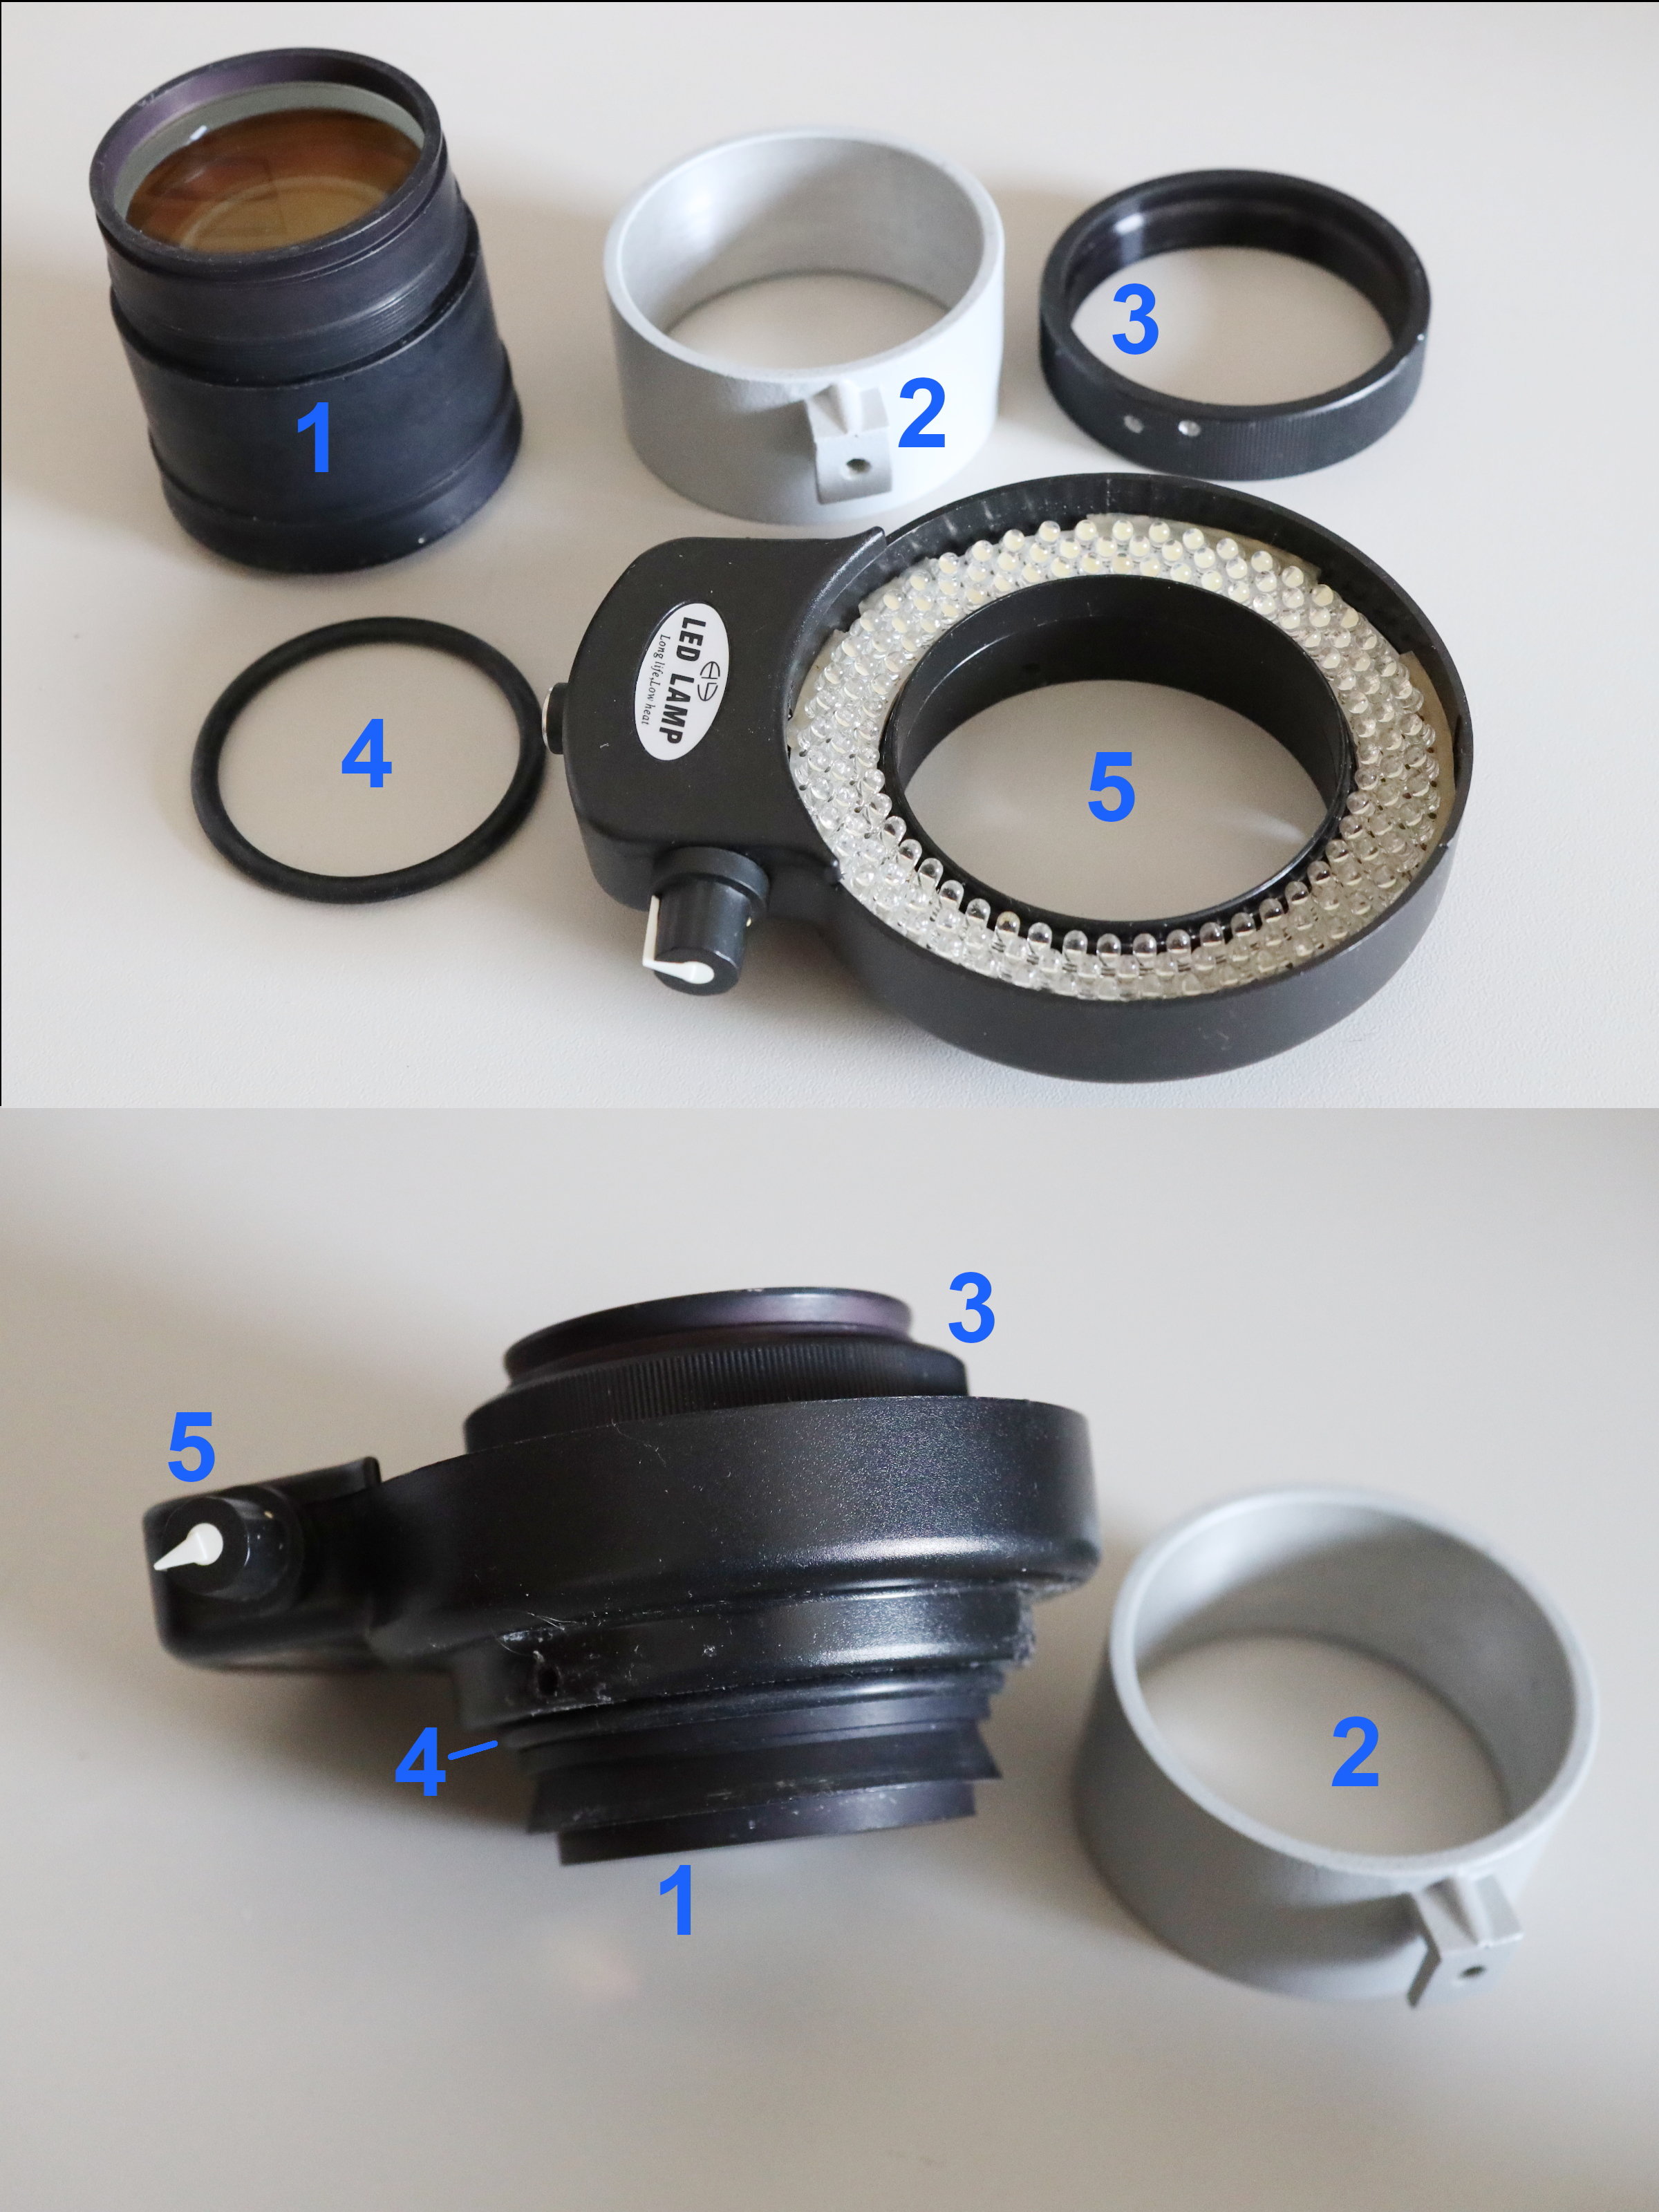
To install the ring light (5) to the objective (1) you need to unscrew the black metal ring on its front (3), take off the lamp connector tube (2) and install a rubber gasket (4mm thickness, 45mm inner diameter) followed by the ring light and the metal ring to secure it. This LED solution is inexpensive and delivers a bright and uniform light (CRI values could be better though...).
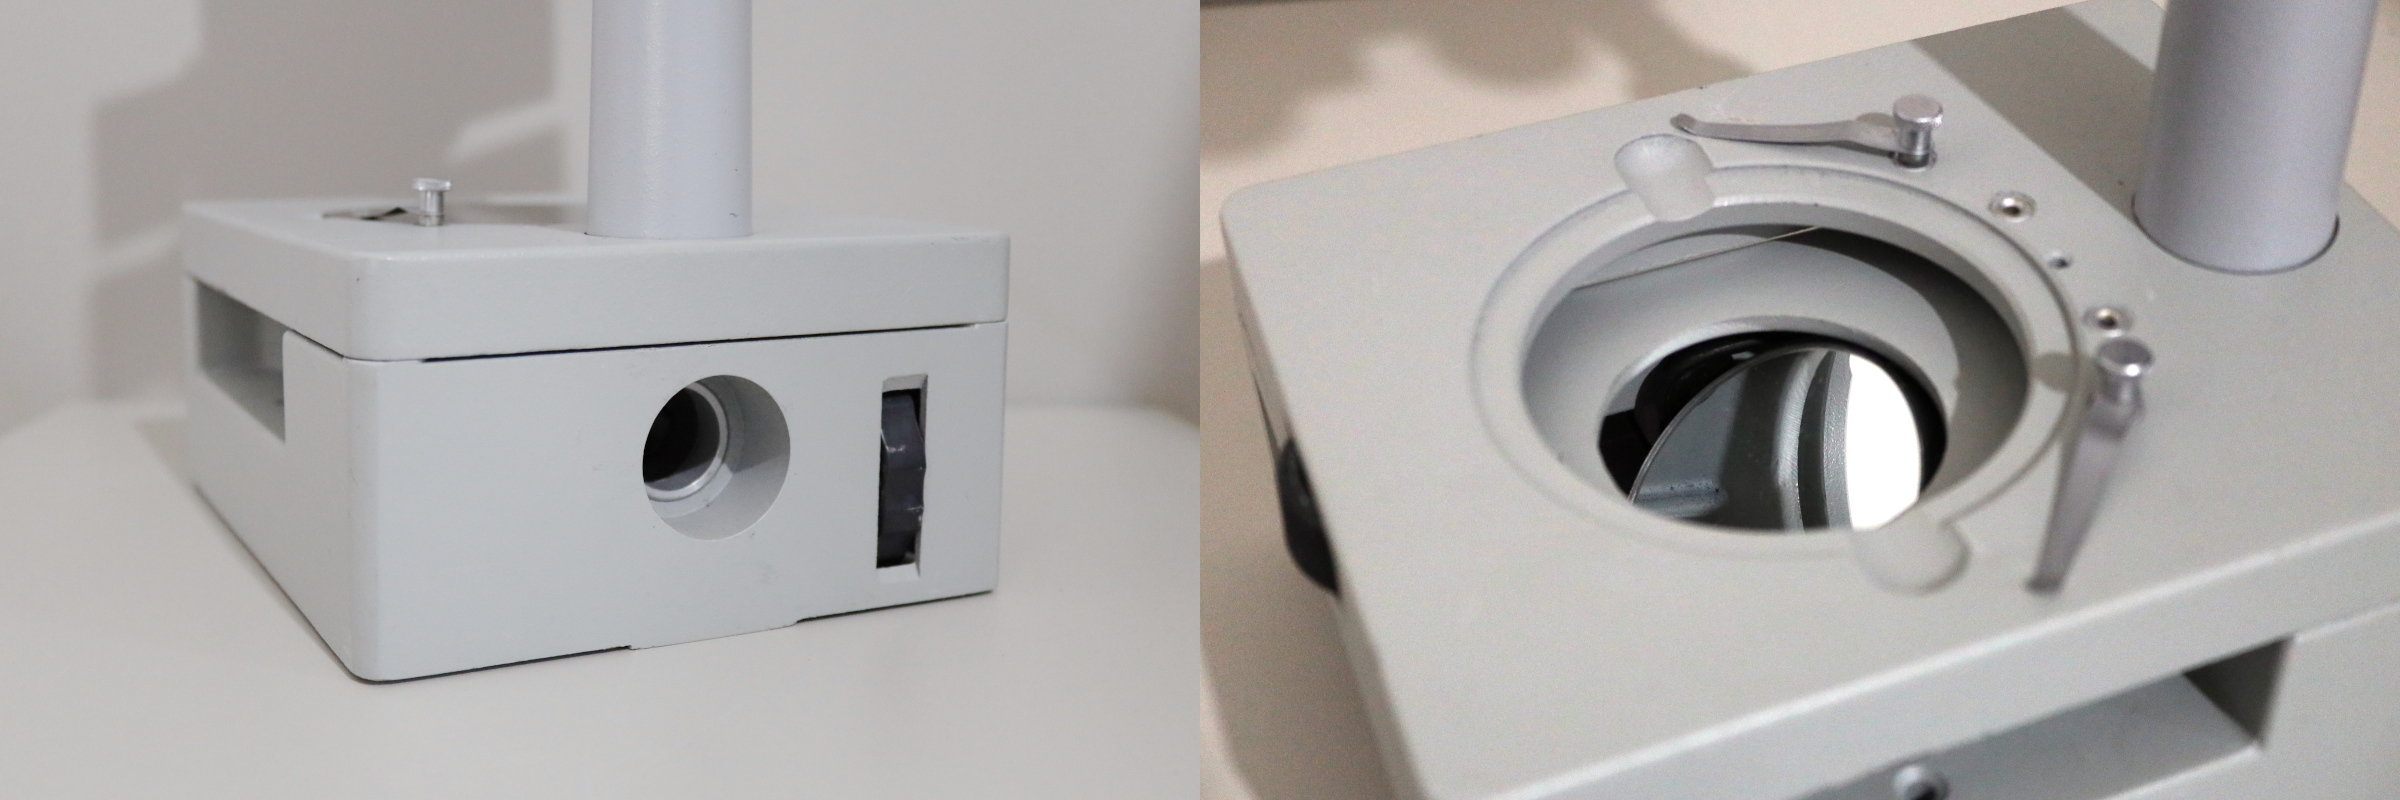
The original lamp can also be used for transmitted illumination when inserted on the backside of the microscope stand (if this is where you want to go, consider this LED mod to the original lamp but be sure to use a more recent LED type, e.g. the XHP35 and a dimmable, flicker-free power supply). The light direction can be modified with a rotatable mirror operated by a nearby turning knob.

With a glass plate on the object stage and some mirror-action you can achieve brightfield and (at least some kind of) darkfield illumination (terribly sorry I could not withstand to animate the shit out of it...last time in this article, promised ;).
Accessories to the MBS-10
The MBS-10 often comes with a plethora of (varying) equipment, but of course what you will get with a used one, will depend upon the shop or the previous owner(s) from where you buy it.
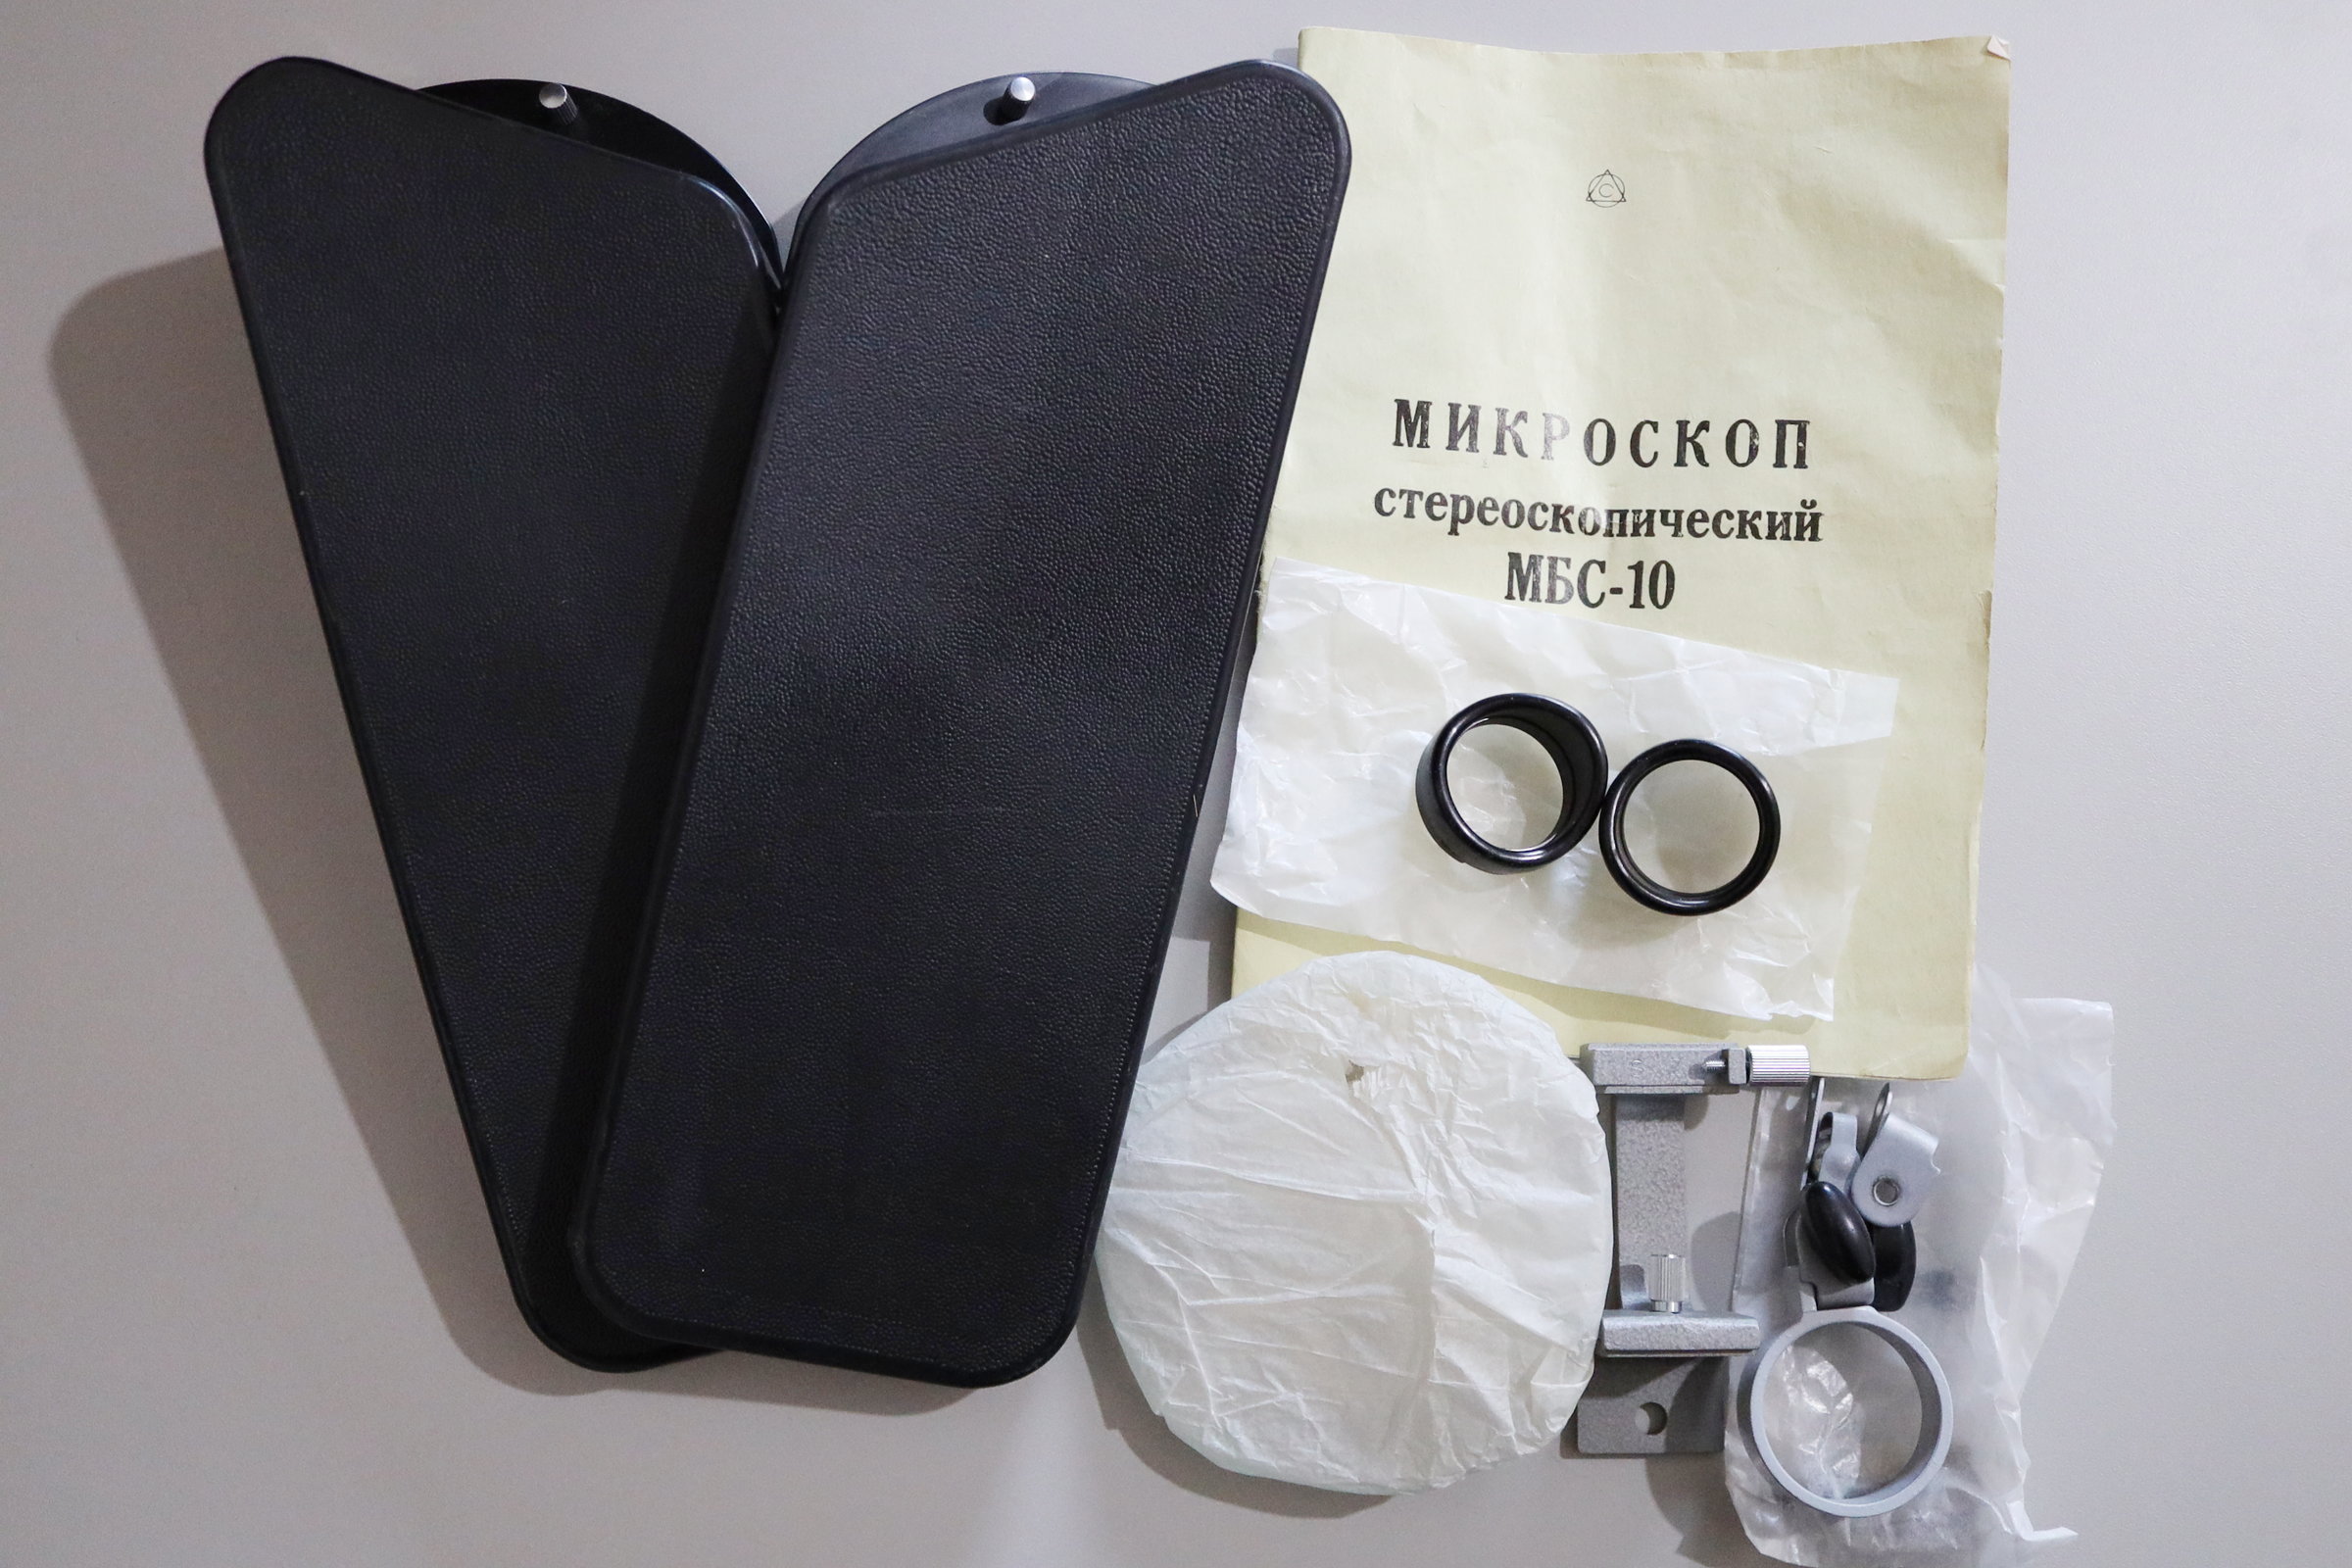
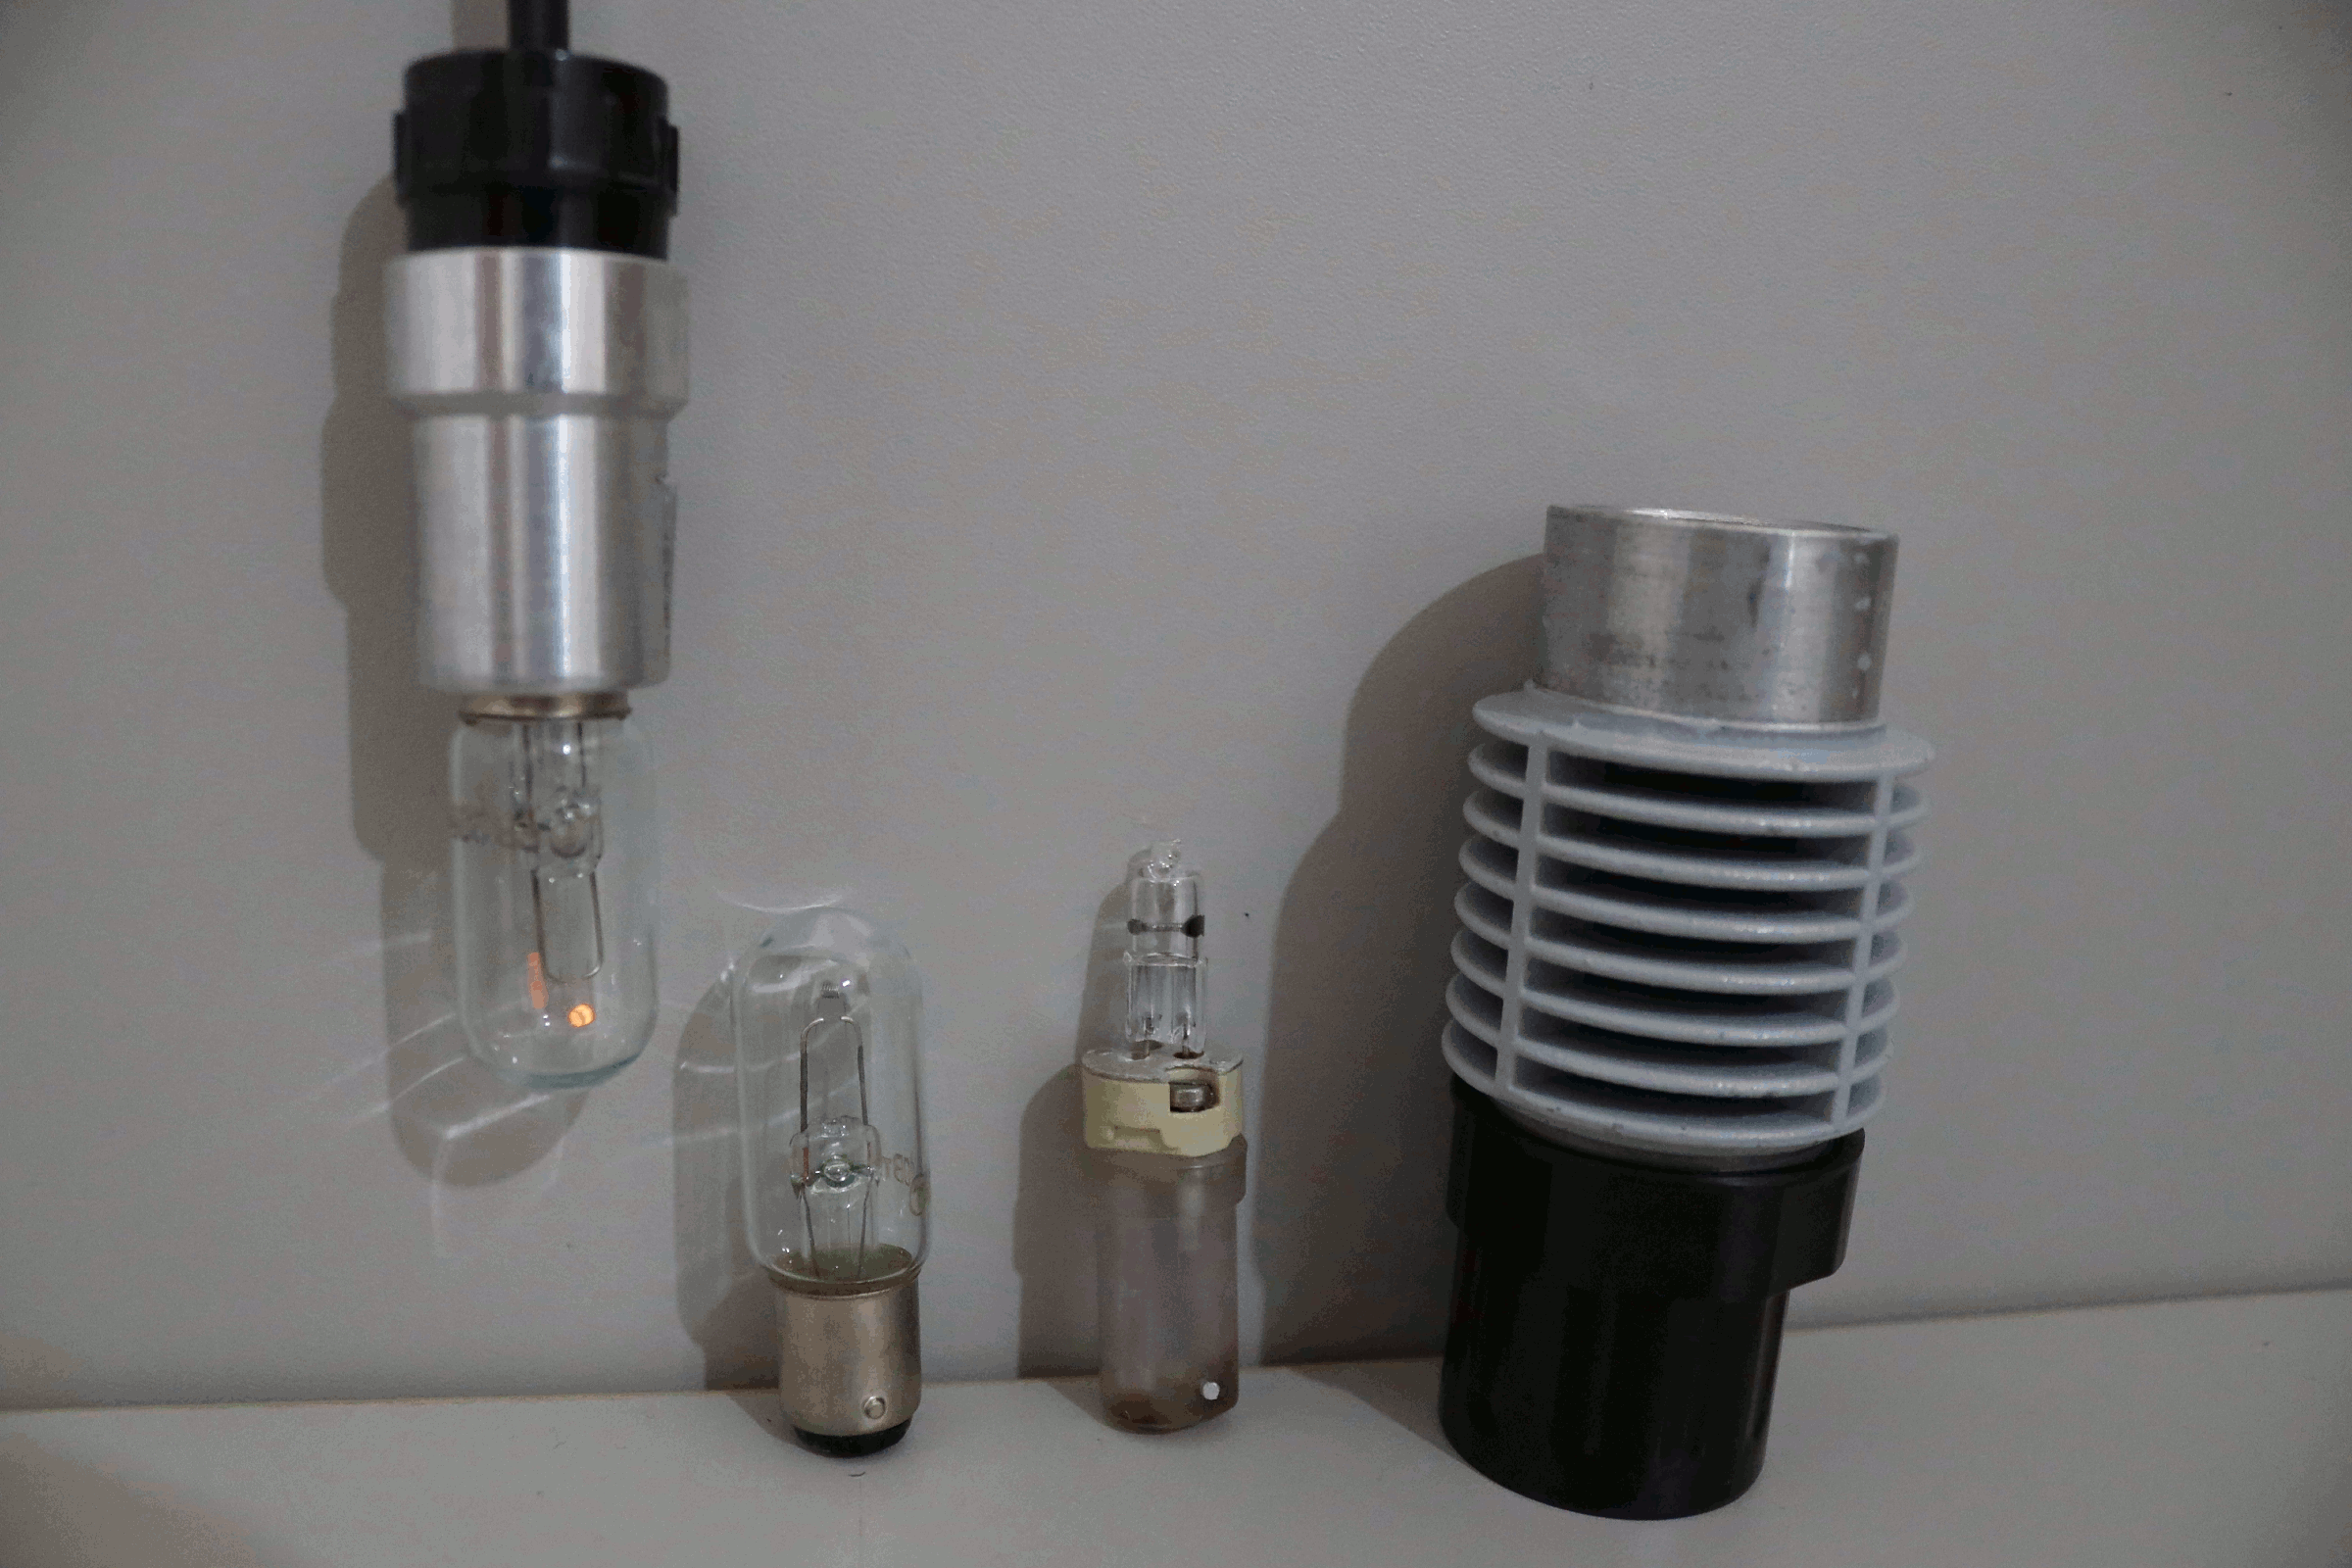
Some of the accessories, including a Cyrillic manual, the armrests, lamp parts, a glass plate and (hard plastic and imo unusable) eye cups.
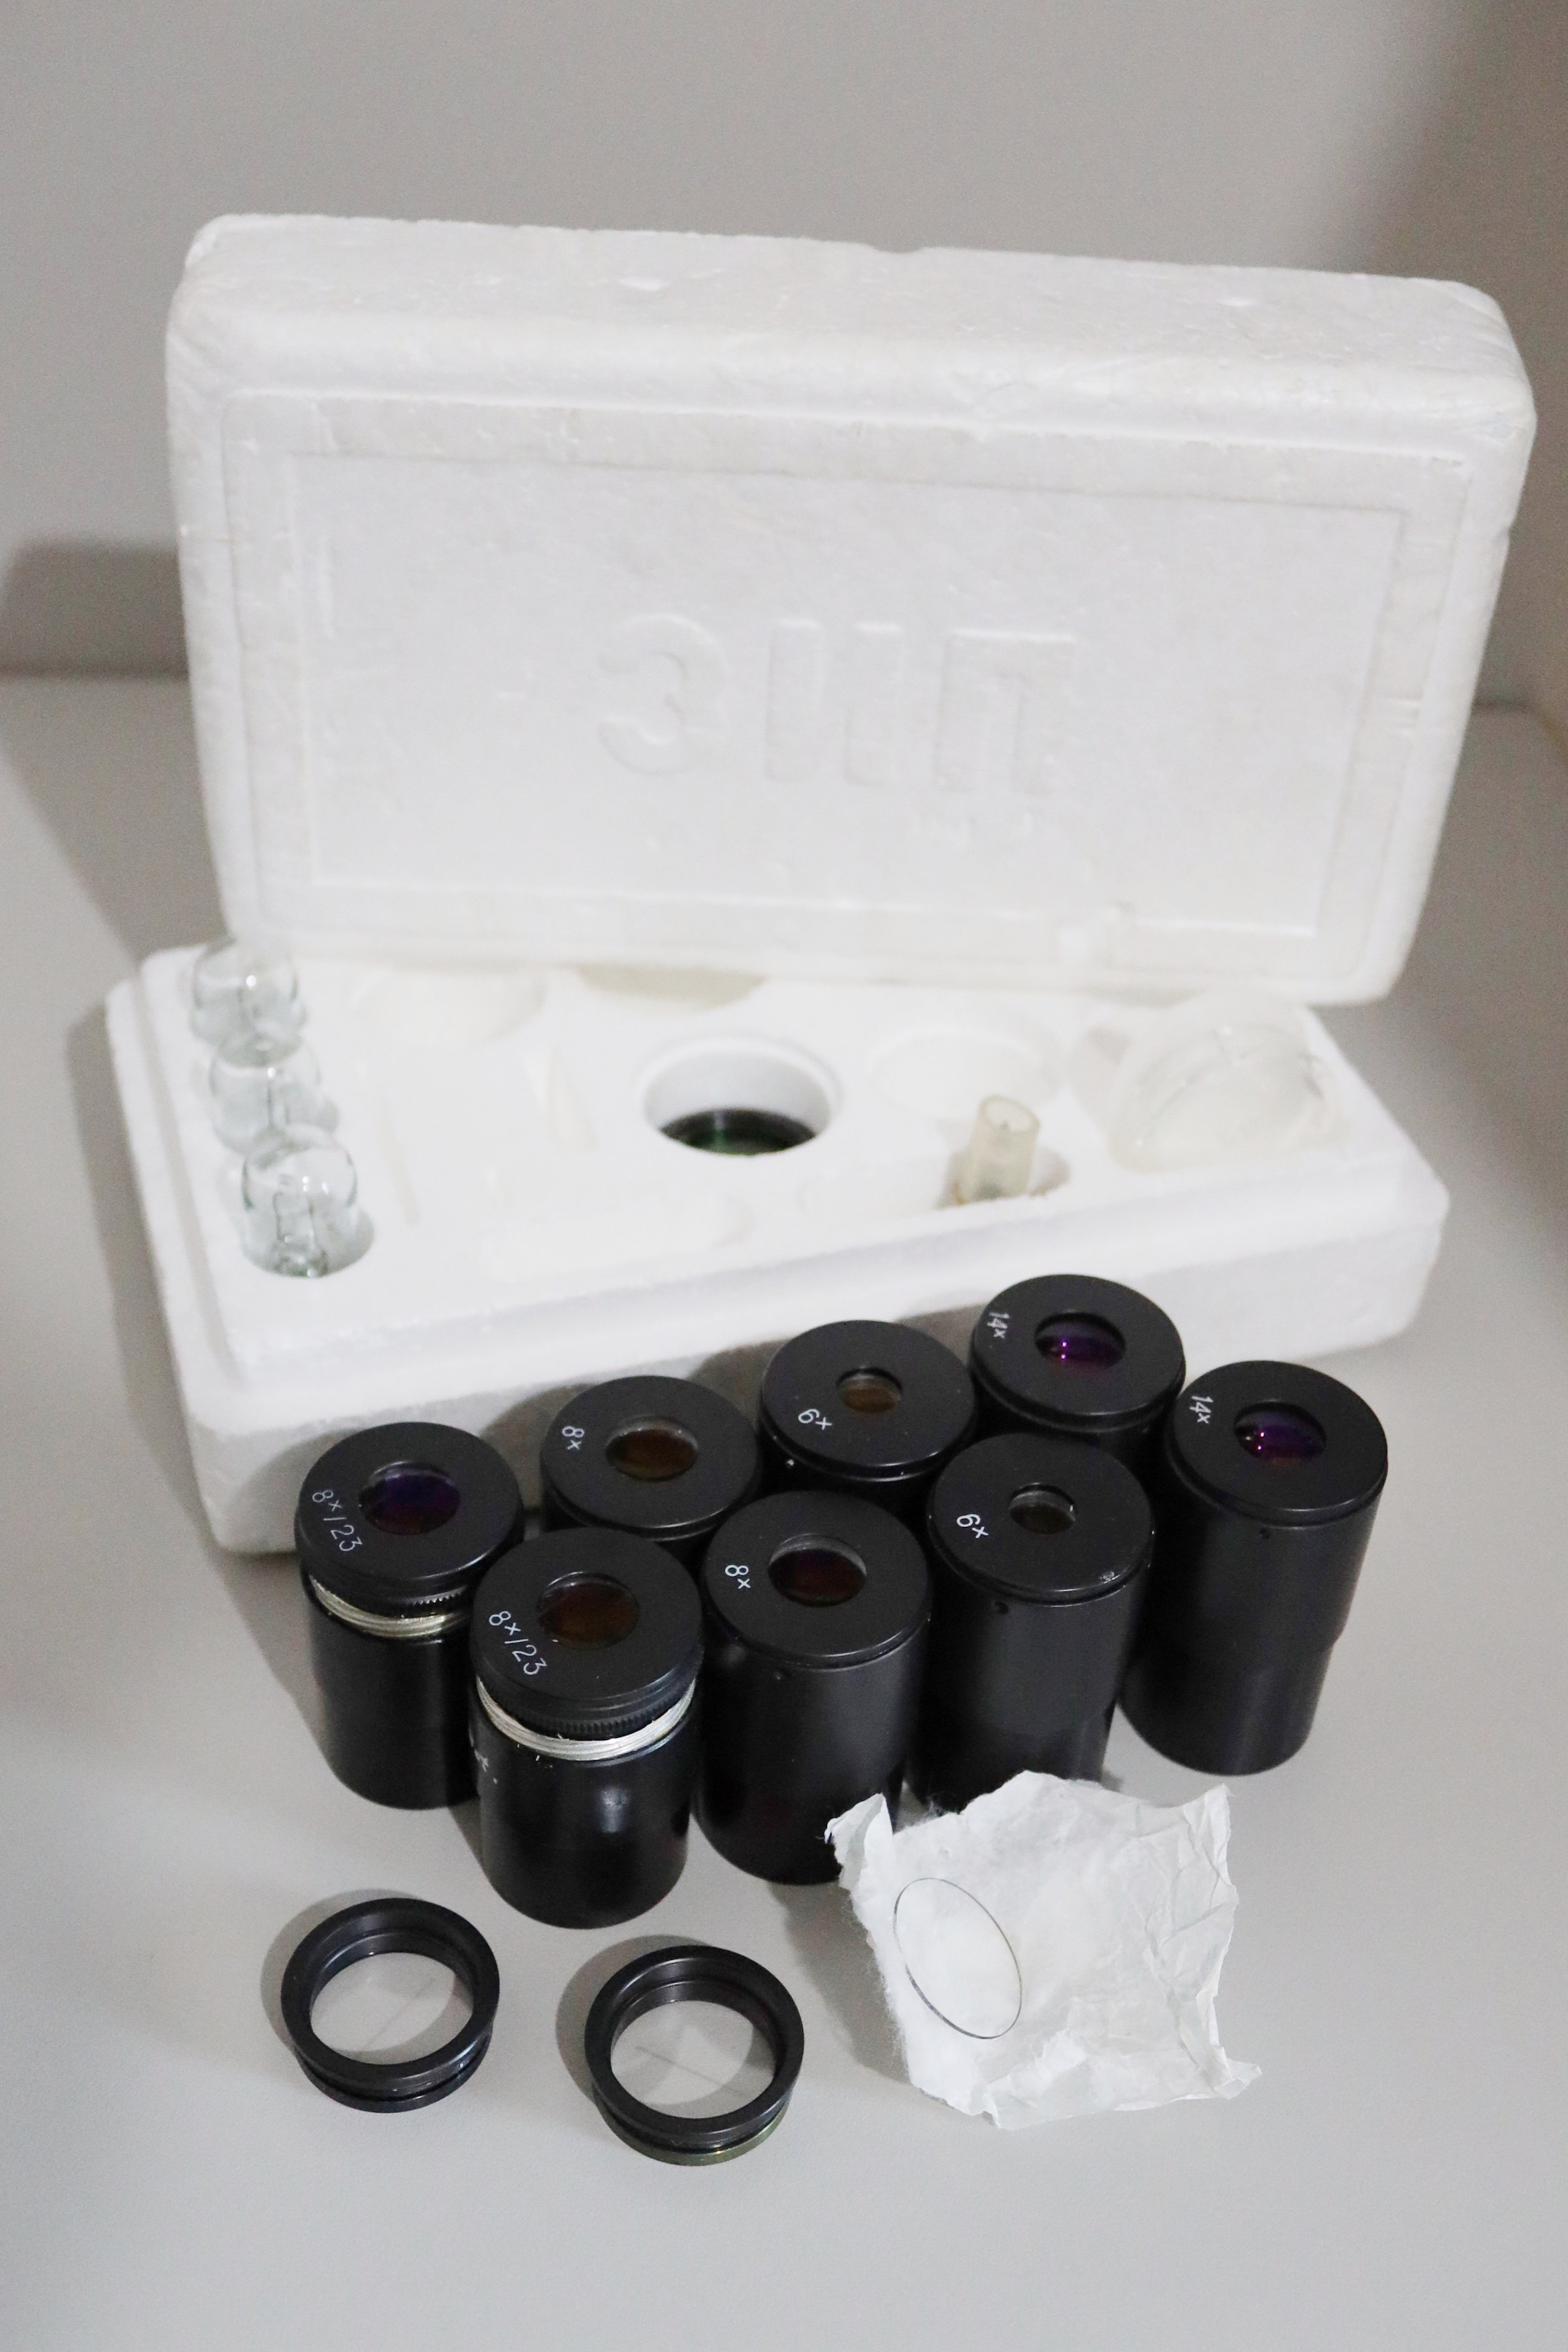
The "OEM version" features a polystyrene box with replacement bulbs (if you should ever need those), a green filter for the lamp (same...) and three pairs of eyepieces (6x, 8x and 14x). In addition, there is usually one eyepiece with a grid and a scale insert for measurements (in my case I got a pair of these which made it easier to align the prisms of the binotube - as hinted before).
Optical capabilities of the MBS-10
Talking about eyepieces, it is time to discuss the microscope´s optical capabilities. As already mentioned, binotube prism alignment issues are one flaw, another one that can not be mitigated that easily, is an occasionaly observed yellowish/greenish image tint found in some MBS-10 microscopes. A long discussion - including mitigating propositions with blue light filters from photography - is given on this forum thread (German language).
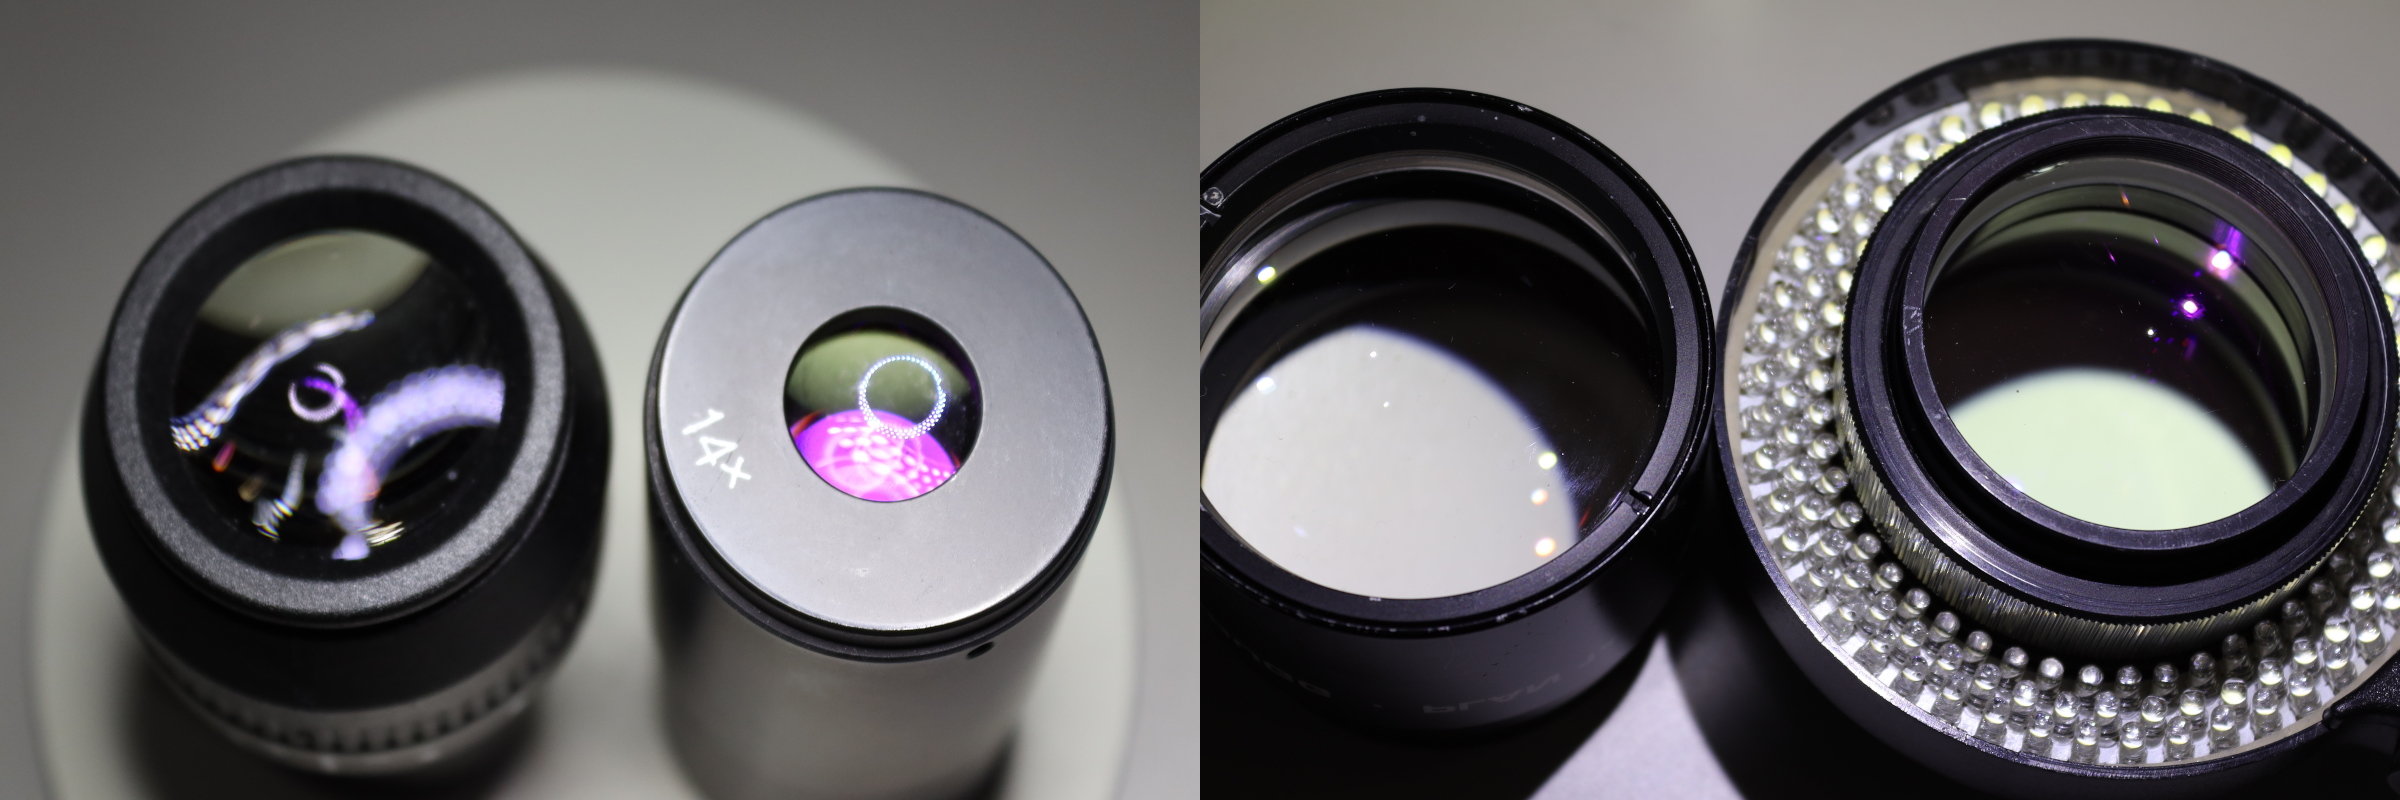
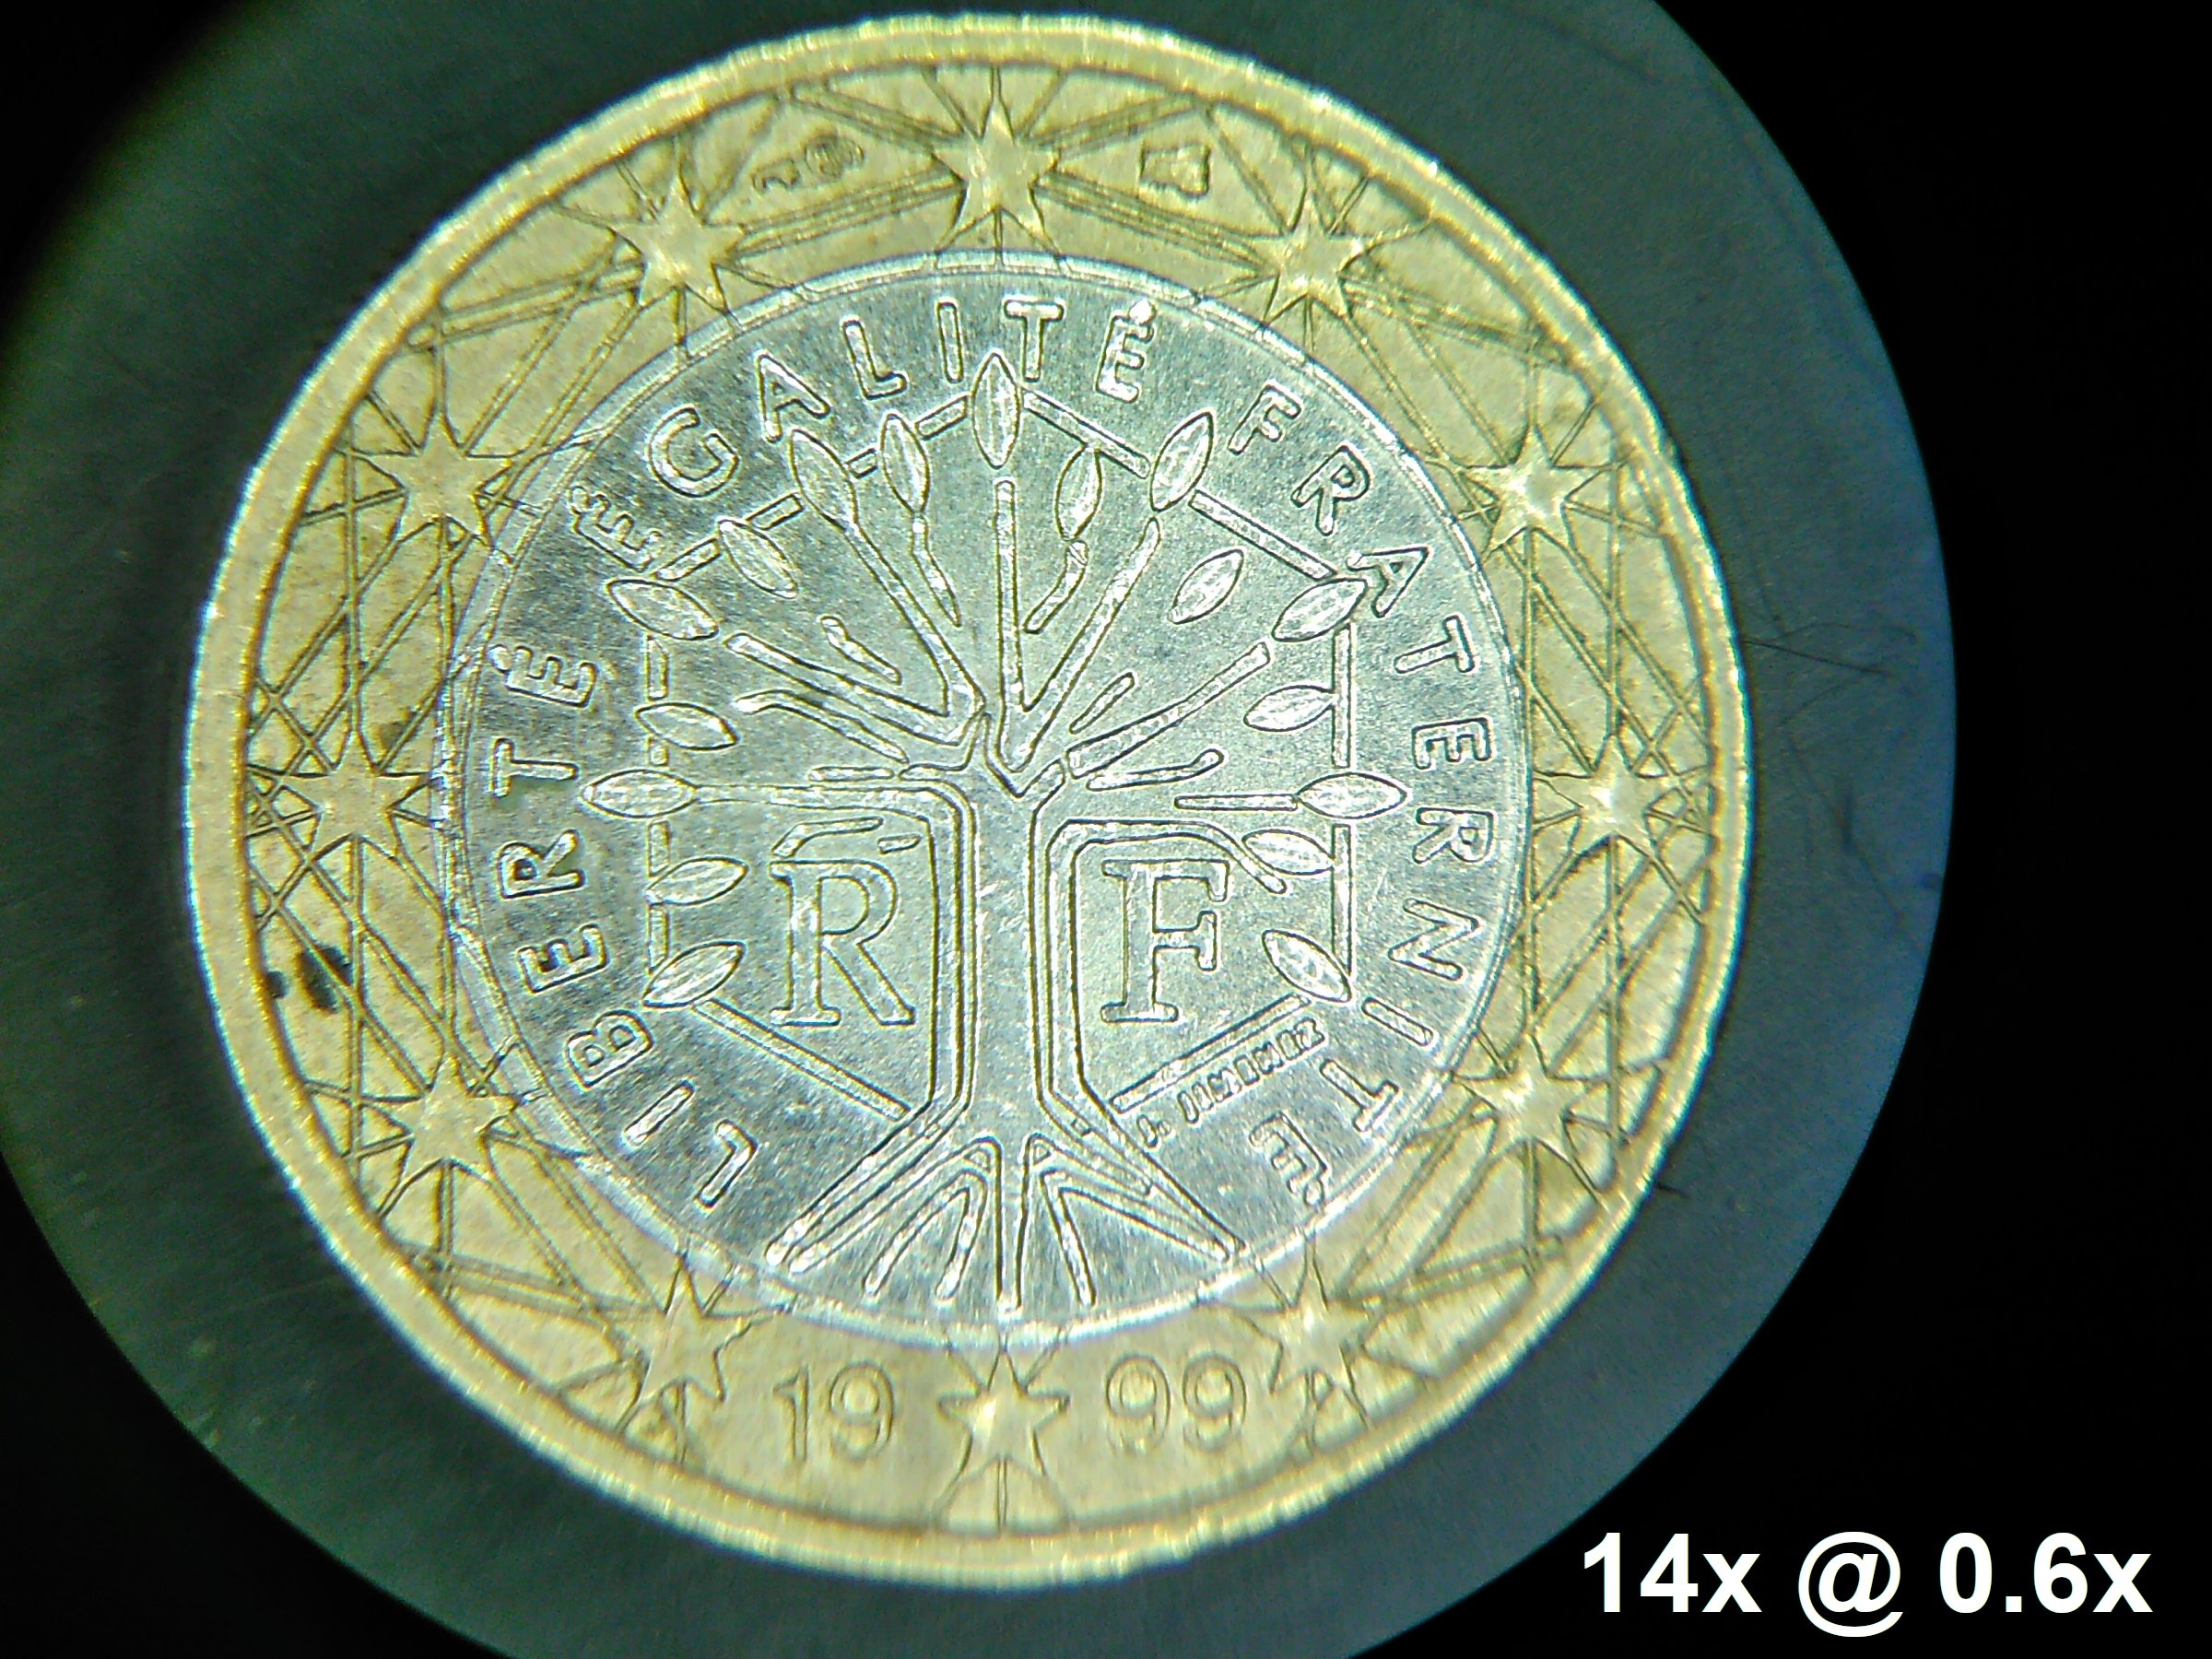
The effect seems to originate from the probably organic (ageing?) lens cement and is highlighted in the picture above, which compares eyepieces and objectives from Leica-Wild with their LZOS counterparts. In both cases the latter ones (each on the right side) clearly display a yellowish image quality (keep that in mind for the following sample images).
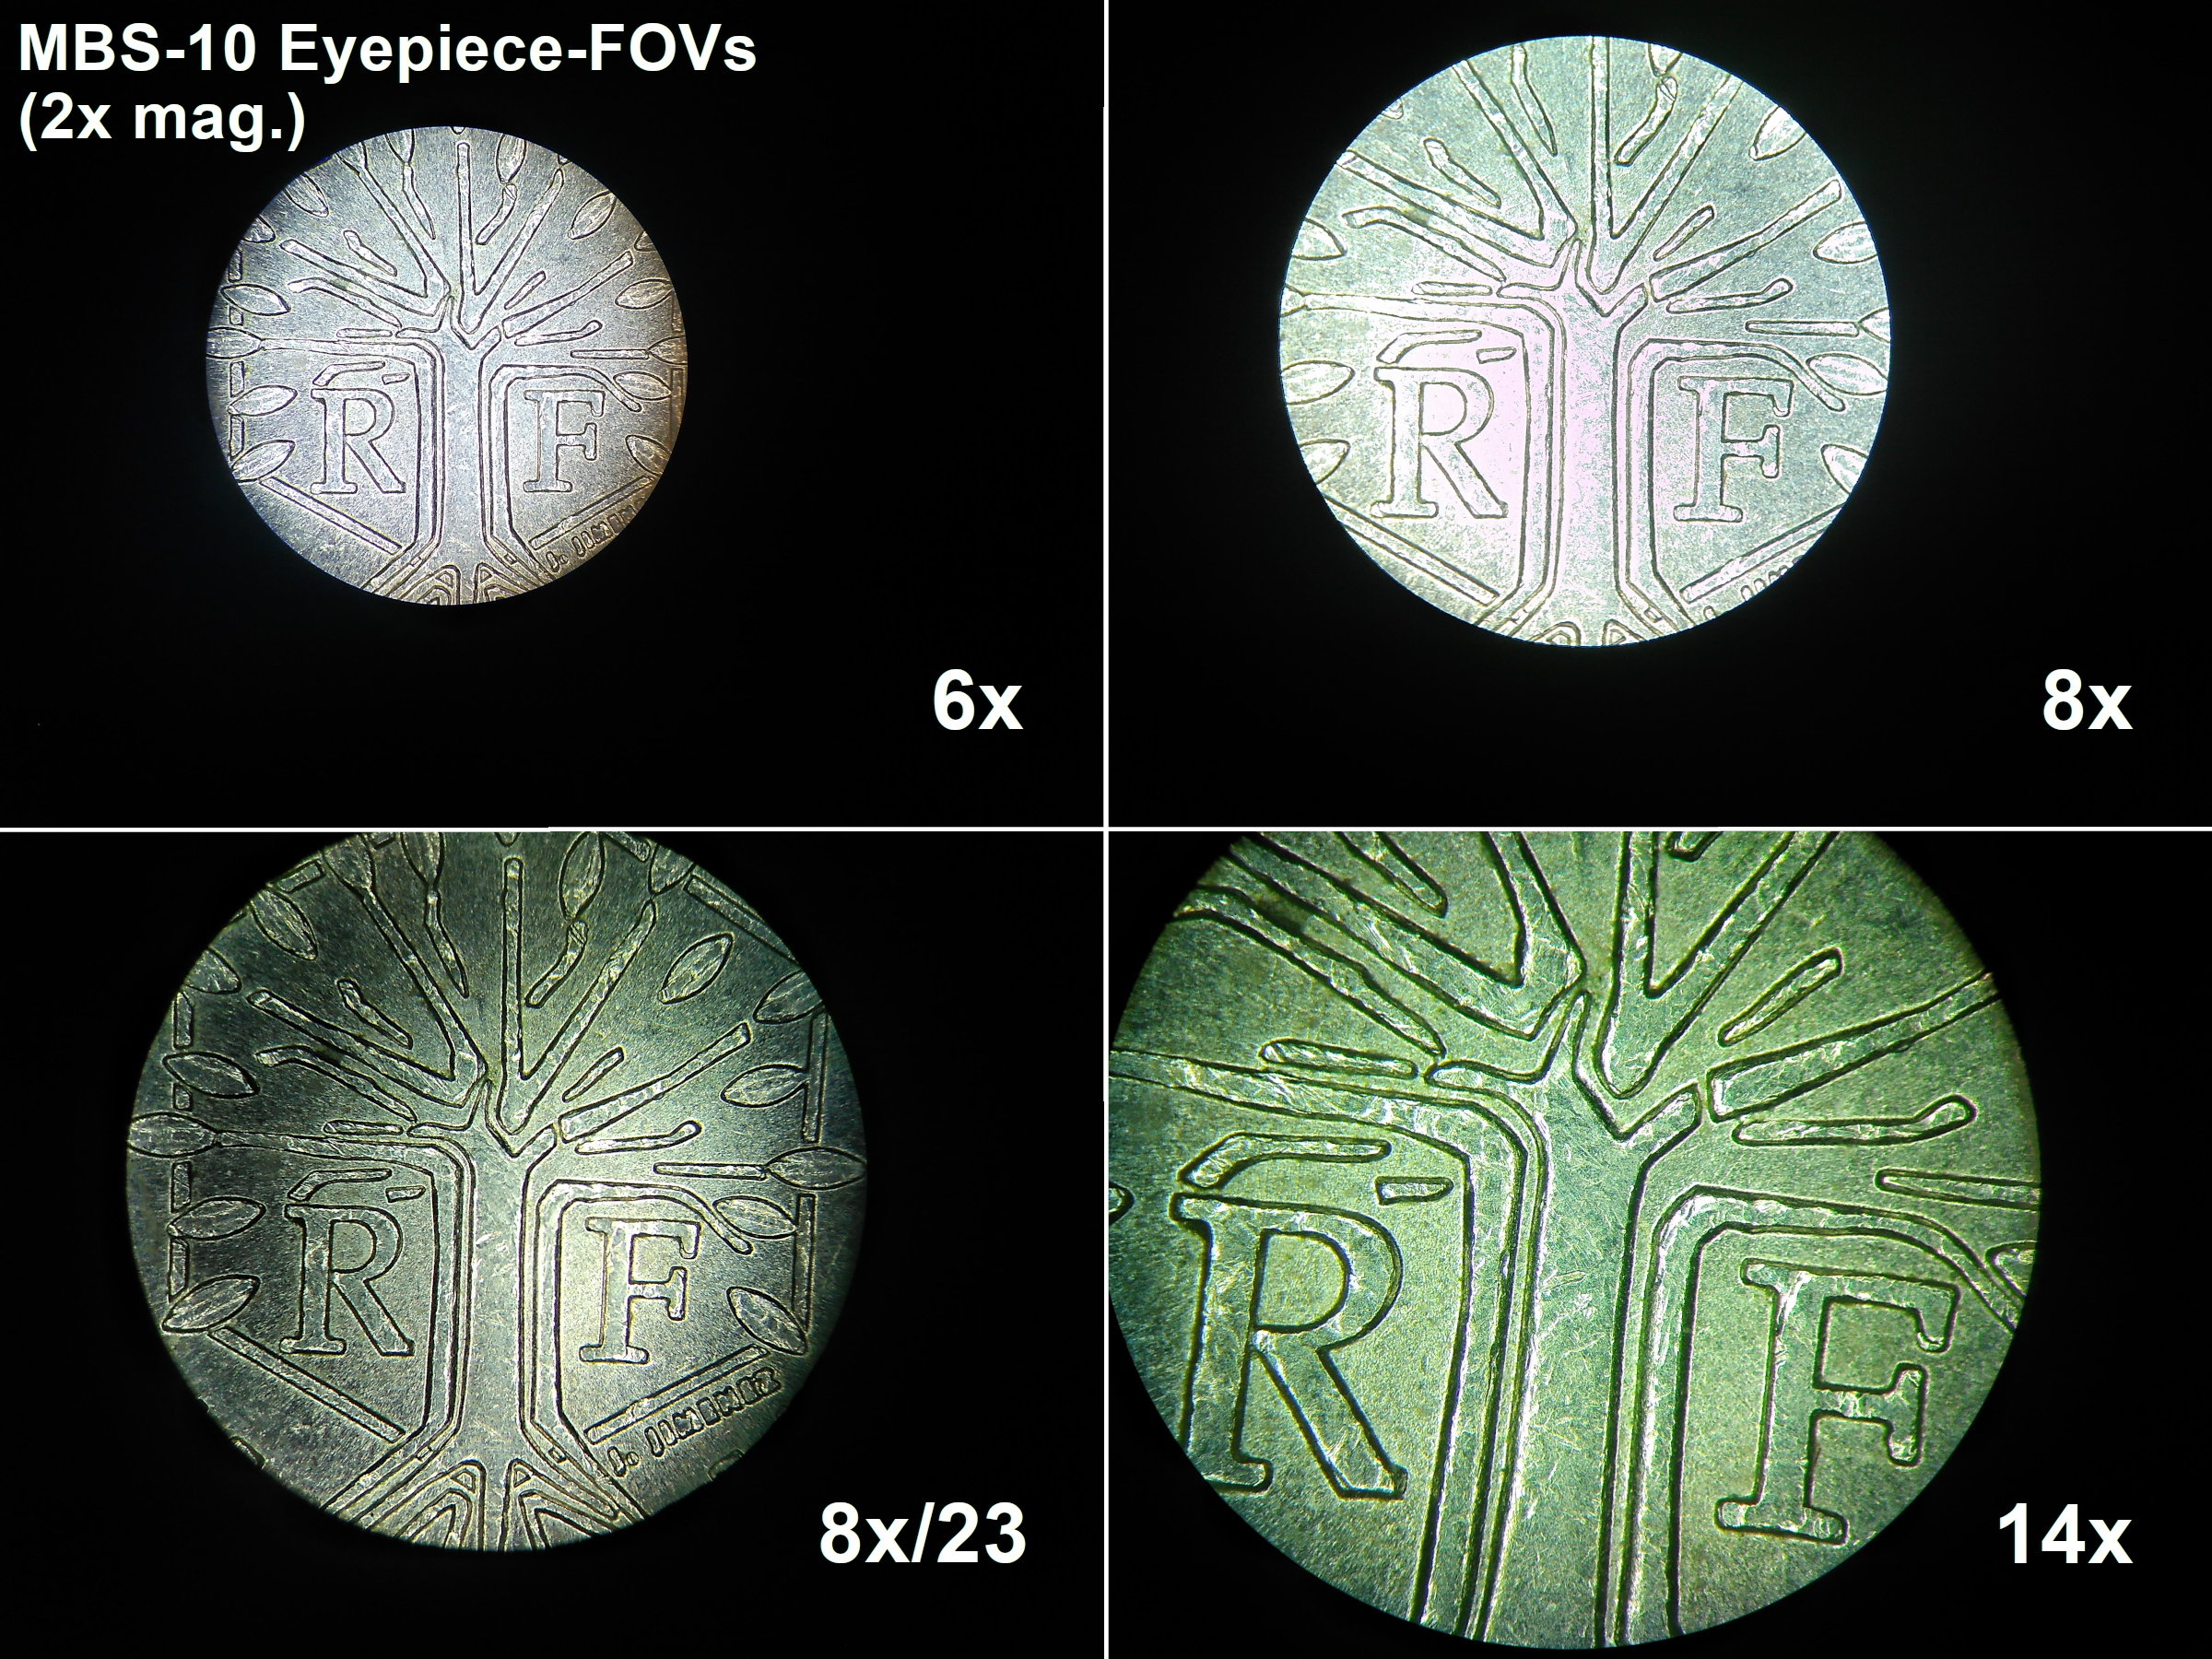
The above pictures were taken directly through the four eyepiece types that come with the MBS-10. The 2x-magnification was used, as it is the only setting without additional lens elements in the beam path between eyepiece and objective.
As we can see, vignetting is a severe problem in case of the 6x and 8x eyepieces (almost no yellow tint with these by the way...). The best eyepiece for a maximum size of the field of view (= fov) will be the 8x/23 measurement eyepiece with no inserted scale. With the 14x eyepiece, otherwise, which has an ultra-wide-field-like viewing experience, we still get the only configuration that does not feel like "keyhole surgery". However, this comes at the cost of a 35% smaller fov (with the field number being around 17mm at 1x magnification, while the 8x has 23mm).
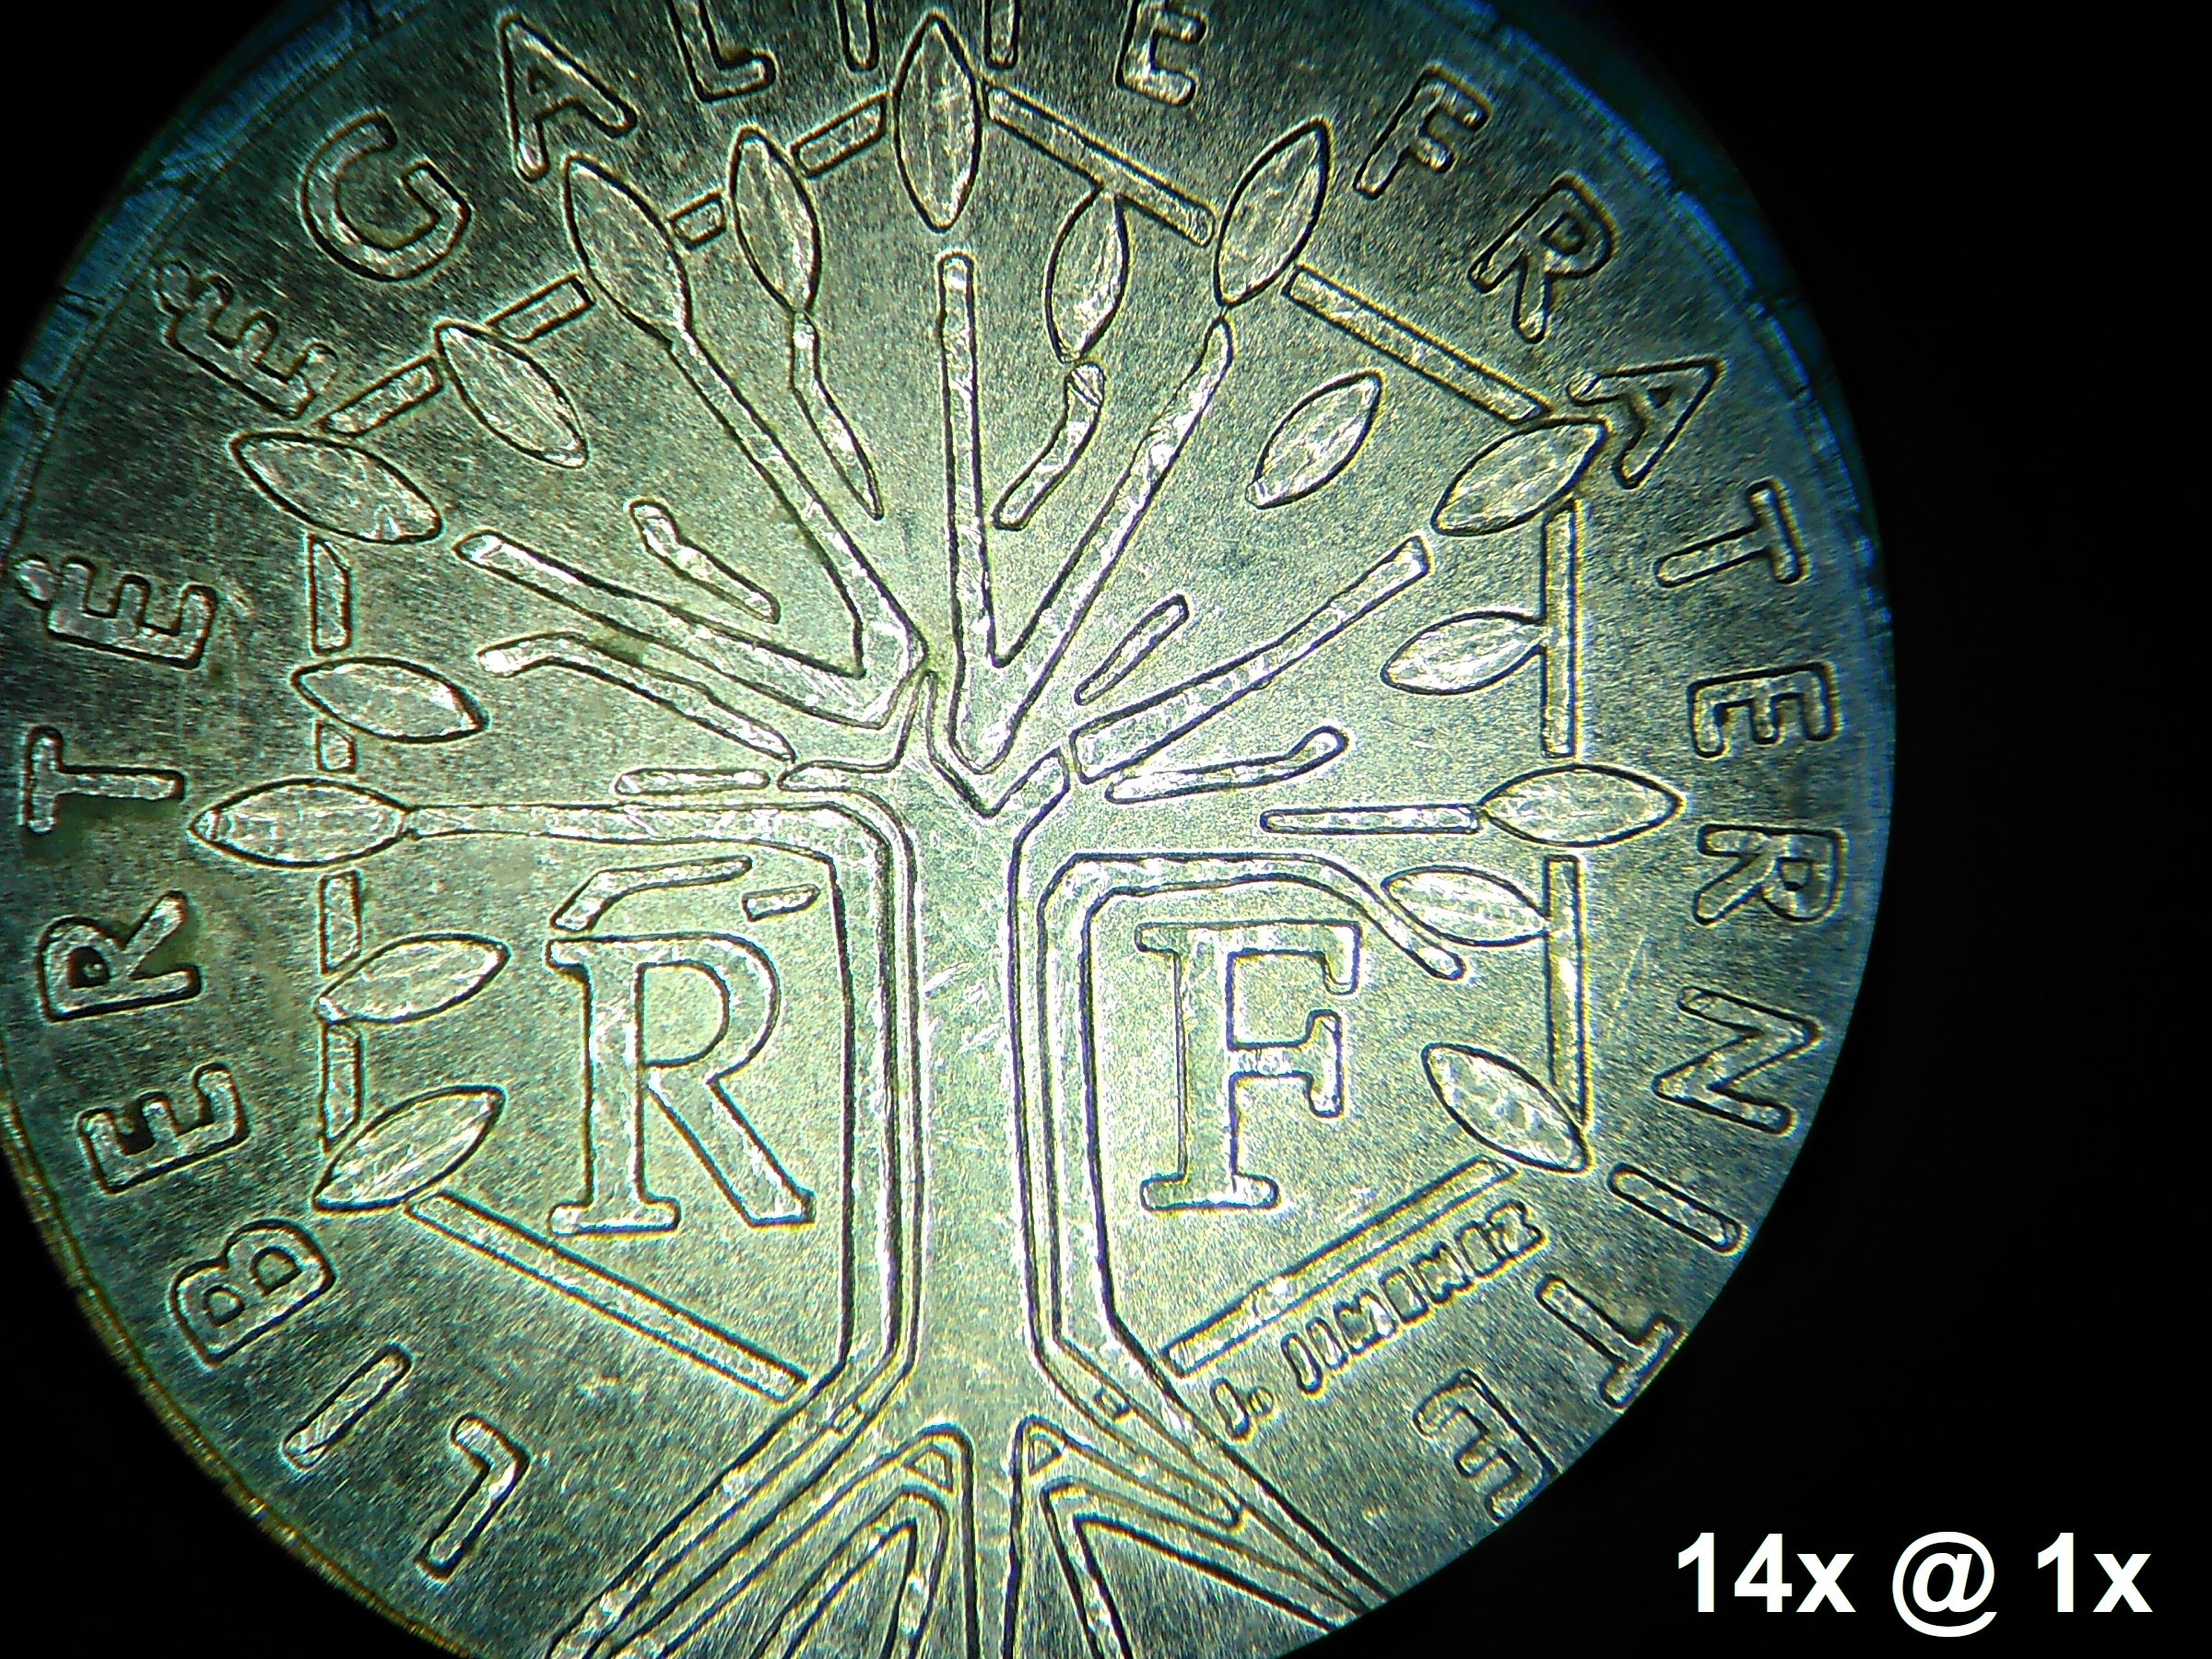
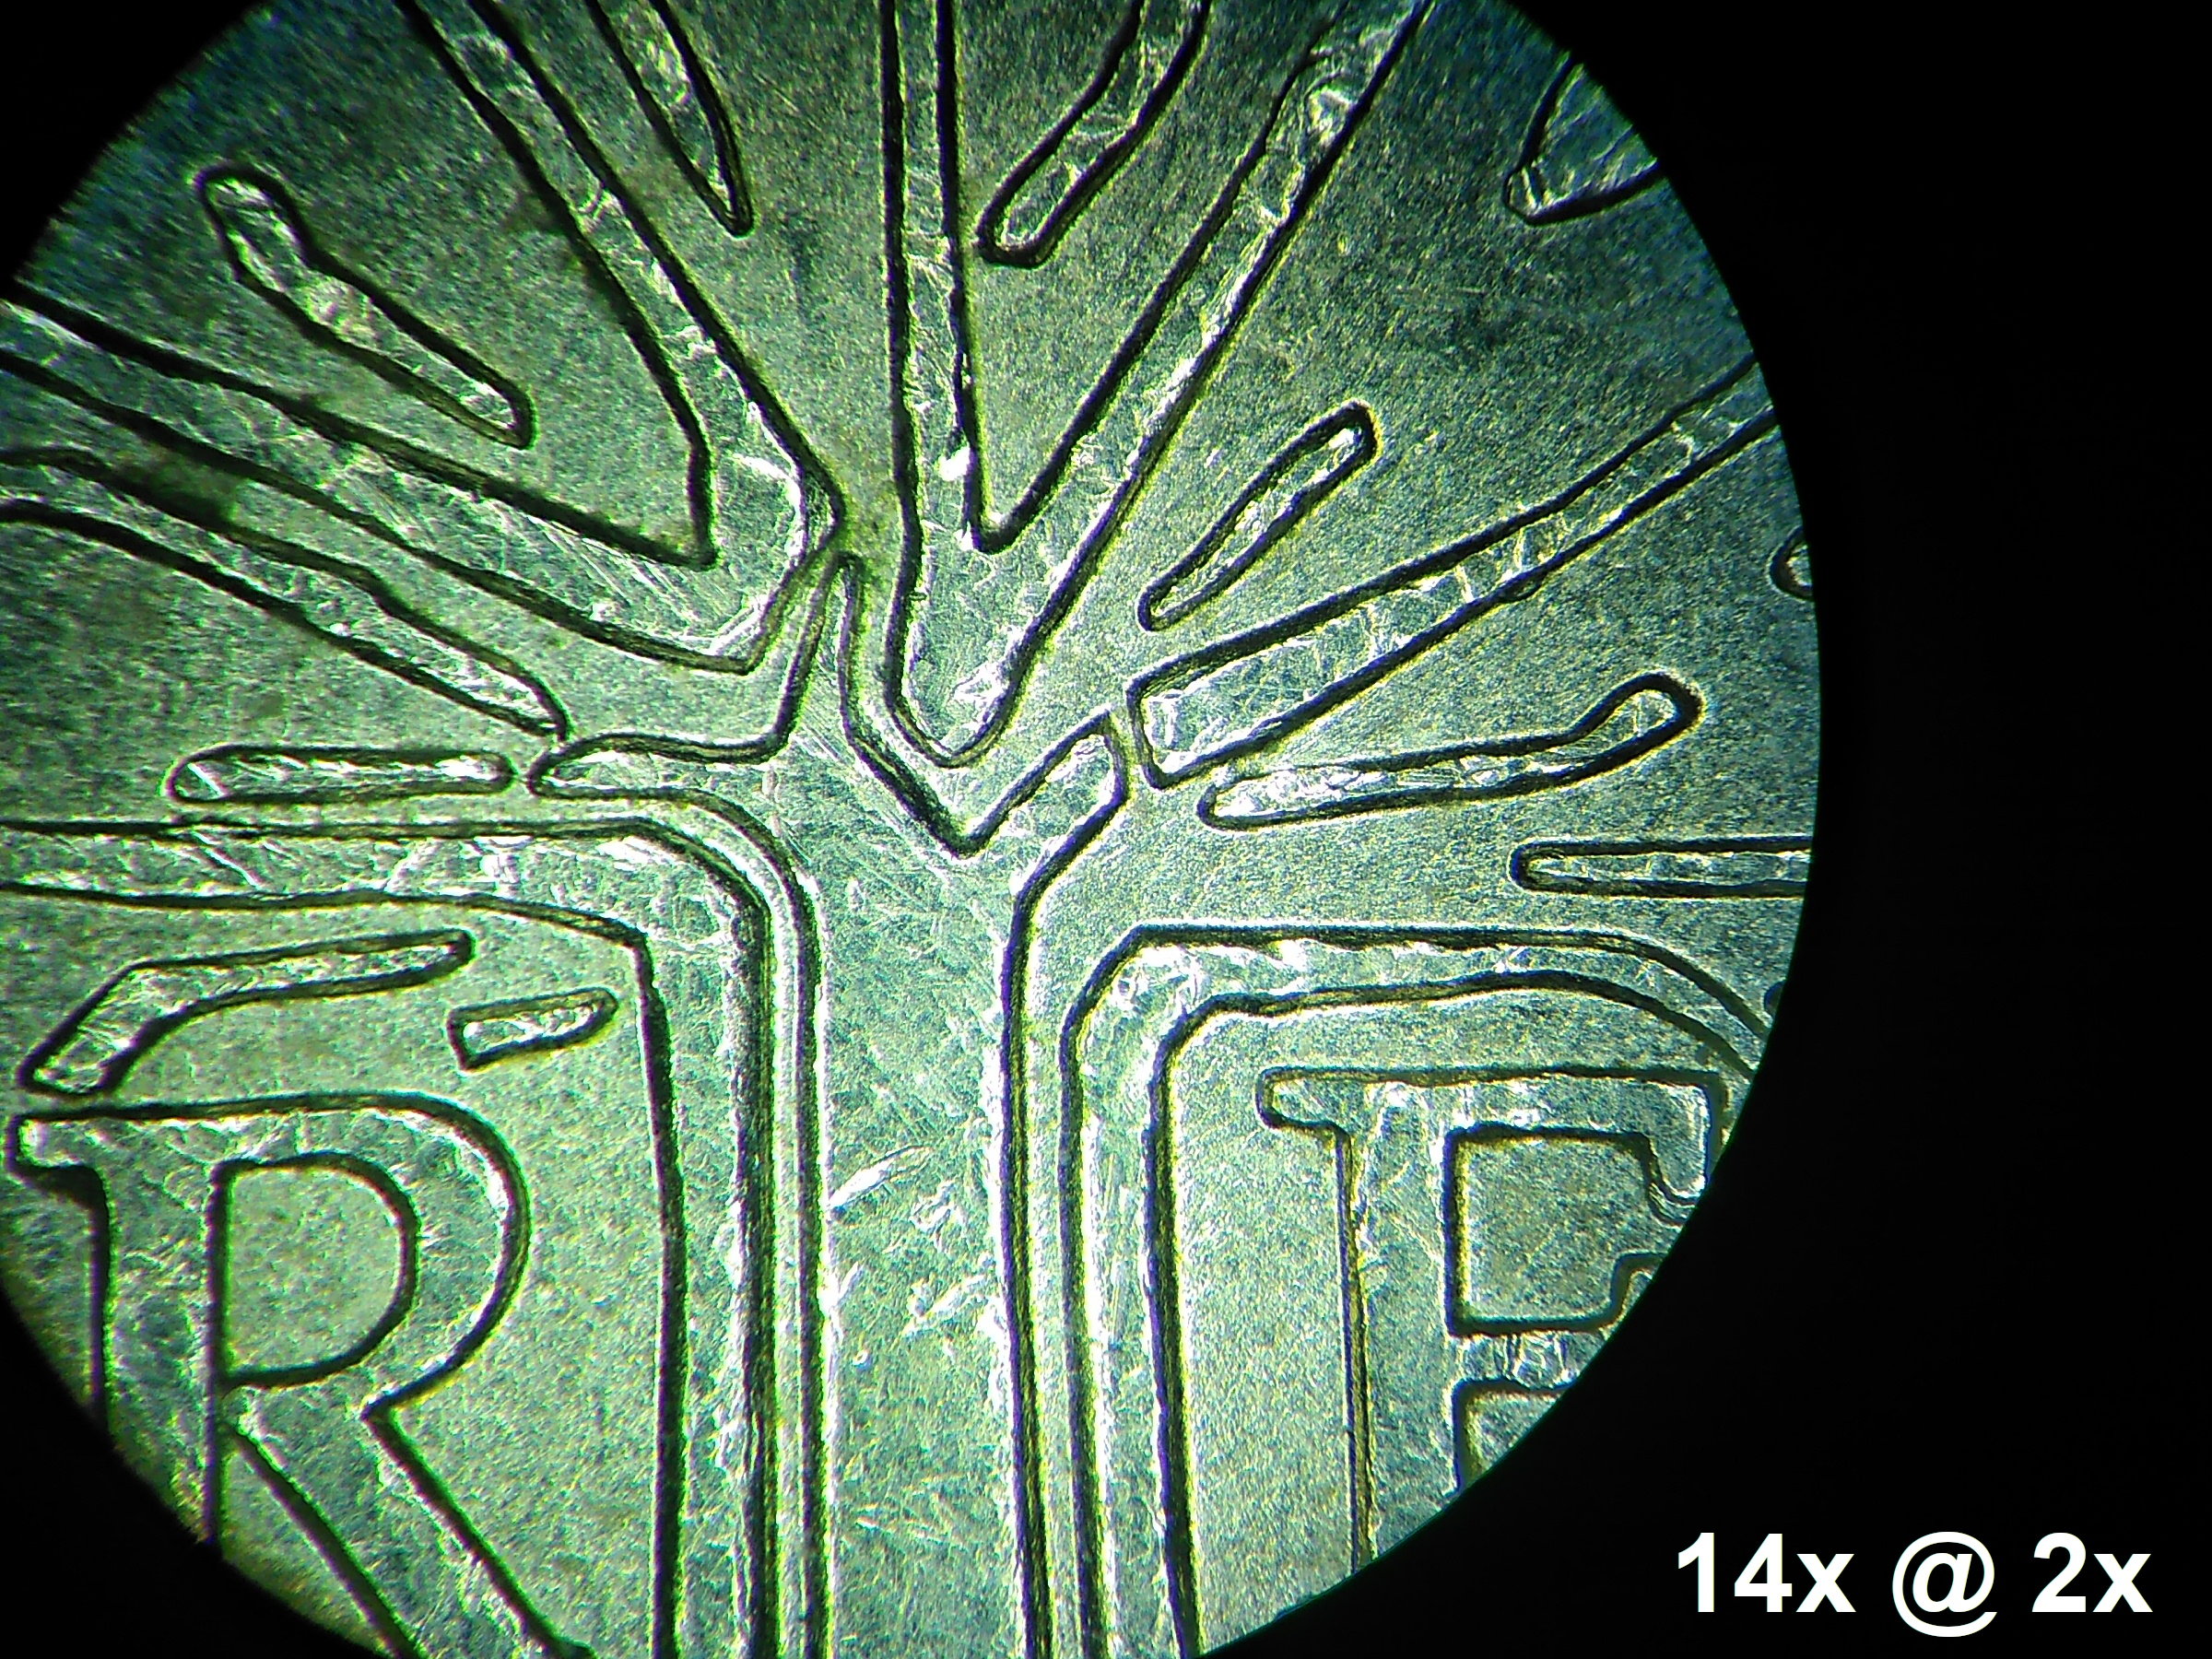
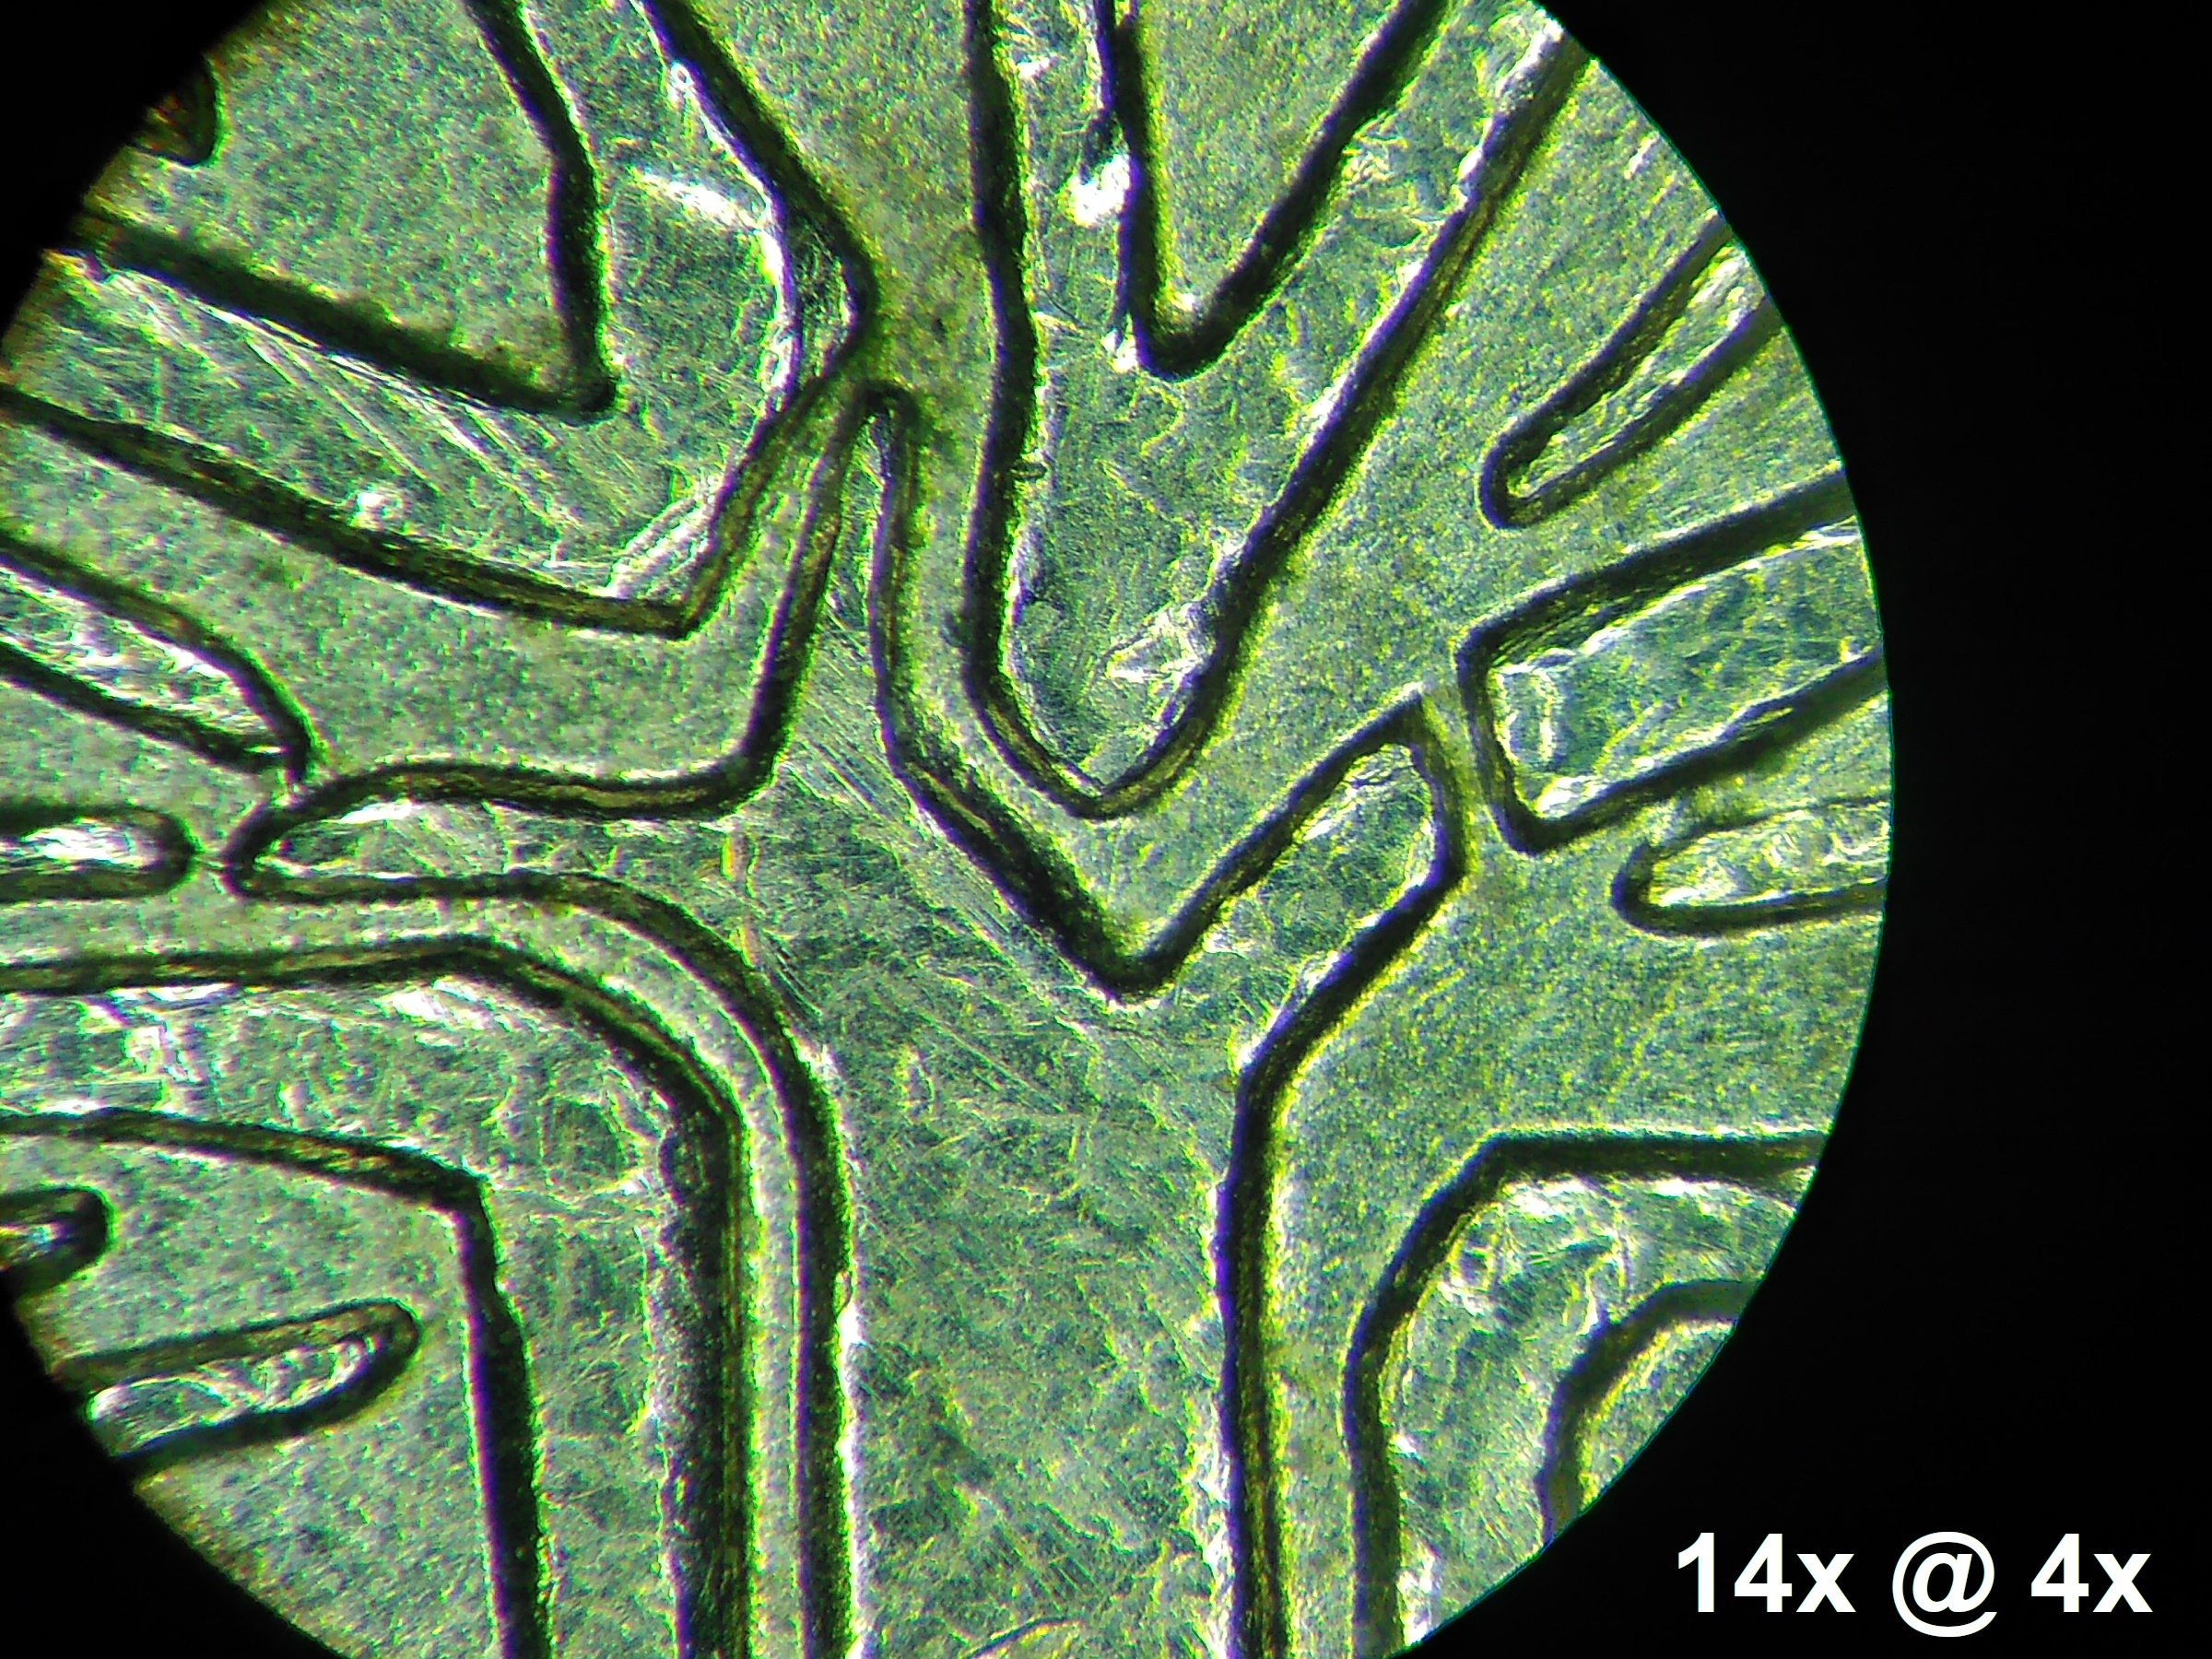
Let us now take the 14x eyepiece and give it a test with the five zoom levels.
The 0.6x mag. (8.4x in total with a 30.2mm fov) has severe distortions on the edges. On the other hand, the effect is much less pronounced, when observed with the naked eye and there would still be some room for optimizations by some realigning of the lenses of the Galilean systems.
The 1x mag. (which makes 14x in total with a 16.8mm fov) is a lot more pleasing to the eye. The spheric aberration is mostly gone.
Without the somewhat crappy intermediate lenses, the picture quality is best at 2x mag. (28x in total at 8.4mm fov). With the 8x/23@2x you would get 12mm fov with increased vignetting.
4x mag. is quite okay (56x in total at 5.4mm fov) but the picture is getting darker, the chromatic abberations beginn to show and we´re getting closer to the resolution limit of the MBS-10.

At 7x mag. (98x in total at 2.4mm fov) we see the typical purple fringing, severe distortions (keep in mind that this is the same optical axis that delivered the 0.6x magnification above) and we hit the "empty magnification" limit.
So that is what you can expect from the default configuration of the MBS-10. To improve the optical quality, it may be of interest, that you can combine the MBS-10 with many other stereo microscope objectives. Because as I told you before, the objective socket here does not have some rare thread diameter in need of fancy (and expensive) adapter solutions, but it does not have a thread at all...

You could, for example, combine the MBS-10 with a high-quality Wild Heerbrugg 1x Plan objective and it will bring you a better picture quality (especially at the 2x magnification setting).
And talking about (Leica-)Wild: The combination of a M3/8-series phototube (or drawing tube) plus a binotube and the 30mm eyepieces of your choice, will also work with the MBS-10 (of course buying a M3 or M8 directly would be the better choice). You can use this excel sheet by Jürgen Schrodt from mikroskopie-mikrofotografie.de to calculate the resulting optical properties.
Verdict
So here´s the TLDR-roundup:
The MBS-10 is a great entry-level stereo microscope up to around 300 € or $ (non-damaged, perfectly-aligned optics and lots of accessories are mandatory then). Price-performance-wise it´s great value as it combines a decent image quality in a magnification range between 8x and 56x with a very sturdy and durable built quality. For best image quality, it is preferably used with a modern LED illumination solution and with 8x/23 or 14x eyepieces at the 2x magnification setting.
The working distance of 90mm is good for any kind of preparation, handicraft or soldering work, without hitting the objective or having to refocus continuously. Thanks to the defined zoom levels (0.6x, 1x, 2x, 4x, 7x) it can be used effectively for precise measurements of small objects.
Thanks to its long production run and widespread use, the MBS-10 also has grown an avid fanbase and for further reading, I can highly recommend the cited links above, as well as the site of the German mikroskopfreunde-nordhessen.de, with a large collection of MBS-10 modification and repair PDFs (although they have falsely attributed the MBS-10 to LOMO which - as we know after having read this review - should be LZOS instead).
However, and this must be said, too: If you have a bigger budget to spend or rely on higher magnifications, better ergonomics or photodocumentation options, then other stereo (zoom) microscopes might suit your needs better (I have already portrayed some others on my blog).
greetings noq2
Comments